


Create unique and decorative designs out of paper! Paper quilling involves nothing more than rolling strips of paper and utilizing these rolls by forming different shapes, designs, and patterns. It’s a simple process that can create, what looks like, complex pieces of art! Create a snowflake, mandala, or starburst with this method!
What you need:

- Paper Quilling Needle/Tool
- Quilling Paper – 5mm wide and 21″ long
- Craft Glue
- Wax Paper
- Scissors
- Tweezers
- Pattern (download below – Print as a full 8.5×11″ sheet)
- Ribbon


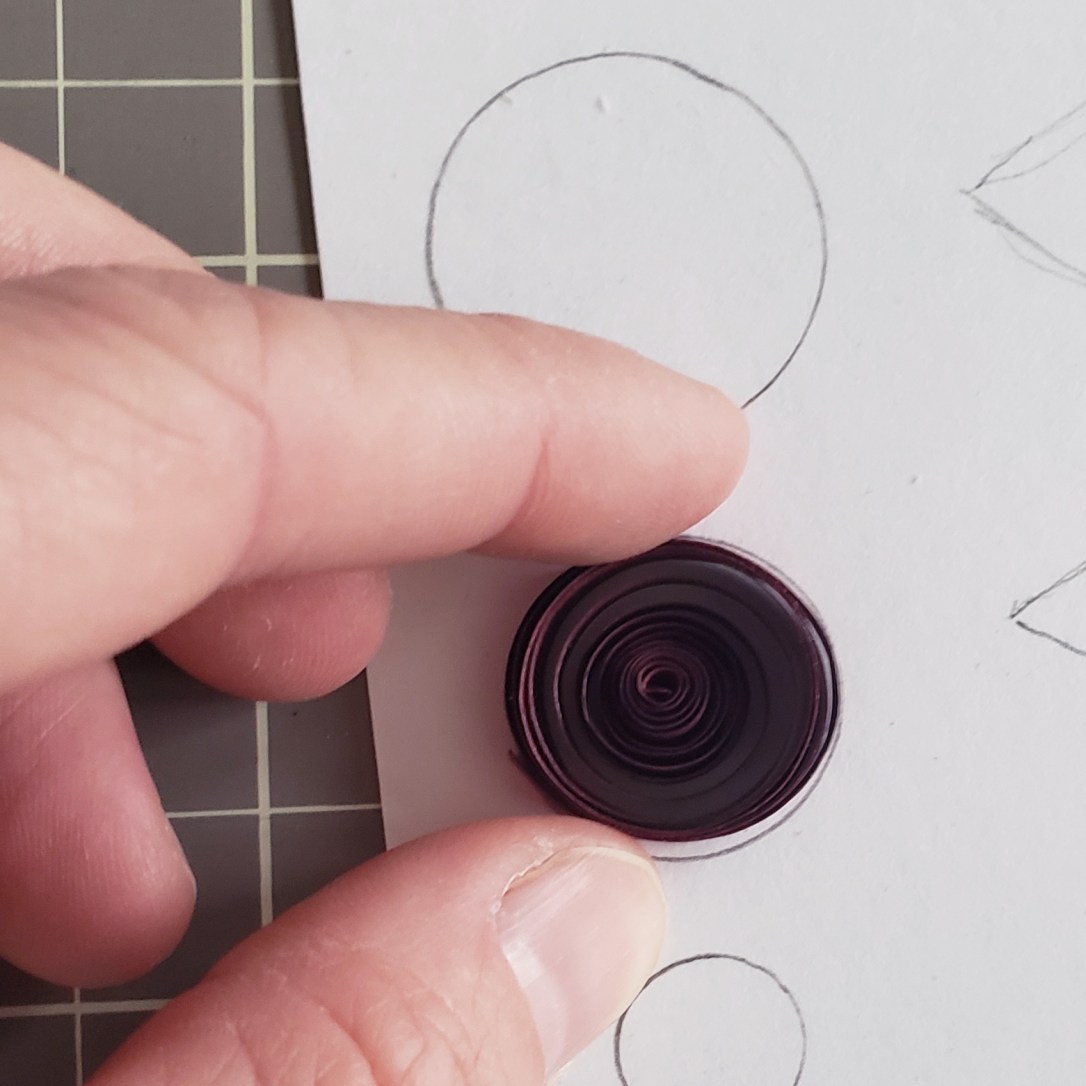
Step One: We will be starting with the inside of your snowflake. Take a strip of your quilling paper in the desired color and begin to coil it with your quilling needle by inserting the end of your paper strip in the slot located at the top of your needle. Then carefully begin to rotate the needle, wrapping your paper around it, to form a coil!


Step Two: Carefully grasp and remove your coil from the needle, being sure to not let it uncoil too much! Take your coil and set it on the top circle of the pattern. Let your coil loosen up slowly until it reaches the size of the circle on the paper. If your coil gets too big, tighten it up by pulling the end, and coiling it back around with your fingers. Once your coil is the correct size add a very small amount of glue to hold the end in place, use tweezers to help pinch the end in place!


Step Three: Now we’re going to shape your coil into a tear drop shape by pinching one side to a point. We want your tear drop to fit the outline next to the top circle on your pattern. Repeat steps 1 through 3, five more times, so you have a total of 6 tear drop shapes (shown in the last picture).


Step Four: Choose another color to create the next shape of the snowflake pattern. Coil your strip and make it the size of the center circle on the pattern, glue the end in place. Next, form your coil into an almond shape by pinching each side of the circle – making your shape line up with the almond shape on the pattern next to the center circle. Repeat 5 more times so you have a total of 6!


Step Five: Choose another color for the last shape of your snowflake pattern. This time cut your paper strip in half before making your coil – these shapes are a little smaller! Create a coil the size of the last circle on the pattern and glue the end in place. Make this into a tear drop shape that matches the smallest tear drop shape on the pattern. Repeat 11 more times for a total of 12!


Step Six: Now that we have all your pieces made it’s time to glue it all together! Place a piece of wax paper over the snowflake pattern and line your pieces up on top – it’s okay if your pieces don’t fit the pattern exactly (you can see in the second photo how mine doesn’t fit perfectly). Starting with the center of your snowflake, begin gluing your pieces together, adding a little bit of glue to the sides of your shapes that will be touching. Line up your pieces carefully and use tweezers to hold the shapes together until the glue holds!


Step Seven: Continue to glue your pieces together and building your snowflake on the wax paper, lining up the pieces on the pattern as best you can. Don’t worry if any glue gets on the wax paper – your snowflake can be easily removed from the waxed paper once the glue is dry!


Step Eight: Let your glue dry completely – at least a couple of hours or longer depending on how much glue you used. Carefully remove the wax paper from your snowflake – if you have any pieces that don’t feel stable or come apart, add more glue and use tweezers to hold in place. You can leave your snowflake as is, or add another coil at the top to add a ribbon to!


Create your own snowflake designs or make changes to the given one! You can add coils on top of your snowflake or make your snowflake larger by adding more to the outside. You can also add gems, sequence, or glitter to your finished snowflake! Hang them in your windows, on your wall, give as gifts, or use as decorations on boxes or frames!
