We’ve had a few weddings the past couple years – including our own! I loved being able to create custom personalized pieces for some of these weddings!
Earlier last year I was asked to make a cake topper of a Bride & Groom’s doggo for their upcoming wedding! I had so much fun creating their pup out of polymer clay for their big day!
Of course, I had to make our own dog for wedding last spring! She’s always looking for tummy rubs – and food – so this was the perfect combo!
I also enjoyed creating original watercolors that we used to make our invitations & save the dates!
These custom sunflower hair pins were purchased as bridesmaids’ gifts, worn during a fall wedding!
The painting below was created from a client’s photo of a friend’s wedding. I enjoyed turning the photo into an original painting of their special day!
Contact me to request your custom order for a pet cake topper, invitations, hair pins, save the dates, custom paintings from your photos, or any wedding related art project!
Create fun and colorful eggs this Easter with decoupage! Gather decorative tissue papers, glitter and some ribbon! These easy and fun eggs are a fun way to create a gift or decoration this Easter!
What you need:
Decorative tissue papers
ModPodge – I used Gloss
Glitter and/or Glitter glue
Paint brush
Eggs – I used real eggs that had been blown out. You can also use plastic dyeable eggs.
Pony beads or similar
Ribbon
Hot glue
Scissors
Hair dryer (optional)
Step one: Gather all your supplies!
Step two: Cut out pieces from your tissue paper – cut more than what you’ll think you will need and try to cut off as much of the background as possible. *If the tissue paper background is white, an your egg is white, then you don’t need to worry as much about getting rid of the background!
Step three: Brush the Modpodge on the egg in a thin layer (I did half the egg at a time), then add one of your tissue paper cut outs, brush another layer of Modpodge on top of the tissue paper. Carefully use your brush to flatten out the tissue paper and press down any wrinkles. The larger pieces of tissue paper you have, the more wrinkles you will end up with as it will have to curve around the egg shell!
Step four: Continue to add your tissue paper to your egg & layering Modpodge under and over each piece! Don’t be afraid to overlap pieces. Once your egg is complete, brush a layer of Modpodge on top of the whole thing, making sure all pieces are pressed down and sealed – I did half my egg at a time drying each half before Modpodging the second half! Let your egg dry completely – use the hair dryer to speed up the processs.
Step five: Apply glitter! The picture on the left is glitter glue in the center of the flowers and the photo on the right was brushed with Modpodge and covered with clear glitter! You could also add details with paint pens or Sharpies at this stage too!
Step six: You can leave your egg as it is or create a hanger with a piece of ribbon and a pony bead. Cut your length of ribbon, fold it in half, slide both cut ends of the ribbon in the bead (photo one), add some hot glue to the ribbon just below the bead, and slide the bead onto the hot glue. Let dry and then cut off any glue or ribbon below the bead. Add a drop of hot glue to the top of your egg and press the bead to it! While the hot glue is still wet you can sprinkle on some glitter!
Create unique and decorative designs out of paper! Paper quilling involves nothing more than rolling strips of paper and utilizing these rolls by forming different shapes, designs, and patterns. It’s a simple process that can create, what looks like, complex pieces of art! Create a snowflake, mandala, or starburst with this method!
What you need:
Paper Quilling Needle/Tool
Quilling Paper – 5mm wide and 21″ long
Craft Glue
Wax Paper
Scissors
Tweezers
Pattern (download below – Print as a full 8.5×11″ sheet)
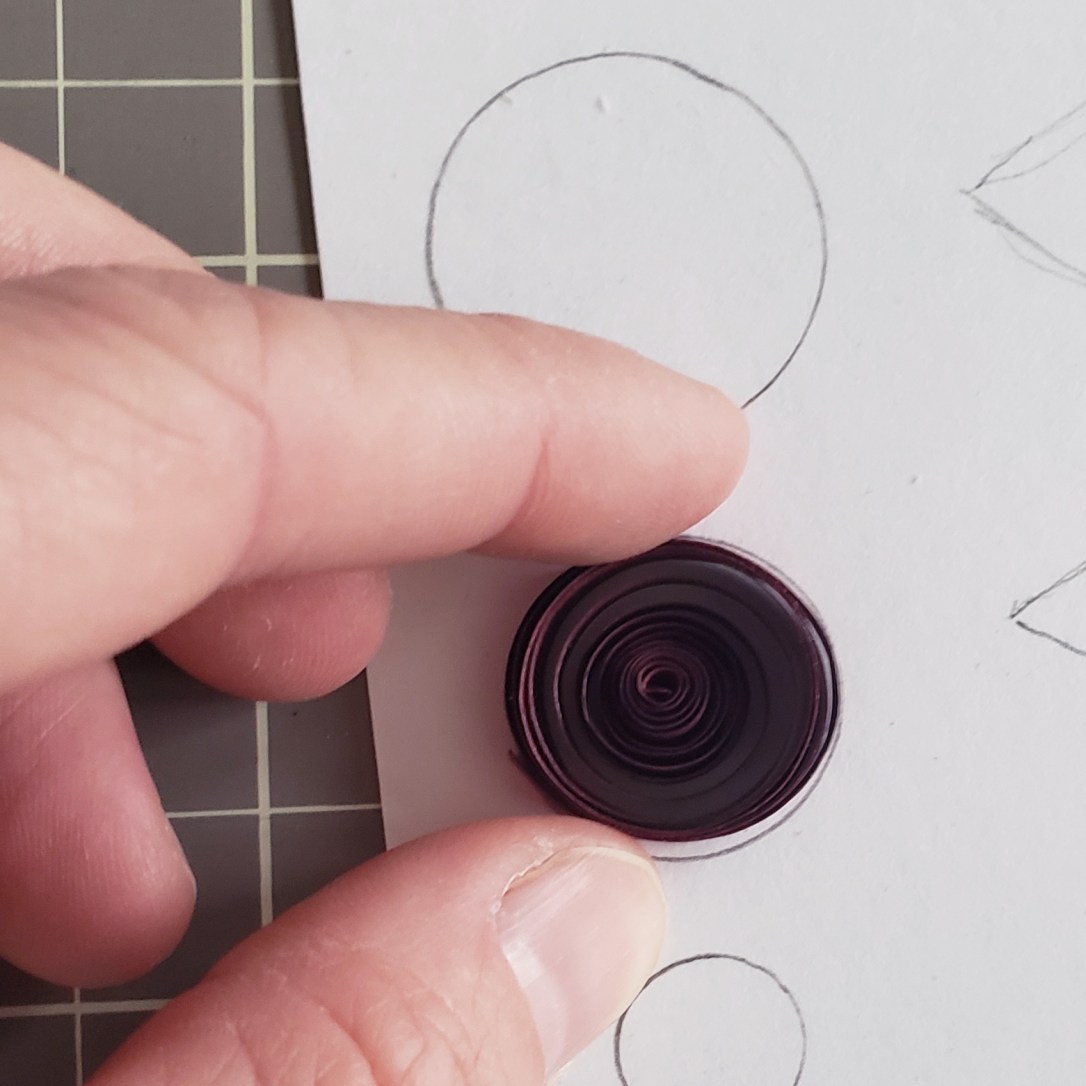
Step One: We will be starting with the inside of your snowflake. Take a strip of your quilling paper in the desired color and begin to coil it with your quilling needle by inserting the end of your paper strip in the slot located at the top of your needle. Then carefully begin to rotate the needle, wrapping your paper around it, to form a coil!
Step Two: Carefully grasp and remove your coil from the needle, being sure to not let it uncoil too much! Take your coil and set it on the top circle of the pattern. Let your coil loosen up slowly until it reaches the size of the circle on the paper. If your coil gets too big, tighten it up by pulling the end, and coiling it back around with your fingers. Once your coil is the correct size add a very small amount of glue to hold the end in place, use tweezers to help pinch the end in place!
Step Three: Now we’re going to shape your coil into a tear drop shape by pinching one side to a point. We want your tear drop to fit the outline next to the top circle on your pattern. Repeat steps 1 through 3, five more times, so you have a total of 6 tear drop shapes (shown in the last picture).
Step Four: Choose another color to create the next shape of the snowflake pattern. Coil your strip and make it the size of the center circle on the pattern, glue the end in place. Next, form your coil into an almond shape by pinching each side of the circle – making your shape line up with the almond shape on the pattern next to the center circle. Repeat 5 more times so you have a total of 6!
Step Five: Choose another color for the last shape of your snowflake pattern. This time cut your paper strip in half before making your coil – these shapes are a little smaller! Create a coil the size of the last circle on the pattern and glue the end in place. Make this into a tear drop shape that matches the smallest tear drop shape on the pattern. Repeat 11 more times for a total of 12!
Step Six: Now that we have all your pieces made it’s time to glue it all together! Place a piece of wax paper over the snowflake pattern and line your pieces up on top – it’s okay if your pieces don’t fit the pattern exactly (you can see in the second photo how mine doesn’t fit perfectly). Starting with the center of your snowflake, begin gluing your pieces together, adding a little bit of glue to the sides of your shapes that will be touching. Line up your pieces carefully and use tweezers to hold the shapes together until the glue holds!
Step Seven: Continue to glue your pieces together and building your snowflake on the wax paper, lining up the pieces on the pattern as best you can. Don’t worry if any glue gets on the wax paper – your snowflake can be easily removed from the waxed paper once the glue is dry!
Step Eight: Let your glue dry completely – at least a couple of hours or longer depending on how much glue you used. Carefully remove the wax paper from your snowflake – if you have any pieces that don’t feel stable or come apart, add more glue and use tweezers to hold in place. You can leave your snowflake as is, or add another coil at the top to add a ribbon to!
Create your own snowflake designs or make changes to the given one! You can add coils on top of your snowflake or make your snowflake larger by adding more to the outside. You can also add gems, sequence, or glitter to your finished snowflake! Hang them in your windows, on your wall, give as gifts, or use as decorations on boxes or frames!
Create these fun marbled pumpkins with some simple supplies! You can use real pumpkins or foam pumpkins Use nail polish to float your colors on water and dip your pumpkin for amazing marble effects!
WHAT YOU NEED:
Small pumpkins – either foam or real! – I used foam pumpkins from the dollar store!
Nail polish in various colors
Disposable bowl or bucket filled with water
Protected work surface
Wax paper to set your pumpkins on to dry!
Step one: Gather your supplies!
Step two: Carefully drip nail polish onto the surface of your water – I found that smaller drips will float better on the surface and too much nail polish can eat at the foam pumpkins. Don’t touch the nail polish brush to the water and don’t pour the nail polish – just let it drip!
Step three: Keep dripping your nail polish until your water surface is covered – the colors will spread and fill the water surface, try not to drip too much nail polish onto the areas that have already spread, as these drips will sit on top too much and be thick globs on your pumpkin! If using a foam pumpkin, the thick globs of nail polish also eat at the foam!
Step four: Once your water surface is covered, carefully dip your pumpkin! I held on to the stem and “rolled” my pumpkin onto the surface.
Step five: If your pumpkin didn’t get completely covered, add more drips to your water and re-dip!
Step six: Set your wet pumpkin on a piece of wax paper to dry (a fan can help speed up the dry time).
Use for some fun decorations, add names with paint markers for place cards, or use as gift toppers!
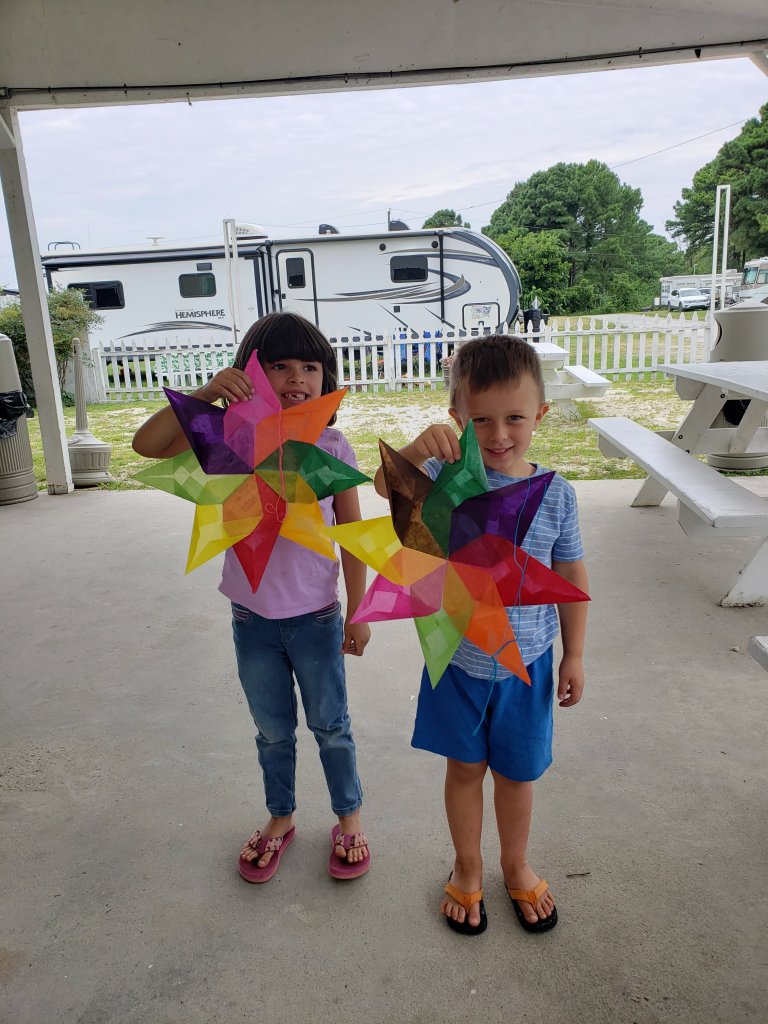
These window stars are easy, fun, and sure to brighten your home! Made from kite paper, also known as colored wax paper, these stars are vibrant and translucent, letting the light shine through and overlapping colors combine to create new colors! Perfect for color mixing lessons!
Step one: Cut 8 squares of kite paper – all the same size. Try various colors! I started with 4″ squares for this example, however, you can make them any size you’d like!
Step two: Fold your square from corner to corner, crease, and unfold.
Step three: Fold the opposite corners together, crease, and unfold – your square should have a crease line from corner to corner, forming an X on your paper!
Step four: Fold one corner into the center of the X.
Step five: Fold the opposite corner to the center of the X.
Step six: Fold the right top edge to the center line as shown.
Step seven: Fold the left top edge to the center line.
Step eight: Repeat with all remaining 7 squares!
Step nine: Once you have all your squares folded, begin to glue them together – the point you just created in the last step will be the outside points of your star! Use a glue stick, starting on one side of the center line, from the wider tip of your origami, up to where the folds begin.
Step ten: Place a second folded piece on the center line and lining up the tips.
Step eleven: Continue to glue 7 pieces of your star together, making sure each one lines up on the center line of the last one and all tips meet in the middle.
Step twelve: Your eighth, and final piece, will be placed with one half on top and the other half underneath your star (or under the first piece you started with) to complete the pattern.
Step thirteen: Complete your star by punching a hold and adding a string or ribbon to hang it from!
A fun, simple & easy project to brighten your day! Create these fun flowers from basic supplies and give your decor a fun burst of colorful flowers!
What you need:
Tissue Paper in multiple colors
Green Pipe Cleaners
Scissors
Button
Step one: Cut out circles from your tissue paper – I use a roll of masking tape to trace and cut for size. You will need approx. 5 circles per flower. I chose to use shades of one color but you could do all the same color or multiple colors for one flower!
Step two: Thread about an inch of your pipe cleaner through your button.
Step three: Bend the inch piece of pipe cleaner in half and push back through another hole in your button. Twist the end to your stem to secure!
Step four: Cut your circles to give your flowers different appearances – here, I cut slits in a radial fashion to make my flower look more ruffle like! For the red flower I cut waves around the edge of my circle. I did this step to all 5 of my tissue paper layers. *Note: don’t have cuts too close to the center of your circles – this may cause them to tear easily in the next few steps!
Step five: Poke the end of your pipe cleaner through the center of your tissue paper circle, gently push your tissue paper all the way up the stem so it’s under your button! Gently crinkle your tissue paper around your button, repeat with all your other layers!
Step six: With all 5 layers on your stem, crinkle the papers up around your button, being careful not to tear your paper! This helps give our flower some more dimension!
Step seven: Carefully “fluff” out your flower petal layers so your center is visible again. You can go back and crinkle individual layers more if needed! You can also add a drop of tacky glue, hot glue, or wrap some floral tape around the stem where the tissue paper is to help hold it in place.
Step eight: To create a leaf, use another piece of pipe cleaner, place across your stem and twist it tightly around a few times to hold it in place. Bend each end back to the stem, creating a loop, and twist it to the stem to secure.
Step nine: Make more flowers! Try different cuts to achieve even more variations of flowers, use larger or smaller circles and create different size flowers! Give as a gift, use as a gift topper, make into pins, hair clips, or just place in a vase and enjoy!
Marbleized paper is a lot of fun to make and you can use the papers for a variety of projects! This is a simple and easy method for creating marbleized paper with fun results every time! Turn your marbleized papers into greeting cards, bookmarks, elements in collage work, book covers, etc. or use this same method to create your marbleized effect on things like envelopes, eggs (for Easter decorations) blank sticker/label papers, etc.! Since it’s almost Valentine’s day, I thought a heart garland would be fun but you can use any shape with the same method!
What you need for Marbleized paper:
Shaving cream
Food coloring
Card stock
Wooden skewer or toothpick
9″x13″ baking dish or aluminum foil pan (or something similar to be used as a vat)
Squeegee, ruler, or piece of cardboard (around 4″x6″)
What you need to make a heart garland:
Your Marbled paper!
Scissors
Pencil
Hole punch
Heart stencil or cookie cutters to trace (or heart punches)
String – I Used embroidery thread but you could also use twine, cotton, yarn, or smaller thread for mini garlands!
CREATING MARBLEIZED PAPER:
Step one: Fill the bottom of your vat with shaving cream!
Step two: Use your ruler, squeegee, or cardboard to smooth out your shaving cream (this doesn’t need to be perfectly smooth!).
Step three: Add drops of food coloring to your shaving cream – I just started off with a few drops of one color, we can add more colors later!
Step four: Swirl your food coloring around with your skewer or toothpick to create a marbleized effect!
Step five: Continue to move your color around by dragging your toothpick or skewer through the shaving cream and color! Be careful not to mix too much – we want to see the swirls!
Step six: Once you’re happy with your marbled look, carefully place your paper on top of your shaving cream! I find the best method is to gently roll your paper and place the middle of your paper on the shaving cream first, then letting the sides unroll into the shavings cream. This way helps reduce any air bubbles that get trapped between your paper and the shaving cream! Gently press your paper into the shaving cream!
Step seven: Pull your paper out of the shaving cream!
Step eight: Lay your paper on a flat surface, shaving cream side up!
Step nine: Use your squeegee, ruler, or cardboard, to remove the shaving cream from your paper – try to do this in one swoop of your tool. You can place the used shaving cream back into your vat and use again!
Step ten: Continue to make more papers in the same vat – smooth your shaving cream add colors and swirl! Colors will start to mix the more you use the shaving cream and eventually you may need to add new shaving cream to avoid a muddy look!
Step eleven: Let your marbleized papers dry!
MAKING A HEART GARLAND:
Step one: Trace your heart shapes on your marbleized papers!
Step two: Cut out your hearts!
Step three: Punch holes towards the top of your hearts on each side.
Step four: Take your string and string your hearts by placing the thread through the top of a hole & coming back up the bottom of the second hole!
Step five: Hang your heart garland!
Check out other projects to do at home here and let me know if you’ve given any a try!
Cut paper snowflakes are a fun easy project that you can create so many variations with and they make excellent winter decorations! In nature most snowflakes are 6 sided, many times when we make paper snowflakes, we create 4 or 8 sided snowflakes – below you will find instructions for folding 6 pointed, 8 pointed and 12 pointed! Once you get the hang of these folds and where to draw your design you will have some amazing paper snowflakes! These can also make a great lesson to incorporate symmetry, angles, fractals, & kirigami into!
What you need:
Paper – I just prefer to use plain white copy paper but any thin paper will do. You can even create colorful snowflakes!
Scissors – Because we’ll be cutting through several layers of paper at once, be sure you have a sharp pair! If you plan to do a lot of smaller details on your snowflake, small sewing scissors can come in handy!
X-Acto Knives – These are optional to be used in place of the scissors or to make cuts that are not along the edge of your folded snowflake.
Pencil for drawing designs out if desired!
MAKING YOUR PAPER SQUARE:
If you’re starting with plain copy paper, the first thing to do is make your paper square – we will need to start with a square piece of paper for any of the snowflakes below!
Step one: Fold the bottom corner of your paper up, and to the opposite side, until you’ve created a point at the bottom of your paper.
This is what it looks like unfolded….
Step two: Cut off the single layer of paper that you see.
Step three: Open your paper back up – square!
You can make your squares any size! Try using the piece of paper you cut off of your rectangle to make a smaller square (and smaller snowflake!).
6 SIDED SNOWFLAKE: This method of folding gives your snowflake 6 points/sides just like a snowflake found in nature! This is also the easiest method listed to cut as there’s less layers of paper to cut through!
Step one: Start with a square piece of paper, leave it folded. (Or fold a square piece of paper from corner to corner)
Step two: Find the center of the bottom of your triangle (shown in the next photo) – do this by folding corner, along the bottom edge, and “pinch” your paper in the center. This way you don’t create a crease line all the way to the point of your paper!
Step three: Make sure you have your paper opened back up after “pinching” the middle point of your paper!
Step four: We will be folding the corners of your paper up on the two lines shown in the picture – you can use a protractor for this, marking the crease lines at 60-degrees.
Step five: Fold the right flap up on the 60-degree mark shown in step four.
Step six: Flip your whole paper over, keeping the point towards you.
Step seven: Fold the right flap up on your other 60-degree mark – the two sides of your paper should all be even.
Step eight: Cut the top triangles off of your paper, making the top layers of paper all even.
Step nine: Draw out your design; I like to have my design go all the way, or almost all of the way, to the top corners, and dip low between them. Then I draw shapes & designs on the edges of my triangle, these shapes start and stop on the same edge of my paper – this keeps my snowflake whole!
Step ten: Cut out your design – it’s easiest to start by cutting your little designs first and then your larger areas.
You can also use the extra paper you cut to create a square and make mini snowflakes!
8 SIDED SNOWFLAKE: This method gives your a couple more points than the first!
Step one: Start with a square piece of paper.
Step two: Fold in half, edge to edge.
Step three: Fold in half again, to create a square.
Step four: Check the edges of your square – point the corner that has all open flaps of paper away from you, and the corner that is the center of your paper (or no flaps of paper) pointed towards you!
Step five: Fold the square in half, right point to left point (keeping the open ends at the top and center towards you).
Step six: Draw out your design!
Step seven: Cut out your smaller details first…..
Step eight: Cut out your larger area & carefully unfold!
12 SIDED SNOWFLAKE: This is my favorite snowflake fold – because it’s 12 layers it can be harder to cut but it makes the snowflakes look more intricate and delicate!
Step one: Start with a square piece of paper!
Step two: Fold your paper in half, from corner, to corner.
Step three: Fold your paper in half again, with your folded edge from the last step on the bottom.
Step four: This next step can be tricky until you’ve done it a few times! We will be folding your paper into 3rds, shown on the fold lines your can see in the photo above. You can use a protractor to do this (dividing it into 3rds, each at a 30-degree angle) or just eyeball it and fold & unfold, until you get it right in the next steps! The more exact you line up and fold your paper, the better your cuts and snowflake will come out, so take your time on getting things lined up!
Step four: With the point of your paper facing you, fold the left side of your paper over on your first 30-degree mark or the first line seen in the picture on step three.
Step five: Flip your whole paper over, keeping the point towards you.
Step six: Fold the left side of your paper over to line up with the right edge, and the other 30-degree mark on your paper.
Step seven: Now you have your papers folded, cut the top triangle pieces off, so that all of your paper layers are even at the top.
Step eight: Draw your designs on your snowflakes! Keep your designs on the edges of your triangles, being sure not to cut all the way from one edge to the other.
Step nine: Cut your snowflake out on your lines! Carefully use an Xacto knife for small cuts if needed! Open your snowflake gently!
Your finished snowflakes can be used to decorate your windows – they look awesome from both inside and out, especially when it’s dark outside! I use a glue stick to attach my snowflakes to the window. You could also use double sided tape or hand them from a string!
You can make smaller or larger snowflakes with the same folds as above – just start out with smaller or larger squares of paper! The snowflakes above that have the objects and scenes incorporated into them are large, approx. 20″ – 24″ wide! They also have cuts that were created “inside” the folded triangle, not along the edge, I had to use a hole punch and my xacto knives to remove these cuts! Keep in mind when you create objects on your snowflakes anything drawn along the edges is just half of a shape, when opened it will become whole!
Use your paper snowflakes for other art projects too – like this mixed media encaustic piece! Paper snowflakes have been layered with different color waxes, pearl powders, & other papers to create a unique collage! I also cut some snowflakes from old book paper, tracing paper and vellum, to create different effects! You could also make a snowflake garland, use as gift topper/decorations, or on greeting cards!
Make this project? I’d love to see some photos! Check out other projects to complete at home here!
Salt dough is fun and easy! The dough can be baked to harden, painted with acrylics and last for years! I had my nephew create some simple cut-out ornaments but you can also make 3-D sculptures with salt dough too! There’s various recipes for creating salt dough, and other similar dough – I’ve listed one below that we used with good results!
What you’ll need:
Flour
Salt
Warm water
Cookie Cutters
Rolling pin
Straw and/or Toothpick (or something to make holes in your ornaments for hanging)
Cookie tray
Acrylic paints
Paint brushes
Spray Sealer or Mod Podge
Ribbon
OPTIONAL SUPPLIES:
Beads to add to your ribbon
Glitter
Stamps – for making impressions on your dough
Sharpies
Hot glue or craft glue
Step one: Mix together 2 cups of all purpose flour, 1 cup of salt and 1/2 cup of warm water in a large bowl.
Step two: Add up to 1/2 cup more of warm water, one tablespoon at a time, until dough forms. Dough should not be sticky – if it is add a bit more flour!
Step three: Kneed your dough and roll it out on a flat surface – use flour to help prevent sticking if needed. We rolled it to 1/4″ – 1/2″ thick for cut-outs. You can also make sculptures with your salt dough instead!
Step four: Use cookie cutters to cut shapes out of your salt dough. Place cut-outs on a baking sheet (I lined mine with parchment).
Step five: Before baking your salt dough make sure to put a hole in your ornaments to hang from! A plastic straw works well or a toothpick for a smaller shape! Bake your salt dough for approx. 2 hours at 275*F or until firm and dried out. Time will depend on size and thickness. You can also leave your salt dough out to air dry. Be sure to fully bake/dry out pieces before painting and sealing to ensure they’ll last a long time!
Step six: Once your pieces have been baked or dried out, use acrylic paints to paint them with! We used acrylic craft paints!
Step seven: Paint your creations and let them dry completely!
Step eight: Once your paint is dry, seal your salt dough – I brushed on a layer of glossy Mod Podge. You can also use an acrylic spray sealer instead. Let dry.
Step nine: Add ribbon and beads to hang your ornaments from! Alternatively, you could also use pipe-cleaner or wire for hangers!
Step ten: Use a sharpie to add names, dates and details to your salt dough!
Step eleven: Hang those ornaments up!
We had a lot of fun making salt dough ornaments! Create your own ornaments from cut-outs like we did or create some 3D ornaments – you can use a little water to help pieces stick together. You could also make personalized gift tags & toppers, hand/foot print plaques, small sculptures (like snowmen!), key chains, pendents, pins, or magnets! Use Popsicle sticks, wooden skewers, or toothpicks for tools. Adorn finished salt dough pieces with pom-poms, pipe-cleaner, glitter, ribbon, beads, and other craft items! Try decorating pieces with marker instead of paint for easier clean up!
Create some fun little ornaments with simple supplies! Find the instructions below each of the three pictured!
Snowman ornament!
What you’ll need:
Mason Jar Lid (not the jar band)
Small piece of sandpaper
Piece of 1/4″ wired ribbon – approx. 12″
Two small pom-poms
Piece of ribbon/twine for hanging
Acrylic Craft Paint (White, red or pink, Orange)
Mod Podge
Scissors
Paint brush
Sharpie pen
Hot glue or craft glue
Step one: Scuff up the mason jar lid with your sandpaper to help the paint adhere better!
Step two: Paint your mason jar lid with white acrylic craft paint – let dry and apply a second layer if needed.
Step three: Once your white paint is dry, use the orange paint to make your snowman’s nose – I made a dot near the center of my lid and towards the edge, and then connected them to create the nose!
Step four: Use your pink paint or make pink by mixing a little red paint to white paint and give your snowman rosy cheeks!
Step five: Once your orange and pink are dry, apply a layer of mod podge sealer over the entire surface, let dry completely!
Step six: Use a sharpie pen to give your snowman eyes & a mouth – check out the pictures below for face ideas! Also outline your nose. Tip: leave a white spot in your snowman’s eye to give him a spark! Download some additional snowman face ideas and practice your own below!
Step seven: Hot glue a ribbon to the back of your lid for a hanger!
Step eight: Cut and glue a piece of your wired ribbon, from side to side of your lid, glue pom-poms on the ends to look like ear muffs! Use leftover ribbon to make a bow for your snowman if desired!
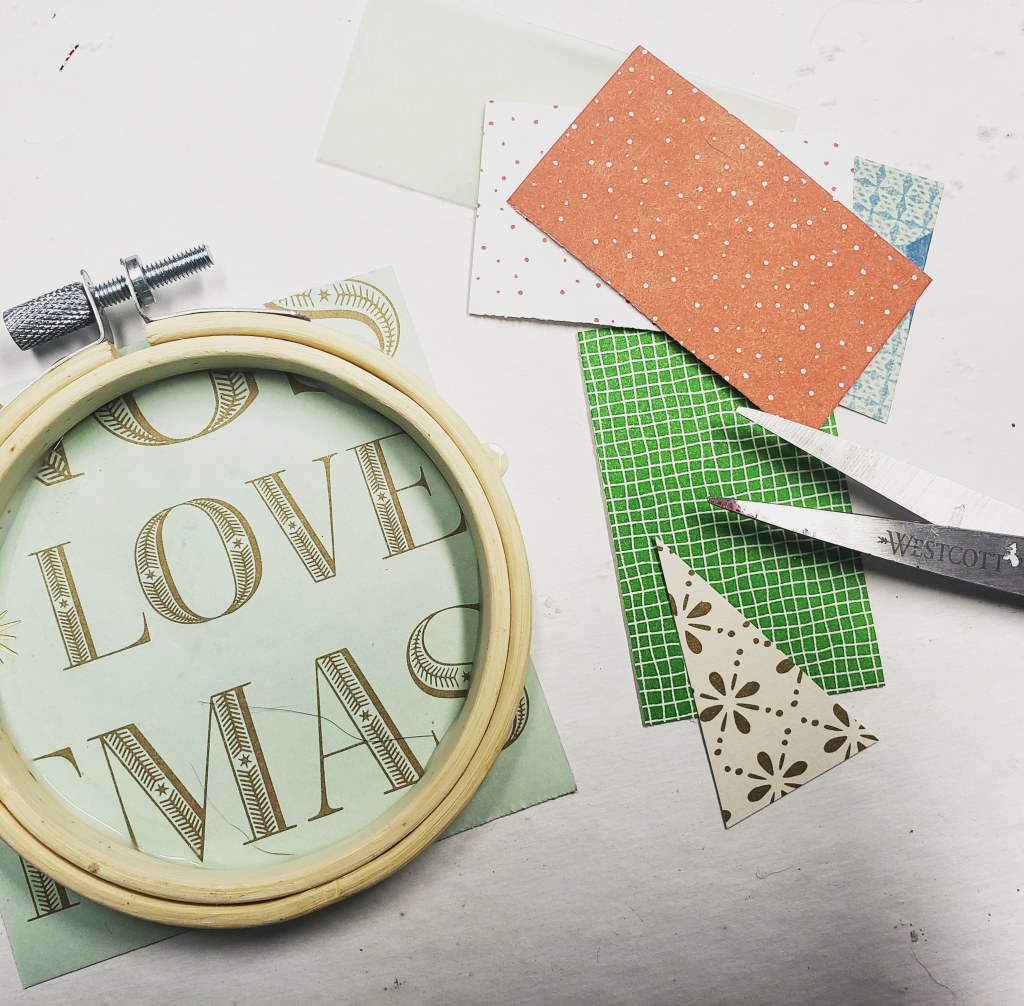
Tree Scene Ornament!
What you’ll need:
3” Embroidery Hoop
2 pieces of approx. 3”x3” decorative cardstock
Small pieces of decorative cardstock
Mini paper snowflakes
Piece of 8” burlap like ribbon
9 Small foam mounting squares
Sequins
Glue gun
Craft Glue
Glue Stick
Scissors
Colored Pencils
Additional items to decorate with, such as, stamps, glitter, ribbon, stickers, etc.
Step one: Cut a piece of cardstock large enough to glue to the back of your hoop – this will become the background to your tree scene, use craft glue to adhere it to your embroidery hoop.
Step two: Work on getting your trees ready while your hoop dries! Using smaller pieces of decorative papers, cut triangles for trees! Make different shapes and sizes for added interest!
Step three: Use colored pencils to shade the side/edges of your trees, giving them a border!
Step four: If your hoop glue is dry, cut the paper off around the edges, you can also use an x-acto knife.
Step five: Add your trees to the hoop! Glue some trees directly to the background paper and use the small mounting squares to adhere some trees, making them “pop” off of the surface – stack mounting squares to add more depth.
Step six: Add sequins as tree toppers and/or ornaments on your trees and add the paper snowflakes (I cut one of my snowflakes in half to use around the edge). Add any other desired decorations and glue the piece of burlap like ribbon to the back for hanging!
Wreath Ornament!
What you’ll need:
Mason Jar Lid Band
6 Pieces of green pipe cleaner
Piece of 12” ribbon/twine for hanging
Glue gun or craft glue
Items to decorate your wreath with – I used pieces of artificial greenery and berries. Some other ideas may include miniature ornaments, pom poms, ribbon, etc.
Step one: Wrap all 6 pieces of green pipe cleaner around your mason jar band!
Step two: Collect items to add to your wreath
Step three: Glue your items to your wreath!
Step four: Add a ribbon to hang your ornament!
Give as gifts, hang on your tree, or use as gift toppers! Have fun making your own!


