

Contact me to join us at Baywater Trading Co. in Hebron to create your own mini donut keychain out of polymer clay, while getting to enjoy a Baywater donut!


Contact me to join us at Baywater Trading Co. in Hebron to create your own mini donut keychain out of polymer clay, while getting to enjoy a Baywater donut!


Create fun and colorful eggs this Easter with decoupage! Gather decorative tissue papers, glitter and some ribbon! These easy and fun eggs are a fun way to create a gift or decoration this Easter!
What you need:

Step one: Gather all your supplies!

Step two: Cut out pieces from your tissue paper – cut more than what you’ll think you will need and try to cut off as much of the background as possible. *If the tissue paper background is white, an your egg is white, then you don’t need to worry as much about getting rid of the background!


Step three: Brush the Modpodge on the egg in a thin layer (I did half the egg at a time), then add one of your tissue paper cut outs, brush another layer of Modpodge on top of the tissue paper. Carefully use your brush to flatten out the tissue paper and press down any wrinkles. The larger pieces of tissue paper you have, the more wrinkles you will end up with as it will have to curve around the egg shell!


Step four: Continue to add your tissue paper to your egg & layering Modpodge under and over each piece! Don’t be afraid to overlap pieces. Once your egg is complete, brush a layer of Modpodge on top of the whole thing, making sure all pieces are pressed down and sealed – I did half my egg at a time drying each half before Modpodging the second half! Let your egg dry completely – use the hair dryer to speed up the processs.


Step five: Apply glitter! The picture on the left is glitter glue in the center of the flowers and the photo on the right was brushed with Modpodge and covered with clear glitter! You could also add details with paint pens or Sharpies at this stage too!


Step six: You can leave your egg as it is or create a hanger with a piece of ribbon and a pony bead. Cut your length of ribbon, fold it in half, slide both cut ends of the ribbon in the bead (photo one), add some hot glue to the ribbon just below the bead, and slide the bead onto the hot glue. Let dry and then cut off any glue or ribbon below the bead. Add a drop of hot glue to the top of your egg and press the bead to it! While the hot glue is still wet you can sprinkle on some glitter!


Check out these fun eggs by students!
Looking for another Easter egg idea? Check out resist dyed Easter eggs and Marbled Easter eggs!


Create cute & fun polymer clay succulents that you can turn into magnets, gift toppers, desktop decor, and more! The instructions show several different types of plants inspired by real succulents and how you can place them together in a tin to create a mini garden and turn it into a magnet – you could also use bottle caps, miniature terracotta pots, or more polymer clay, to create your own containers for your succulents or create the succulent by itself and turn them into jewelry, hair pins, etc. Get creative and create your own types of plants & gardens!
What you need:

Inspired by Baby Toes and Jade Gollum succulents!
Create both by starting with the same steps! Follow steps 1-7 to complete Baby Toes and then continue with steps 8-9 to turn them into Jade Gollum!
1. Roll a piece of clay into a snake approx. 1/16″-1/8″ thick.
2. & 3. Cut several pieces from your snake approx. 1/4″ long – these don’t need to be exact!
4. & 5. Roll one end of your cut pieces into a point.
6. & 7. Gather three pieces and gently press your pointed ends together in a bunch, continue to add remaining pieces in a radial fashion until you’ve reached your desired baby toes succulent size!
Turn your Baby Toes into Jade Gollum by using a toothpick to create a divot in the top of the succulent (photos 8). Lastly add pink pastel dust to the tops of your Jade Gollum (photo 9)!

Inspired by Zebra Haworthia, create this spiky succulent!
1. To make a darker green clay, mix a little bit of red with some green clay.
2. & 3. Roll your clay into approx. 1/8″ thick snake and pinch off several small pieces from the snake, approx. 1/2″ long.
4. Roll the ends of each piece you pinched off, to create points.
5. Gently flatten your piece between your fingers.
6 & 7. Gather three pieces and gently press your pointed ends together in a bunch at the bottom and allowing the tops to slightly fan out. Continue to add remaining pieces in a radial fashion until you’ve reached your desired Haworthia succulent size!

Inspired by Little Jewel succulents!
1. Roll 12 balls of clay in various sizes, with the largest not much bigger than a pea. 2. Roll your balls into a small snake, rolling on the ends to form points. 3. Pinch 3 of your smallest pieces together to form the center of your little jewel. 4. Gently flatten your remaining piece between your fingers. 5. & 6. Continue to add your pieces, smallest to largest, around your center, begin by adding three between each of your center pieces (photo 5), then adding three more between each of those pieces!
Inspired by Purpusorum!
1. & 2. Form several small flattened diamond shapes from the desired color in various sizes – no larger than your pinky nail. 3. Pinch 3 of your smallest diamond’s points together to form the center of your Purpusorum. 4. & 5. Continue to add your pieces, smallest to largest, around your center, begin by adding three between each of your center pieces (photo 4), then adding three more between each of those pieces! Continue to add pieces until you’ve reached your desired size!

Seedum comes in many shapes and forms, this little clay succulent was inspired by the Lime Zinger variety!
1. Make 4 sets of small clay balls in various sizes, for a total of 8 balls (two of each size), with the largest set about the size of a pea.
2. & 3. Gently flatten all of your balls into pancakes!
4. Starting to form the center of your Lime Zinger, take your two smallest pancakes, turn them into taco shells and slide them together as shown in picture 4.
5. Take your next size up pancakes and place them around your center piece so they are opposite of your center – don’t line them up the exact same way as your first two but cover the gap that was created.
6. With your next two pancakes, place them opposite of your last two – covering the new gaps created in the last step.
7. Continue to add your last set of pancakes on in this manner – you can also make your seedum larger by adding more pancakes!

1.Add terracotta colored clay to the inside of your tin – this doesn’t need to be all the way to the top, but near the top.
2. Use a toothpick to create texture!
3., 4. & 5. Use liquid sculpey to “glue” your succulents to the terracotta clay – ensure your plants are stuck well by blending some of the plant into the terracotta and visa versa.
6. & 7. Add color to some of your succulents with chalk pastel dust – scribble some pastel on a piece of paper and then use a soft brush to pick up the dust and apply to your succulent.
Bake your piece at 275*F for approx. 15min. – check on your piece several times during baking, if you notice any “scorching” on the tips of smaller succulents you may need to turn down the temp and cook longer (for example: 265* for 20 min.).
Once it’s baked and cooled, you can add a magnet or leave as is! I use E6000 to adhere the magnet to the tin – let sit for 24hrs before using!


Join us at the Art League of Ocean City in June to create your own!


Create unique and decorative designs out of paper! Paper quilling involves nothing more than rolling strips of paper and utilizing these rolls by forming different shapes, designs, and patterns. It’s a simple process that can create, what looks like, complex pieces of art! Create a snowflake, mandala, or starburst with this method!
What you need:


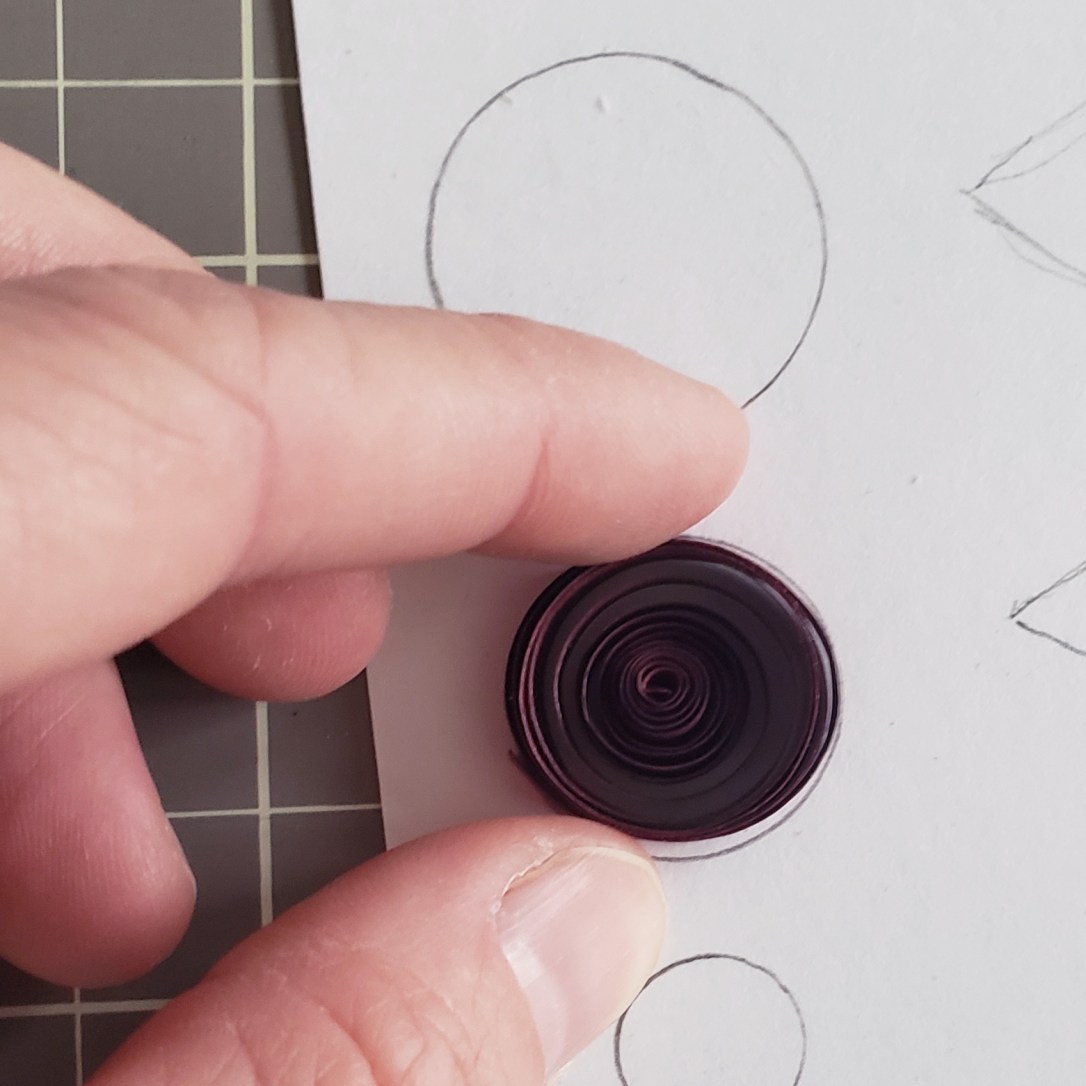
Step One: We will be starting with the inside of your snowflake. Take a strip of your quilling paper in the desired color and begin to coil it with your quilling needle by inserting the end of your paper strip in the slot located at the top of your needle. Then carefully begin to rotate the needle, wrapping your paper around it, to form a coil!


Step Two: Carefully grasp and remove your coil from the needle, being sure to not let it uncoil too much! Take your coil and set it on the top circle of the pattern. Let your coil loosen up slowly until it reaches the size of the circle on the paper. If your coil gets too big, tighten it up by pulling the end, and coiling it back around with your fingers. Once your coil is the correct size add a very small amount of glue to hold the end in place, use tweezers to help pinch the end in place!


Step Three: Now we’re going to shape your coil into a tear drop shape by pinching one side to a point. We want your tear drop to fit the outline next to the top circle on your pattern. Repeat steps 1 through 3, five more times, so you have a total of 6 tear drop shapes (shown in the last picture).


Step Four: Choose another color to create the next shape of the snowflake pattern. Coil your strip and make it the size of the center circle on the pattern, glue the end in place. Next, form your coil into an almond shape by pinching each side of the circle – making your shape line up with the almond shape on the pattern next to the center circle. Repeat 5 more times so you have a total of 6!


Step Five: Choose another color for the last shape of your snowflake pattern. This time cut your paper strip in half before making your coil – these shapes are a little smaller! Create a coil the size of the last circle on the pattern and glue the end in place. Make this into a tear drop shape that matches the smallest tear drop shape on the pattern. Repeat 11 more times for a total of 12!


Step Six: Now that we have all your pieces made it’s time to glue it all together! Place a piece of wax paper over the snowflake pattern and line your pieces up on top – it’s okay if your pieces don’t fit the pattern exactly (you can see in the second photo how mine doesn’t fit perfectly). Starting with the center of your snowflake, begin gluing your pieces together, adding a little bit of glue to the sides of your shapes that will be touching. Line up your pieces carefully and use tweezers to hold the shapes together until the glue holds!


Step Seven: Continue to glue your pieces together and building your snowflake on the wax paper, lining up the pieces on the pattern as best you can. Don’t worry if any glue gets on the wax paper – your snowflake can be easily removed from the waxed paper once the glue is dry!


Step Eight: Let your glue dry completely – at least a couple of hours or longer depending on how much glue you used. Carefully remove the wax paper from your snowflake – if you have any pieces that don’t feel stable or come apart, add more glue and use tweezers to hold in place. You can leave your snowflake as is, or add another coil at the top to add a ribbon to!


Create your own snowflake designs or make changes to the given one! You can add coils on top of your snowflake or make your snowflake larger by adding more to the outside. You can also add gems, sequence, or glitter to your finished snowflake! Hang them in your windows, on your wall, give as gifts, or use as decorations on boxes or frames!


Create these fun marbled pumpkins with some simple supplies! You can use real pumpkins or foam pumpkins Use nail polish to float your colors on water and dip your pumpkin for amazing marble effects!
WHAT YOU NEED:

Step one: Gather your supplies!

Step two: Carefully drip nail polish onto the surface of your water – I found that smaller drips will float better on the surface and too much nail polish can eat at the foam pumpkins. Don’t touch the nail polish brush to the water and don’t pour the nail polish – just let it drip!

Step three: Keep dripping your nail polish until your water surface is covered – the colors will spread and fill the water surface, try not to drip too much nail polish onto the areas that have already spread, as these drips will sit on top too much and be thick globs on your pumpkin! If using a foam pumpkin, the thick globs of nail polish also eat at the foam!

Step four: Once your water surface is covered, carefully dip your pumpkin! I held on to the stem and “rolled” my pumpkin onto the surface.

Step five: If your pumpkin didn’t get completely covered, add more drips to your water and re-dip!

Step six: Set your wet pumpkin on a piece of wax paper to dry (a fan can help speed up the dry time).
Use for some fun decorations, add names with paint markers for place cards, or use as gift toppers!


Create these fun and super easy tile coasters with a few Sharpies and some rubbing alcohol! Ceramic tiles make an inexpensive substrate to make these wonderful abstract designs on – I find tiles from our local Re-Store in all different shapes and sizes! Perfect for inexpensive & unique gifts to give!
What you need:

Step one: Gather all your supplies and clean your ceramic tile surface with the rubbing alcohol, you can apply it to a cotton ball or paper towel!

Step two: Make sure your tile is dry from the rubbing alcohol, then start coloring your tile with your Sharpies or permanent markers! Keep in mind your colors are going to get moved around and colors will blend together – it’s best to just create abstract designs here, don’t try to create a picture, as it will get messed up in our next few steps!

Step three: Continue to color in your tile – you can leave some areas blank if desired, however, I find that the more color the better!

Step four: Dip your rush in the rubbing alcohol and gently “dab” the alcohol on the tile – a little bit goes a long way. You will immediately see the alcohol have an effect on the color.

Step five: Continue to add rubbing alcohol, I did mine in all dabs, creating a droplet effect. You could try splattering, brush strokes, or a combination to achieve different effects!

Step six: I continued to add dabs until all of my marker lines were gone. Be careful not to add too much rubbing alcohol as it moves and spreads your colors out, making the colors lighter and allowing more of the white to show through (this is why I find the more color the better in step three).

Step seven: Let you rubbing alcohol dry completely and then spray your tile with a clear coat – I used Rust-Oleum Gloss. Start with a very light layer of clear coat as sometimes it can effect your design. Let the light layer dry and then add a second coat to finish your tile!

Step eight: Let your tile dry completely – you can tell the clear coat effected my colors, making them a bit more muted!

Step nine: Once your tile is dry flip it over and add felt pads to the corners so your tile doesn’t scratch any surfaces! I used self adhesive felt pads but you could also hot glue cut felt pieces or cork as well!
Step ten: Enjoy your coaster! Or make and give as gifts!

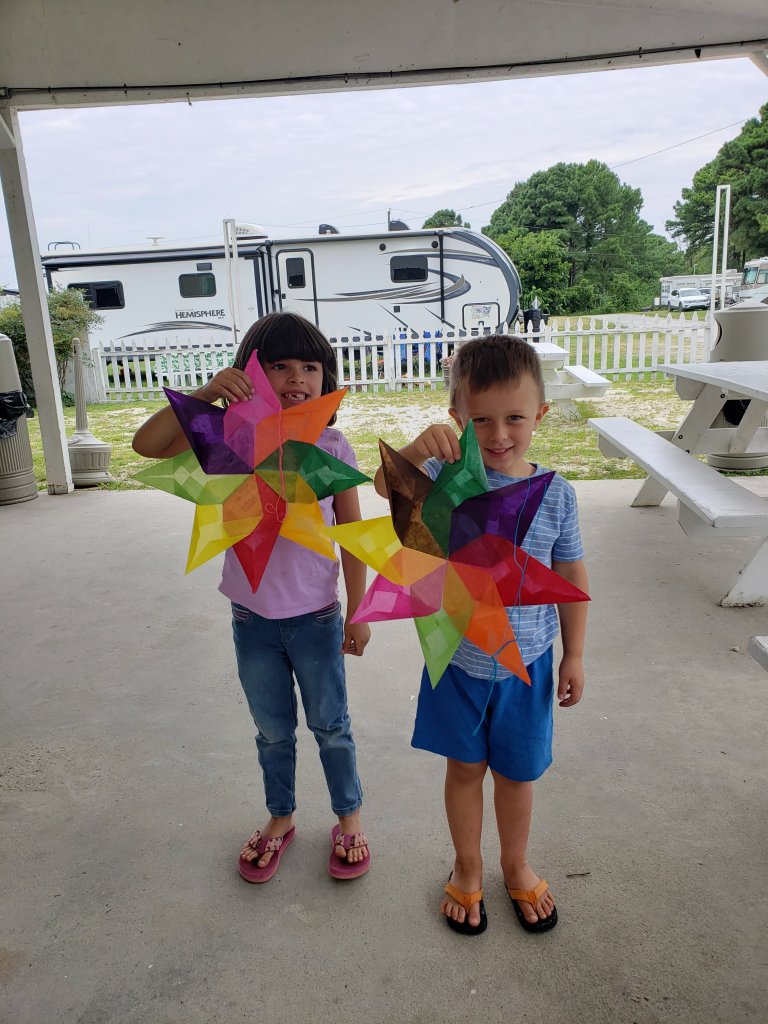
These window stars are easy, fun, and sure to brighten your home! Made from kite paper, also known as colored wax paper, these stars are vibrant and translucent, letting the light shine through and overlapping colors combine to create new colors! Perfect for color mixing lessons!
What you need:

Step one: Cut 8 squares of kite paper – all the same size. Try various colors! I started with 4″ squares for this example, however, you can make them any size you’d like!

Step two: Fold your square from corner to corner, crease, and unfold.

Step three: Fold the opposite corners together, crease, and unfold – your square should have a crease line from corner to corner, forming an X on your paper!

Step four: Fold one corner into the center of the X.

Step five: Fold the opposite corner to the center of the X.

Step six: Fold the right top edge to the center line as shown.

Step seven: Fold the left top edge to the center line.

Step eight: Repeat with all remaining 7 squares!

Step nine: Once you have all your squares folded, begin to glue them together – the point you just created in the last step will be the outside points of your star! Use a glue stick, starting on one side of the center line, from the wider tip of your origami, up to where the folds begin.

Step ten: Place a second folded piece on the center line and lining up the tips.

Step eleven: Continue to glue 7 pieces of your star together, making sure each one lines up on the center line of the last one and all tips meet in the middle.

Step twelve: Your eighth, and final piece, will be placed with one half on top and the other half underneath your star (or under the first piece you started with) to complete the pattern.

Step thirteen: Complete your star by punching a hold and adding a string or ribbon to hang it from!


A fun, simple & easy project to brighten your day! Create these fun flowers from basic supplies and give your decor a fun burst of colorful flowers!
What you need:

Step one: Cut out circles from your tissue paper – I use a roll of masking tape to trace and cut for size. You will need approx. 5 circles per flower. I chose to use shades of one color but you could do all the same color or multiple colors for one flower!

Step two: Thread about an inch of your pipe cleaner through your button.


Step three: Bend the inch piece of pipe cleaner in half and push back through another hole in your button. Twist the end to your stem to secure!


Step four: Cut your circles to give your flowers different appearances – here, I cut slits in a radial fashion to make my flower look more ruffle like! For the red flower I cut waves around the edge of my circle. I did this step to all 5 of my tissue paper layers. *Note: don’t have cuts too close to the center of your circles – this may cause them to tear easily in the next few steps!


Step five: Poke the end of your pipe cleaner through the center of your tissue paper circle, gently push your tissue paper all the way up the stem so it’s under your button! Gently crinkle your tissue paper around your button, repeat with all your other layers!

Step six: With all 5 layers on your stem, crinkle the papers up around your button, being careful not to tear your paper! This helps give our flower some more dimension!

Step seven: Carefully “fluff” out your flower petal layers so your center is visible again. You can go back and crinkle individual layers more if needed! You can also add a drop of tacky glue, hot glue, or wrap some floral tape around the stem where the tissue paper is to help hold it in place.


Step eight: To create a leaf, use another piece of pipe cleaner, place across your stem and twist it tightly around a few times to hold it in place. Bend each end back to the stem, creating a loop, and twist it to the stem to secure.

Step nine: Make more flowers! Try different cuts to achieve even more variations of flowers, use larger or smaller circles and create different size flowers! Give as a gift, use as a gift topper, make into pins, hair clips, or just place in a vase and enjoy!
Check out other projects to make at home here!


Create your own magnet or key-chain of your furry friend on shrink film! Use a photo of your pet to trace an outline on shrink film, color you pet in, and then place your shrink film in an oven to shrink! Turn these mini pet masterpieces into a key chain or magnet! Learn more about Shrink film here!
What you’ll need:

Step one: Print a picture of your pet – a head shot will work best, with clear details & good lighting. If you don’t have a pet or picture of your pet you can use a picture from a book or magazine! The photo should be at least 3.5”x5” or similar – I wouldn’t go much smaller as it will make details more difficult!

Step two: Place your shrink film over your pet’s photo with the rough/sanded side facing up. We will want to color on the sanded side!

Step three: With your permanent marker trace your pet; Tracing from a photo can be tricky – we want to include some details but not EVERYTHING, especially with shrink film as our artwork will become very small and details become more condensed. Focus on outlining the main features of your pet (like the eyes, nose, coloration spots) and the main outline.

Step four: Slide your outline off you photo to see what it looks like without your photo! Sometimes this helps us see what more we need to add! If needed, finish up any lines or details with the marker. You can also use the marker to color in any black areas (such as the pupils). *Tip: When making eyes be sure to leave a little white dot to help make them look more alive!

Step five: Color your pet in! Use the colored pencils to add color to your pet – you can make your drawing any color you’d like or similar to your pet’s real colors! The colored pencils will look very light on the shrink film – this is okay, when we “shrink” your film the colors will become more vivid and bright!

Step six: Be sure to color any white areas of your pet in with the white colored pencil – it’s hard to see on the shrink film before it’s shrunk but if we don’t add the white colored pencil these areas will look grey! You can also layer and blend your colored pencils to create different shades and shadows!

Step seven: Once you have your pet colored in you can add a background or outline!

Step eight: Cut out your pet – I like to leave a little border space around my drawing but you don’t have to do this. If you’re going to make your piece into a key-chain, make sure to leave an area where you can punch a hole!

Step nine: If you’re making this into a key-chain or anything else that you need a hole for, use a hole punch to create your hole before baking!

Step ten: Bake your shrink film! Place your shrink film in an oven @ 325* F for just a few minutes – You can bake it on a piece of parchment paper or tin foil on a baking sheet. You’ll notice your shrink film crinkles up and then will flatten back out as a much smaller and thicker piece of plastic. Once flat remove your shrink film & let cool.

Step eleven: Finish your shrink film! Add your key-chain piece by connecting the jump ring to your shrink film and key-chain part with pliers. Or adhere magnets to the back of your piece to create a magnet! These could also be made into zipper pulls, ornaments, hair clips, pins, necklaces, earrings, etc.! Check out other ideas for shrink film projects here!


Create some cool sand clay sculptures and pieces of art with this simple recipe! This clay recipe dries hard as a rock when left exposed to air or can be wrapped in plastic to save for another time! Finished sculptures can be dried out and displayed as is, or painted with acrylics! Gather shells, rocks, sea glass to press or encase in your clay. Make ornaments, wall hangings, or fossils!
What you need:

Step one: Gather all your supplies!

Step two: Measure the flour, salt & sand in a mixing bowl.

Step three: Mix your flour, salt & sand together!

Step four: Add a little bit of warm water to your bowl at a time (around 1/2 cup at a time) and mix, then add a little more water & mix. Depending on if your sand was super dry or a little damp you may need more or less water – we want your clay to hold it’s shape, not be too crumbly, and we also don’t want it to be too wet and soggy. You may find it’s also easier as you get started to mix with your hands instead of a spoon! If you add too much water you can always add in a little more sand, flour, & salt, to firm it back up. Once completely mixed, the sand clay should not be too sticky and hold its shape!
Step five: Create with your sand clay! Make sculptures, faux fossils, hand print impression plaques, or draw a picture in the sand! Some examples of what I’ve done with the sand clay are below – get creative! Let you creations fully dry – this can take several hours to several days, depending on how thick & wet your clay is. Place it in the sun or use a fan to help speed up dry time! Once dry, clay becomes very hard and can be painted (I’ve used acrylics)!


Check out other projects you can do at home here!