Art, Happenings, Make, Create, & Share!, student artwork

Student Spotlight! (February 2022)

Each month I will be spotlighting one of my students – past or present, and their artistic ventures! I work with students of all ages and abilities and you’ll get to learn a little bit about these amazing artists and their work!

Our February spotlight is on:

Elijah Cockey

How long have you been taking art lessons? “I have been taking art lessons since 2012.”

Why did you begin to take art lessons/how did you become interested in art? “I began taking art lessons because, as a homeschooler, it is hard to find opportunities to do art.”

What or who inspires you to create your artwork? “Well, I have no muse, really, but (Ms. Jenell can back me up on this), I really like sharks and snakes, so I create a lot of art about them.”

What are your favorite mediums and/or subjects for your artwork? “My favorite medium I’ve used in class is probably acrylics. My favorite medium I’ve used outside of class is probably blacksmithing.”

Is there anything else about you that you’d like us to know? “One thing I’d like you all to know is that the word “Lego” comes from the Danish term “Leg Godt,” or “Play Well.” I thought that was interesting.”

“Santasaurus” Acrylic on Slate – “To avoid seeming off task while looking at stencils, I somehow had to incorporate dinosaurs into my artwork. It turned out almost as lit as the meteorite that brought santasauru’s career to an end.”

Besides visual arts are you into any other art forms? “I am certainly into other art forms. I like music a lot. I play cello, upright bass, electric bass, and banjo. I’m considering learning bagpipes, but that’s still a work in progress.”

Why do you think art is important? – Why is it important for you? “I think that art is important for numerous reasons, but I’ll focus specifically on art’s historic significance. Art—whether that be paintings, carvings, photography, sculpture, etc.—has proved to be a key component of our understanding of history. For example, when we come across a culture whose writing system is yet to be deciphered, or a culture who may not have had a written language, their art is often one of the sole windows into their world that we have. Even in recorded history, images of historical events can give contextual evidence for historical events. Art is important to me for the same reason.”

What is your favorite thing about art? “My favorite thing about art is the wide variety of artistic mediums there are.”

What artist(s) from history do you admire most and why? “The artist I admire most in history is Caravaggio. Though he is underappreciated, he influenced other artists.”

Do you plan to have a career in the arts? “I do. I plan on becoming a musician.”

“Impossible Shape” Acrylic on canvas – “If it’s impossible, then how did I draw it?”

Do you enter your artwork in any shows or contests? “Whenever an opportunity comes up, whether that be through art class or through another organization like 4-H, I always submit my art. Did I say I win? No. But I submit.”

Is there a certain style, or type, of art that you’d like to someday try? “I’ve always wanted to try glassblowing. I’ve seen people do it at Jamestown, the Corning Museum of Glass, and Salisbury University. It’s a mesmerizing process.”

Do you have a favorite color? “My favorite color is orange. I like campfires, leaves, pumpkins, and all other things related to fall, so orange seemed like a natural favorite color.”

How long does it take you to complete your artwork? “My artwork takes as long for me to complete as I will stop talking in art class. Fact.”

“Sharkuterie” Mixed Media on Board – “It’s a picture of a shark because I’m a great admirer of sharks.”

What is your favorite thing you’ve ever created and why? “My favorite thing I’ve ever created in art class is a shark on a board. Kind of like a…Sharkuterie board. I crack myself up.”

When you’re making your art do like to listen to music or watch tv for inspiration (if so what)? “I like listening to music while I do my homework. I find it helps me focus.”

Is there an aspect of art that you don’t like, and why? “One thing that I don’t like about art is the fact that stick figures are often looked down upon. That’s kind of offensive…if you’re a stick figure, of course.”

Do you have any advice for someone who wants to become an artist or improve their skills? “Yeah, go take from Ms. Jenell.”

What do you think makes a good artist and/or piece of art? “I think that a good artist has a point to make with their art, and I think good art makes that point. It doesn’t have to be a deep, metaphysical point. It just ha to be worth making.”

How has your artwork improved/what have you done to keep improving as an artist? “My artwork has much improved over the years. One skill I have developed in particular is the ability to look at a picture and draw from that picture.”

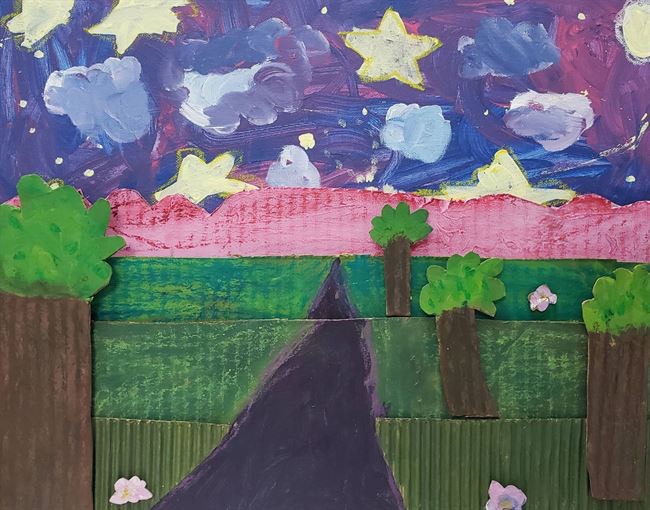
Elijah brings fun and humor to class every week – he enjoys making others laugh (as well as “cracking himself up”), his sense of humor reflected in his artwork; bringing a smile to the viewers. He also likes to think outside the box and add his own perspective or take on the given subjects, mediums, & styles, creating unique and personal pieces of art!

Check out our other student spotlights here!

Art, Art activities, card making, Craft, Holiday, Make, Create, & Share!, Painting, student artwork

Cool Hands & Warm Hearts

Have fun with warm and cool colors, creating simple & meaningful pieces of art that also make perfect Valentine’s Day cards!

What you need:

  • Watercolor Paints
  • Watercolor Paper x2 at least 8″x10″
  • Paint Brush
  • Masking Tape
  • Gluestick
  • Crayons
  • Course Sea Salt
  • Plastic Grocery Bag

What are warm and cool colors? Warm colors are reds, oranges and yellows, while cool colors are, blues, greens, & violets. Warm colors often make us think of warmth – fire, sunshine, heat. Cool colors tend to be more calming and make us think of water, sky, or ice. For this project we have three different elements: Your background paper, your hand, and your heart! We created a pattern by layering warm and cool colors for each element; Background in warm colors, hand in cool colors, heart in warm colors, or the reverse; background cool colors, hand warm colors, heart cool colors. Next to one another, warm and cool colors are very contrasting and make one another stand out! Decide if you would rather have a warm heart and cool hand or cool heart and warm hand!

Prepare your papers: You will need one piece of paper for your background and one piece to share for your hand and heart. Tape one piece of watercolor paper down to a work surface for your background with your masking tape. Cut the other piece of watercolor paper in two, trace an outline of your hand one piece, and draw a heart shape on the other (make sure your heart will fit in your hand outline). Tape your hand and heart pieces of watercolor paper to your work surface as well. Taping helps to keep your paintings flat while you work on them! Keep in mind the tape will resist the watercolor – try to apply the tape evenly around your background paper!

Listed below are three different watercolor techniques to make your warm and cool color hearts and hands! You can use any of the three of the techniques for any portion of your project – background, hand, & heart, or combine techniques or create your own! For each technique we will be using “wet on wet” – where we brush your paper with water, then add our paint. This helps our colors flow and mix around, giving us some really fun effects! Have your watercolors prepared and ready!

Crayons & Watercolor – Use warm or cool color crayons to draw designs or patterns on one of your elements (background, hand or heart). Brush water on your element, going over the crayon designs, then use watercolor paint to fill in your element – the crayons are waxy and will resist the watercolor!

Salt & Watercolor – Wet your element by brushing it with water, then dab splotches of watercolor on top! Watch as the paint flows and mixes on the paper! While the paint is still wet, sprinkle a little bit of salt on your element – notice how the paint pools around the pieces of salt! Let your element dry completely and then gently brush off the salt pieces to reveal the finished technique!

Plastic & Watercolor – This technique is made by using a plastic grocery bag – you may need to cut the bag open so it’s bigger and can cover your whole paper surface! Wet your paper with water and then add color to paper – in the example below we dabbed color on the paper but you can use almost any method for this technique! Once you have your whole piece of paper covered with color, and while it’s still wet, place your piece of plastic over the wet paint, pressing gently, and being sure to “scrunch” or “crinkle” the plastic on your paper. Let this dry completely (this can take some time!) and then remove the plastic to reveal a very cool technique!

Once you have all your elements painted, let them dry completely – it’s best not to use a hair dryer to speed up the process for the salt or plastic techniques as it may not allow the techniques to work well. When they’re dry and ready, remove the tape and cut out your hand and heart! Glue all of your elements together! Turn these into cards or pictures for Valentine’s day!

Change it up and make multiple hands – add something instead of hearts!

Art, Happenings, Make, Create, & Share!, student artwork

Student Spotlight! (January 2022)

Each month I will be spotlighting one of my students – past or present, and their artistic ventures! I work with students of all ages and abilities and you’ll get to learn a little bit about these amazing artists and their work!

Our September spotlight is on:

Guinevere Cockey

My name is Guinevere Cockey, I am 12 years old, and I have been taking art with Ms. Jenell for 10 years. I started taking lessons in about 2012. My siblings had been taking art with Ms. Jenell before I started, and I was so excited when I was allowed to start! Other artists’ works as well as animals—domestic and wild—inspire me to create art. I enjoy painting with acrylics and watercolor, but I enjoy fabric arts like knitting, crocheting, and sewing, equally. I also love riding horses.

“Christmas Slate” Acrylic on Slate

What is your favorite thing you’ve ever created and why? “My favorite thing I’ve ever created is a roof slate on which I painted a Christmas scene. I enjoyed creating it because the focus was on the trees, but, beyond them, is a small snowman, smiling in a winter storm. Also, the slate had been used for many years on the roof of a house and, itself, had seen many Christmas storms. Now it was being turned into a work of art about a Christmas storm!”

Besides visual arts are you into any other art forms? “Besides visual arts, I dance, act in community theater, and play many different instruments in my family band.”

“Impossible Square” Acrylic on canvas

Do you have a favorite color? “My favorite color is probably light turquoise. Light turquoise is my favorite color because it reminds me of the water in a beautiful beach in Pensacola, Florida my family and I went to on our summer vacation.”

Is there an aspect of art that you don’t like, and why? “I don’t like modern art. Not like Andy Warhol, but other types of modern art. Like the kinds that just are, for example, a blank yellow page that represents all the rain in the clouds.”

“Flowery Dots” Alcohol inks on Yupo

Do you plan to have a career in the arts? “When I go to college I might double-major in Equestrian Studies and Photography or Performing Arts.”

Guin is always excited and cheerful when taking on projects, trying new mediums, subjects, & styles! She’s open to new ideas and thoughts – and never goes into any project thinking she can’t do it! Being able to enjoy the process of making and creating along with her positive outlook, makes her a successful artist who spreads happy qualities through her art; inspiring others!

Check out our other student spotlights here!

Art, Happenings, Make, Create, & Share!, student artwork

Student Spotlight! (December 2021)

Each month I will be spotlighting one of my students – past or present, and their artistic ventures! I work with students of all ages and abilities and you’ll get to learn a little bit about these amazing artists and their work!

Our September spotlight is on:

Caden Pavese

Hello, my name is Caden Pavese and I am 13 years old. I am home schooled and in 8th grade. I have been taking art classes with Ms. Jenell since 2nd grade. I began taking classes because I enjoy it and both of my older siblings were attending classes too. Two of my favorite art mediums to use are pencil and acrylics. Some of my other interests include: woodworking, hiking, camping, Boy Scouts and VEX robotics.

“Sunrise Through The Arch”, Mixed Media

How long does it take you to complete your artwork? “It depends on what I am doing, but if I am drawing it usually takes me a few hours.”

“Nature”, Watercolor on Plaster Cast

Besides visual arts are you into any other art forms? “Yes, I like creating stop motion movies with Lego’s, woodworking and wood burning.”

“Snowy Owl”, Pastels

Do you have a favorite color? “My favorite color is dark green or blue.”

“Trash Into Treasure”, Mixed Media

Is there a certain style, or type of art that you would like to someday try? “One style of art I would like to try is charcoal drawing.”

“Geometric Bear”, Watercolor

How has your artwork improved/ what have you done to keep improving as an artist? “I like to watch video tutorials on YouTube because watching people draw helps me to learn new technique.”

Do you have any advice for someone who wants to become an artist and/or improve their skills? “I think practicing daily is a key aspect to help you to become a good artist.”


Caden takes his time and puts forth determination, effort, and thought, into all of his artwork! He’s excited to utilize new techniques and mediums to achieve the goals he sets out to reach within each piece of art he creates. It’s this focus and willingness to learn that will allow Caden to continue to grow and improve as an artist!

Check out our other student spotlights here!

Art, Art activities, Craft, decorating, DIY, Make, Create, & Share!, paper art

Paper Quilled Snowflakes!

Create unique and decorative designs out of paper! Paper quilling involves nothing more than rolling strips of paper and utilizing these rolls by forming different shapes, designs, and patterns. It’s a simple process that can create, what looks like, complex pieces of art! Create a snowflake, mandala, or starburst with this method!

What you need:

  • Paper Quilling Needle/Tool
  • Quilling Paper – 5mm wide and 21″ long
  • Craft Glue
  • Wax Paper
  • Scissors
  • Tweezers
  • Pattern (download below – Print as a full 8.5×11″ sheet)
  • Ribbon

Step One: We will be starting with the inside of your snowflake. Take a strip of your quilling paper in the desired color and begin to coil it with your quilling needle by inserting the end of your paper strip in the slot located at the top of your needle. Then carefully begin to rotate the needle, wrapping your paper around it, to form a coil!

Step Two: Carefully grasp and remove your coil from the needle, being sure to not let it uncoil too much! Take your coil and set it on the top circle of the pattern. Let your coil loosen up slowly until it reaches the size of the circle on the paper. If your coil gets too big, tighten it up by pulling the end, and coiling it back around with your fingers. Once your coil is the correct size add a very small amount of glue to hold the end in place, use tweezers to help pinch the end in place!

Step Three: Now we’re going to shape your coil into a tear drop shape by pinching one side to a point. We want your tear drop to fit the outline next to the top circle on your pattern. Repeat steps 1 through 3, five more times, so you have a total of 6 tear drop shapes (shown in the last picture).

Step Four: Choose another color to create the next shape of the snowflake pattern. Coil your strip and make it the size of the center circle on the pattern, glue the end in place. Next, form your coil into an almond shape by pinching each side of the circle – making your shape line up with the almond shape on the pattern next to the center circle. Repeat 5 more times so you have a total of 6!

Step Five: Choose another color for the last shape of your snowflake pattern. This time cut your paper strip in half before making your coil – these shapes are a little smaller! Create a coil the size of the last circle on the pattern and glue the end in place. Make this into a tear drop shape that matches the smallest tear drop shape on the pattern. Repeat 11 more times for a total of 12!

Step Six: Now that we have all your pieces made it’s time to glue it all together! Place a piece of wax paper over the snowflake pattern and line your pieces up on top – it’s okay if your pieces don’t fit the pattern exactly (you can see in the second photo how mine doesn’t fit perfectly). Starting with the center of your snowflake, begin gluing your pieces together, adding a little bit of glue to the sides of your shapes that will be touching. Line up your pieces carefully and use tweezers to hold the shapes together until the glue holds!

Step Seven: Continue to glue your pieces together and building your snowflake on the wax paper, lining up the pieces on the pattern as best you can. Don’t worry if any glue gets on the wax paper – your snowflake can be easily removed from the waxed paper once the glue is dry!

Step Eight: Let your glue dry completely – at least a couple of hours or longer depending on how much glue you used. Carefully remove the wax paper from your snowflake – if you have any pieces that don’t feel stable or come apart, add more glue and use tweezers to hold in place. You can leave your snowflake as is, or add another coil at the top to add a ribbon to!

Create your own snowflake designs or make changes to the given one! You can add coils on top of your snowflake or make your snowflake larger by adding more to the outside. You can also add gems, sequence, or glitter to your finished snowflake! Hang them in your windows, on your wall, give as gifts, or use as decorations on boxes or frames!

Art, Happenings, Make, Create, & Share!, student artwork

Student Spotlight! (November 2021)

Each month I will be spotlighting one of my students – past or present, and their artistic ventures! I work with students of all ages and abilities and you’ll get to learn a little bit about these amazing artists and their work!

Our September spotlight is on:

Elana Pavese

Hi my name is Elana, I’m 10 years old and in the 5th grade. I like playing outside, being with friends, gymnastics, camping and Legos!

“Sunset Mountains”, Mixed Media

Why did you begin to take art lessons/how did you become interested in art? “I started liking art because you can express your feelings in a way besides telling them.”

What are your favorite mediums and/or subjects for your artwork? “Painting & coloring.”

“The Walk Of The Elephant”, Watercolors

What is your favorite thing you’ve ever created and why? “My geometric shape elephant because it has all my favorite colors and is my favorite animal.”

Do you have a favorite color? “Bubble gum pink & Lavender purple.”

“A Day in Nature”, Metal Tooling

What or who inspires you to create your artwork? “My art teacher Miss Jenell, her artwork is really inspiring!”

Is there a certain style, or type, of art that you’d like to try someday? “Origami – I just love the way the shapes come out in different things.”

“Sports”, Paper Mache

How has your artwork improved/what have you done to keep improving as an artist? “Keep practicing and the art homework helps me.”

Is there an aspect of art that you don’t like and why? “It’s really messy and sometimes it doesn’t come out the way you want it.”

Do you have any advice for someone who wants to become an artist or improve their skill? “Keep practicing to get better.”


Elana is careful in her artwork, taking her time and coming up with ideas before executing them! She puts a lot of thought into her work but is open to make changes or adjustments if needed! Elana is also very dedicated to accomplish what she sets out to do and continues to work on a piece until she’s happy with it! Keep up the great work Elana!

Check out our other student spotlights here!

Art, Happenings, Make, Create, & Share!, student artwork

Student Spotlight! (October 2021)

Each month I will be spotlighting one of my students – past or present, and their artistic ventures! I work with students of all ages and abilities and you’ll get to learn a little bit about these amazing artists and their work!

Our October spotlight is on:

Gage Smartnick

“I’m Gage and I’m 15 and in 9th grade at James M Bennett High School. I like swimming and I swim on the YMCA swim team, running, playing on the computer, and art classes. I was adopted from China and have 3 brothers and 1 sister.”

“This is a paint by number on canvas. It took me a long time to finish.”

How long have you been taking art lessons? “8 years”


Why did you begin to take art lessons/how did you become interested in art? “To get more creative.”

What’s your favorite thing about art? “I like seeing the finished product from all my hard work. “

This is my favorite art work and I won an award for it at the Ward Museum.


What are your favorite mediums and/or subjects for your artwork? “I like painting landscapes the most.”

When you’re making your art do like to listen to music or watch tv for inspiration (if so what)? “I like it to be quiet when I work on my art. At home, I usually paint in my room because it’s away from all the noise.” 

What is your favorite thing you’ve ever created and why? “The picture of Marty, my sister’s dog, that I painted her for her birthday.”

Do you have a favorite color? ” My favorite color when I was younger was green, but now I like blue.” 

“One of my walls full of my art.”

What or who inspires you to create your artwork? “Ms. Jenell”

Is there anything else about you that you’d like us to know? “I’m an uncle already.”

Do you have any advice for someone who wants to become an artist or improve their skills? “Follow your dreams and never give up.”

Gage always has a positive outlook on his art – even when his work isn’t quite going the way he’d like! Instead of getting frustrated and giving up, he takes his time and carefully continues to work on the piece until he’s able to reach his artistic goals! His perseverance and determination is inspiring! Keep on creating Gage!

Check out our other student spotlights here!

Art, Art activities, Craft, decorating, DIY, Holiday

Marble Pumpkins!

Create these fun marbled pumpkins with some simple supplies! You can use real pumpkins or foam pumpkins Use nail polish to float your colors on water and dip your pumpkin for amazing marble effects!

WHAT YOU NEED:

  • Small pumpkins – either foam or real! – I used foam pumpkins from the dollar store!
  • Nail polish in various colors
  • Disposable bowl or bucket filled with water
  • Protected work surface
  • Wax paper to set your pumpkins on to dry!

Step one: Gather your supplies!

Step two: Carefully drip nail polish onto the surface of your water – I found that smaller drips will float better on the surface and too much nail polish can eat at the foam pumpkins. Don’t touch the nail polish brush to the water and don’t pour the nail polish – just let it drip!

Step three: Keep dripping your nail polish until your water surface is covered – the colors will spread and fill the water surface, try not to drip too much nail polish onto the areas that have already spread, as these drips will sit on top too much and be thick globs on your pumpkin! If using a foam pumpkin, the thick globs of nail polish also eat at the foam!

Step four: Once your water surface is covered, carefully dip your pumpkin! I held on to the stem and “rolled” my pumpkin onto the surface.

Step five: If your pumpkin didn’t get completely covered, add more drips to your water and re-dip!

Step six: Set your wet pumpkin on a piece of wax paper to dry (a fan can help speed up the dry time).

Use for some fun decorations, add names with paint markers for place cards, or use as gift toppers!

Art, Happenings, Make, Create, & Share!, student artwork

Student Spotlight! (September 2021)

Each month I will be spotlighting one of my students – past or present, and their artistic ventures! I work with students of all ages and abilities and you’ll get to learn a little bit about these amazing artists and their work!

Our September spotlight is on:

Caroline Nielson

My name is Caroline Nielson. I am 5 years old and am in Kindergarten. I have been taking art lessons with Miss Jenell for 4 months. I began taking art lessons because I really like making art. Miss Jenell inspires me to do art because she is really good at it. I like using acrylic paint for my artwork and drawing pretty things like hearts and flowers. I also enjoy reading and playing with my little brother.

Title: The Pretty Petal
Medium: Paint
I used pink to paint the petals because it’s my favorite color. 

What’s your favorite thing about art? “My favorite thing about art is drawing and coloring.”

Besides visual arts are you into any other art forms? “I take ballet lessons because I like dancing. I feel happy when I dance.”

Title: Moonlight Road, Medium: Paint

This is a painting of a road leading to a magical land in the mountains. I like the colors I used in this painting. 

What is your favorite thing you’ve ever created and why? “My favorite thing I’ve ever created is my painting, “Moonlight Road.” It is my favorite because I like to paint.”

Do you have a favorite color? “My favorite color is pink because it’s bright and pretty.”

Title: Flower the Cat
Medium: Pencil, Crayon
This picture makes me feel happy because I like drawing pink hearts. 


How has your artwork improved/what have you done to keep improving as an artist? “I’ve been taking art lessons with Miss Jenell every week. We color, draw, and paint a lot and that helps me get better.”

Caroline comes full of smiles and ready to create some art every week! She is eager to learn new art mediums and techniques and puts in a lot of concentration and focus to become better! She always has fun and is imaginative in her work as well! Keep up all the good work Caroline!

Check out our other student spotlights here!

Art, Art activities, Craft, DIY, Make, Create, & Share!

Sharpie Tile Coasters!

Create these fun and super easy tile coasters with a few Sharpies and some rubbing alcohol! Ceramic tiles make an inexpensive substrate to make these wonderful abstract designs on – I find tiles from our local Re-Store in all different shapes and sizes! Perfect for inexpensive & unique gifts to give!

What you need:

  • Sharpies or permanent markers
  • 91% Isopropyl Alcohol
  • Clear Coat spray – I used Rust-Oleum Gloss
  • Ceramic Tile
  • Adhesive Felt pads
  • Small paint brush

Step one: Gather all your supplies and clean your ceramic tile surface with the rubbing alcohol, you can apply it to a cotton ball or paper towel!

Step two: Make sure your tile is dry from the rubbing alcohol, then start coloring your tile with your Sharpies or permanent markers! Keep in mind your colors are going to get moved around and colors will blend together – it’s best to just create abstract designs here, don’t try to create a picture, as it will get messed up in our next few steps!

Step three: Continue to color in your tile – you can leave some areas blank if desired, however, I find that the more color the better!

Step four: Dip your rush in the rubbing alcohol and gently “dab” the alcohol on the tile – a little bit goes a long way. You will immediately see the alcohol have an effect on the color.

Step five: Continue to add rubbing alcohol, I did mine in all dabs, creating a droplet effect. You could try splattering, brush strokes, or a combination to achieve different effects!

Step six: I continued to add dabs until all of my marker lines were gone. Be careful not to add too much rubbing alcohol as it moves and spreads your colors out, making the colors lighter and allowing more of the white to show through (this is why I find the more color the better in step three).

Step seven: Let you rubbing alcohol dry completely and then spray your tile with a clear coat – I used Rust-Oleum Gloss. Start with a very light layer of clear coat as sometimes it can effect your design. Let the light layer dry and then add a second coat to finish your tile!

Step eight: Let your tile dry completely – you can tell the clear coat effected my colors, making them a bit more muted!

Step nine: Once your tile is dry flip it over and add felt pads to the corners so your tile doesn’t scratch any surfaces! I used self adhesive felt pads but you could also hot glue cut felt pieces or cork as well!

Step ten: Enjoy your coaster! Or make and give as gifts!