Create fun and colorful eggs this Easter with decoupage! Gather decorative tissue papers, glitter and some ribbon! These easy and fun eggs are a fun way to create a gift or decoration this Easter!
What you need:
Decorative tissue papers
ModPodge – I used Gloss
Glitter and/or Glitter glue
Paint brush
Eggs – I used real eggs that had been blown out. You can also use plastic dyeable eggs.
Pony beads or similar
Ribbon
Hot glue
Scissors
Hair dryer (optional)
Step one: Gather all your supplies!
Step two: Cut out pieces from your tissue paper – cut more than what you’ll think you will need and try to cut off as much of the background as possible. *If the tissue paper background is white, an your egg is white, then you don’t need to worry as much about getting rid of the background!
Step three: Brush the Modpodge on the egg in a thin layer (I did half the egg at a time), then add one of your tissue paper cut outs, brush another layer of Modpodge on top of the tissue paper. Carefully use your brush to flatten out the tissue paper and press down any wrinkles. The larger pieces of tissue paper you have, the more wrinkles you will end up with as it will have to curve around the egg shell!
Step four: Continue to add your tissue paper to your egg & layering Modpodge under and over each piece! Don’t be afraid to overlap pieces. Once your egg is complete, brush a layer of Modpodge on top of the whole thing, making sure all pieces are pressed down and sealed – I did half my egg at a time drying each half before Modpodging the second half! Let your egg dry completely – use the hair dryer to speed up the processs.
Step five: Apply glitter! The picture on the left is glitter glue in the center of the flowers and the photo on the right was brushed with Modpodge and covered with clear glitter! You could also add details with paint pens or Sharpies at this stage too!
Step six: You can leave your egg as it is or create a hanger with a piece of ribbon and a pony bead. Cut your length of ribbon, fold it in half, slide both cut ends of the ribbon in the bead (photo one), add some hot glue to the ribbon just below the bead, and slide the bead onto the hot glue. Let dry and then cut off any glue or ribbon below the bead. Add a drop of hot glue to the top of your egg and press the bead to it! While the hot glue is still wet you can sprinkle on some glitter!
Create cute & fun polymer clay succulents that you can turn into magnets, gift toppers, desktop decor, and more! The instructions show several different types of plants inspired by real succulents and how you can place them together in a tin to create a mini garden and turn it into a magnet – you could also use bottle caps, miniature terracotta pots, or more polymer clay, to create your own containers for your succulents or create the succulent by itself and turn them into jewelry, hair pins, etc. Get creative and create your own types of plants & gardens!
What you need:
Polymer Clay – I used primary colors (Yellow, Red, & Blue) to mix my own shades of greens, reds/purples, along with some white clay to make lighter greens/jades/teals. Additionally, I used terracotta colored clay for my ground – you could also mix brown with the primaries. I recommend SculpeyIII, a 2oz block of each color will be enough to make a few gardens in a similar size to mine.
Translucent Liquid Sculpey
E6000 or Quick Grip – or another strong glue to attach your magnet to your tin.
Strong Magnets – these need to be smaller than the container you plan to put you succulents in.
Tin or other container for your garden – I recommend something shallow like a bottle cap, small tin or miniature terracotta pot. The tins I used were 15ml.
Toothpick or skewer
Soft Pastel – in desired colors, I used pinks & reds.
Paint Brush – soft and relatively small.
Inspired by Baby Toes and Jade Gollum succulents!
Create both by starting with the same steps! Follow steps 1-7 to complete Baby Toes and then continue with steps 8-9 to turn them into Jade Gollum!
1. Roll a piece of clay into a snake approx. 1/16″-1/8″ thick.
2. & 3. Cut several pieces from your snake approx. 1/4″ long – these don’t need to be exact!
4. & 5. Roll one end of your cut pieces into a point.
6. & 7. Gather three pieces and gently press your pointed ends together in a bunch, continue to add remaining pieces in a radial fashion until you’ve reached your desired baby toes succulent size!
Turn your Baby Toes into Jade Gollum by using a toothpick to create a divot in the top of the succulent (photos 8). Lastly add pink pastel dust to the tops of your Jade Gollum (photo 9)!
Inspired by Zebra Haworthia, create this spiky succulent!
1. To make a darker green clay, mix a little bit of red with some green clay.
2. & 3. Roll your clay into approx. 1/8″ thick snake and pinch off several small pieces from the snake, approx. 1/2″ long.
4. Roll the ends of each piece you pinched off, to create points.
5. Gently flatten your piece between your fingers.
6 & 7. Gather three pieces and gently press your pointed ends together in a bunch at the bottom and allowing the tops to slightly fan out. Continue to add remaining pieces in a radial fashion until you’ve reached your desired Haworthia succulent size!
Inspired by Little Jewel succulents!
1. Roll 12 balls of clay in various sizes, with the largest not much bigger than a pea. 2. Roll your balls into a small snake, rolling on the ends to form points. 3. Pinch 3 of your smallest pieces together to form the center of your little jewel. 4. Gently flatten your remaining piece between your fingers. 5. & 6. Continue to add your pieces, smallest to largest, around your center, begin by adding three between each of your center pieces (photo 5), then adding three more between each of those pieces!
Inspired by Purpusorum!
1. & 2. Form several small flattened diamond shapes from the desired color in various sizes – no larger than your pinky nail. 3. Pinch 3 of your smallest diamond’s points together to form the center of your Purpusorum. 4. & 5. Continue to add your pieces, smallest to largest, around your center, begin by adding three between each of your center pieces (photo 4), then adding three more between each of those pieces! Continue to add pieces until you’ve reached your desired size!
Seedum comes in many shapes and forms, this little clay succulent was inspired by the Lime Zinger variety!
1. Make 4 sets of small clay balls in various sizes, for a total of 8 balls (two of each size), with the largest set about the size of a pea.
2. & 3. Gently flatten all of your balls into pancakes!
4. Starting to form the center of your Lime Zinger, take your two smallest pancakes, turn them into taco shells and slide them together as shown in picture 4.
5. Take your next size up pancakes and place them around your center piece so they are opposite of your center – don’t line them up the exact same way as your first two but cover the gap that was created.
6. With your next two pancakes, place them opposite of your last two – covering the new gaps created in the last step.
7. Continue to add your last set of pancakes on in this manner – you can also make your seedum larger by adding more pancakes!
1.Add terracotta colored clay to the inside of your tin – this doesn’t need to be all the way to the top, but near the top.
2. Use a toothpick to create texture!
3., 4. & 5. Use liquid sculpey to “glue” your succulents to the terracotta clay – ensure your plants are stuck well by blending some of the plant into the terracotta and visa versa.
6. & 7. Add color to some of your succulents with chalk pastel dust – scribble some pastel on a piece of paper and then use a soft brush to pick up the dust and apply to your succulent.
Bake your piece at 275*F for approx. 15min. – check on your piece several times during baking, if you notice any “scorching” on the tips of smaller succulents you may need to turn down the temp and cook longer (for example: 265* for 20 min.).
Once it’s baked and cooled, you can add a magnet or leave as is! I use E6000 to adhere the magnet to the tin – let sit for 24hrs before using!
A fun, simple & easy project to brighten your day! Create these fun flowers from basic supplies and give your decor a fun burst of colorful flowers!
What you need:
Tissue Paper in multiple colors
Green Pipe Cleaners
Scissors
Button
Step one: Cut out circles from your tissue paper – I use a roll of masking tape to trace and cut for size. You will need approx. 5 circles per flower. I chose to use shades of one color but you could do all the same color or multiple colors for one flower!
Step two: Thread about an inch of your pipe cleaner through your button.
Step three: Bend the inch piece of pipe cleaner in half and push back through another hole in your button. Twist the end to your stem to secure!
Step four: Cut your circles to give your flowers different appearances – here, I cut slits in a radial fashion to make my flower look more ruffle like! For the red flower I cut waves around the edge of my circle. I did this step to all 5 of my tissue paper layers. *Note: don’t have cuts too close to the center of your circles – this may cause them to tear easily in the next few steps!
Step five: Poke the end of your pipe cleaner through the center of your tissue paper circle, gently push your tissue paper all the way up the stem so it’s under your button! Gently crinkle your tissue paper around your button, repeat with all your other layers!
Step six: With all 5 layers on your stem, crinkle the papers up around your button, being careful not to tear your paper! This helps give our flower some more dimension!
Step seven: Carefully “fluff” out your flower petal layers so your center is visible again. You can go back and crinkle individual layers more if needed! You can also add a drop of tacky glue, hot glue, or wrap some floral tape around the stem where the tissue paper is to help hold it in place.
Step eight: To create a leaf, use another piece of pipe cleaner, place across your stem and twist it tightly around a few times to hold it in place. Bend each end back to the stem, creating a loop, and twist it to the stem to secure.
Step nine: Make more flowers! Try different cuts to achieve even more variations of flowers, use larger or smaller circles and create different size flowers! Give as a gift, use as a gift topper, make into pins, hair clips, or just place in a vase and enjoy!
Create your own chunky knit scarf or cowl with arm knitting! Use jumbo size yarn to create the chunky loose knit pictured or use larger weight yarn for a tighter knit look! You can also double up yarns and follow the same directions with two strands to give a fuller scarf look! If you’ve knitted before, your arms just replace the knitting needles!
What you need:
Jumbo 7 yarn, approx. 46 yards – I used Red Heart Grande/Jumbo 7
Your arms! – this is easiest with no long sleeves and no bracelets or watches on!
Scissors
Casting on: This will determine the width of your scarf – I cast on 8 stitches, which made my scarf around 8” in width – when not stretched or bunched (as the knit is very loose). Cast on more or less depending on the size of your yarn and the width you would like your scarf to be!
Step one: create a slip knot at the end of your yarn. Place your right arm inside the slip knot and pull tight. Make sure you leave a tail to your knot – around 6” or so to help tie off at the end!
Step two: Begin casting on stiches to your arm. I added 7 more stiches for a total of eight (the slip knot becomes one of the stiches). Keep your working yarn taut with your left hand, grab the working yarn with your right hand, twisting the yarn to make a loop (pictures 1 & 3 below). Continue with the same steps until you have the desired number of stiches!
Knitting right arm to left arm: We will be taking all the stiches cast onto your right arm and knitting them onto your left arm! The “working yarn” is the yarn coming from your skein.
Step three: Take the top loop on your right hand and carefully pull the working yarn through the loop. Place the new loop you’ve pulled through onto your left wrist, dropping the old loop. Pull the working yarn to tighten the loop on your left wrist.
Step four: Continue step three for each remaining stitch on your right hand.
Knitting left arm to right arm: Continue to knit from your left arm to your right arm!
Step five: Hold onto the working yarn firmly in your left hand. Pull the top loop over your left fist and drop. Open your left hand and place that loop onto your right wrist. Pull the working yarn to tighten the loop.
Step six: Continue with step five for all remaining stiches on your left arm.
Step seven: Continue knitting from your right to left arm, and left to right arm, until your scarf is the desired length – make sure to stop when you have at least 36-48″ of yarn remaining. I find it easier to end with the stiches on my right arm.
Casting off: Now to get your scarf off of your arm! The directions below will show as if you’ve ended on your right arm, however, can be completed in the same manor if you’ve ended on your left arm.
Step eight: Knit two of your stiches onto your left arm (following step three), take hold of the top loop in your left hand, pull the bottom loop on your left wrist over your fist and drop it. Open your left fist, keep this loop on your left wrist. Bring another stich from your right arm over to your left (as in step three) and repeat by holding the top loop in your left hand while you bring the bottom loop over your fist and dropping. Continue until you have one loop remaining on your left wrist.
Step nine: Finish off your last loop by bringing your last bit of working yarn through the loop and pulling tight (if you have a long piece remaining or still have some of your skein left, trim your yarn to leave a 14-18″ piece before pulling though).
Finishing your scarf: Weave in your tails or make your scarf into an infinity scarf/cowl by “sewing” your ends together with your tail pieces!
Create some fun little ornaments with simple supplies! Find the instructions below each of the three pictured!
Snowman ornament!
What you’ll need:
Mason Jar Lid (not the jar band)
Small piece of sandpaper
Piece of 1/4″ wired ribbon – approx. 12″
Two small pom-poms
Piece of ribbon/twine for hanging
Acrylic Craft Paint (White, red or pink, Orange)
Mod Podge
Scissors
Paint brush
Sharpie pen
Hot glue or craft glue
Step one: Scuff up the mason jar lid with your sandpaper to help the paint adhere better!
Step two: Paint your mason jar lid with white acrylic craft paint – let dry and apply a second layer if needed.
Step three: Once your white paint is dry, use the orange paint to make your snowman’s nose – I made a dot near the center of my lid and towards the edge, and then connected them to create the nose!
Step four: Use your pink paint or make pink by mixing a little red paint to white paint and give your snowman rosy cheeks!
Step five: Once your orange and pink are dry, apply a layer of mod podge sealer over the entire surface, let dry completely!
Step six: Use a sharpie pen to give your snowman eyes & a mouth – check out the pictures below for face ideas! Also outline your nose. Tip: leave a white spot in your snowman’s eye to give him a spark! Download some additional snowman face ideas and practice your own below!
Step seven: Hot glue a ribbon to the back of your lid for a hanger!
Step eight: Cut and glue a piece of your wired ribbon, from side to side of your lid, glue pom-poms on the ends to look like ear muffs! Use leftover ribbon to make a bow for your snowman if desired!
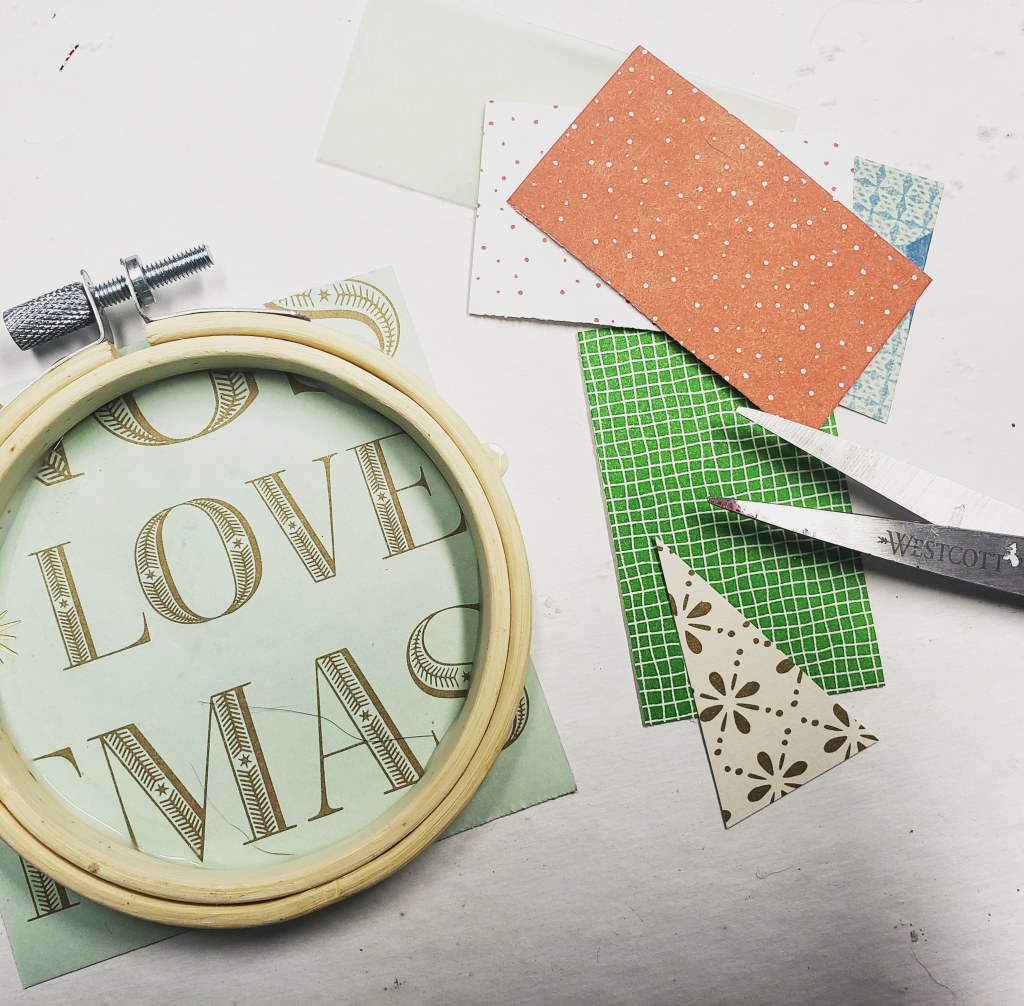
Tree Scene Ornament!
What you’ll need:
3” Embroidery Hoop
2 pieces of approx. 3”x3” decorative cardstock
Small pieces of decorative cardstock
Mini paper snowflakes
Piece of 8” burlap like ribbon
9 Small foam mounting squares
Sequins
Glue gun
Craft Glue
Glue Stick
Scissors
Colored Pencils
Additional items to decorate with, such as, stamps, glitter, ribbon, stickers, etc.
Step one: Cut a piece of cardstock large enough to glue to the back of your hoop – this will become the background to your tree scene, use craft glue to adhere it to your embroidery hoop.
Step two: Work on getting your trees ready while your hoop dries! Using smaller pieces of decorative papers, cut triangles for trees! Make different shapes and sizes for added interest!
Step three: Use colored pencils to shade the side/edges of your trees, giving them a border!
Step four: If your hoop glue is dry, cut the paper off around the edges, you can also use an x-acto knife.
Step five: Add your trees to the hoop! Glue some trees directly to the background paper and use the small mounting squares to adhere some trees, making them “pop” off of the surface – stack mounting squares to add more depth.
Step six: Add sequins as tree toppers and/or ornaments on your trees and add the paper snowflakes (I cut one of my snowflakes in half to use around the edge). Add any other desired decorations and glue the piece of burlap like ribbon to the back for hanging!
Wreath Ornament!
What you’ll need:
Mason Jar Lid Band
6 Pieces of green pipe cleaner
Piece of 12” ribbon/twine for hanging
Glue gun or craft glue
Items to decorate your wreath with – I used pieces of artificial greenery and berries. Some other ideas may include miniature ornaments, pom poms, ribbon, etc.
Step one: Wrap all 6 pieces of green pipe cleaner around your mason jar band!
Step two: Collect items to add to your wreath
Step three: Glue your items to your wreath!
Step four: Add a ribbon to hang your ornament!
Give as gifts, hang on your tree, or use as gift toppers! Have fun making your own!
Turn some of those beach treasures into a lovely trinket dish! These make great personalized gifts too!
What you need:
Clean shells – larger, smoother shells are easiest to start with!
Mod Podge – I used gloss
Paint brushes
Decorative tissue papers, or thin papers (like origami paper).
Scissors
Acrylic paints in desired colors
Metallic paints – I used Lumiere by Jacquard
Step one: Gather and clean your shells – ones that have larger, flat/smooth insides will be easiest to start with!
Step two: Find printed tissue papers, pieces of maps, origami papers, or any other thin paper to decoupage your shells with
Step three: If using tissue papers to decoupage your shell with, first paint the inside surface of your shell with acrylic paint. I used white, as my tissue paper was white with printed blue designs – this way the white parts of the tissue looks like it disappears in the back ground of my shell. You may need to apply more than one layer of paint to cover your shell with – if this is the case, let your paint dry between layers.
Step four: Cut your papers for your shells – if using tissue papers that match with the background of your shell, you don’t have to be too careful in cutting out the design precisely. If using papers that will completely cover the inside of your shell, cut it quite a bit larger than your shell!
Step five: If using tissue paper – Add Mod Podge to the inside of your shell and place your tissue paper on top
Step six: If using other papers – brush a layer of mod podge in your shell and on the back of your paper, then place in your shell
Step seven: Gently brush a layer of mod podge on top of your tissue paper or if you’re using paper follow the steps below!
Step eight: If using paper, vs. tissue paper, use your fingers to firmly press your paper into your shell…..start from the center of your shell and work out
Step nine: Use a firm brush to add a layer of mod podge on top of your paper – use the brush to help push and smooth out the paper on the shell surface! Just be careful not to tear your paper as it can become fragile!
Step ten: Let your mod podge dry and trim off any extra paper – you may also need to add in extra mod podge around the cut edges if you have some areas that are not quite stuck! Don’t worry if your cut edge is not perfect – as long as it’s glued down well, the cut edge will get covered with the metallic paints!
Step eleven: Use your metallic paints to create a painted outline on your shells!
Have fun creating these simple trinket dishes! You could also drill a hole and make them an ornament or add other elements in them like other shells, personal photos, sea glass, etc.!
This is a great way to use up any paper scraps you might have left over from some other art projects! Paper mosaics are easy and can be made simple or into more detailed pieces of art. A mosaic is simply a piece of art that has been put together using smaller pieces of tiles (usually, stone, ceramic, shell, glass), typically of different colors, placed closely together to create a larger image or design. Instead of the typical tile and grout we may think of for mosaics, this project uses pieces of colored paper arranged closely together!
What you need:
Scrap pieces of colored paper – You could also use magazines, junk mail, etc.
Glue stick
Scissors and/or paper cutter
Piece of card stock or thicker paper to complete your mosaic on (my piece is appox. 5″x7″) You could also make it into a greeting card!
Step one: Gather your scrap papers! You can either cut your paper into a lot of geometric shapes in various sizes, or plan out a design – cutting blocks of colors that will get cut smaller later.
Step two: Start to arrange your pieces of cut paper on your card stock. You want your pieces to fit together like a puzzle – leaving small even gaps of the card stock showing between your pieces. Flip, rotate, and trim pieces as needed!
If you’ve cut larger pieces for a pattern, you can start to cut and separate into smaller pieces. You can also draw an outline of a shape or object to fill in like in the video.
Step three: Get your cats to help you.
Step four: Once you have your pattern started you can begin to glue down pieces – remember to leave the gaps between your pieces! The better your pieces fit together the more even gaps you’ll create between them! Sometimes you might have to cut and add little tiny pieces to fill in gaps. This is what give us the mosaic effect!
Step five: Keep going until you have your entire pattern glued down!
Make some awesome artwork just with paper! You can turn your finished paper mosaics into greeting cards, framed art, or incorporate them into collage artworks or even create them on wooden boxes with mod-podge instead of glue sticks! 🙂
Bring on the summer vibes with this fun and easy painted flower pot!
What you need:
Terracotta flower pot – mine is approx. 6″
Krylon, indoor/outdoor, Gloss Clear Coat
Acrylic craft paints – I use Apple Barrel bran in Spring Green, Bright Red, & white.
Sharpie Marker
3/4″ Paint brush (or similar)
Step one: Paint the rim of your flower pot with green – also cover the rim on the inside portion of your flower pot too! (Note: if you’re re purposing an old flower pot make sure it’s scrubbed clean and dry!) It may require two coats of paint – in this case let your first layer dry completely before applying the second.
Step two: Mix together some red and white paint to create a dark pink color for your watermelon – add little bits of white to your red at a time until you get the color you’d like! Paint the whole bottom part of your flower pot with your pink color!
Step three: To add the light green stripes on the rim of your flower pot, mix a little white & green paint together. Once you have a light green, we want to use a “dry brush” technique for creating the stripes on your rim. This means that we don’t want a lot of paint on your brush and we want to see the texture of the brush stroke show up on your pot. To do this, wipe off most of the green paint from your brush and then paint your stripe! Remember we want to see the texture and create stripes that are all different!
Step four: Once your flower pot is completely dry, apply your clear coat. Let dry, and then using your Sharpie, draw your watermelon seeds!
Have fun creating this simple Summer project! Use your finished watermelon pot to hold pencils, start seedlings, as a cover for a plastic potted plant, to hold kitchen utensils, or just as a decoration!
Could you even fish for a better Dad? Make him a special Father’s Day card to let him know how Fin-tastic he is 🙂
What you need:
Card stock in the color you’d like for the outside of your card – 8.5″x11″, folded in half to make a 5.5″x8.5″ card
Card stock in the color you’d like for the inside of your card – 8″x10″, folded in half to make a 5″x8″ card
Watercolor paper – 8″x10″
Watercolor paint
Sea Salt (table salt can be used instead, however, the effect we’ll be creating will not be as dramatic)
A piece of a mesh onion bag (or any mesh bag you may get fruits of veggies in)
Tin Foil
Sharpies
Scissors
Paint Brushes
Pencil
Ruler
Glue stick & Craft Glue
MAKING THE WAVES:
Step one: Prepare your watercolor paints. I prefer watercolors from a tube and mix them with some water. I used cool colors – shades of blues, greens, & purples for my waves.
Step two: Cover your entire piece of watercolor paper with your paint – Work quickly to achieve a “wet on wet” technique where your colors will move and blend together while all your paint is wet!
Step three: While your paint is still wet sprinkle sea salt all over your paper! The salt creates a cool effect on your watercolor paint that gives us a unique look for your waves. Your paint still needs to be wet for the effect of the salt to work – the wet paint will pool around the pieces of salt, creating the textured effect! Adding too much salt can cause the effect not to show as well. If you only have table salt you will still get the effect just not as dramatic as the larger pieces of salt!
Step four: Let your paper dry completely – the salt effect works best if your paper dries naturally vs using a hair dryer to speed up the process (you can move onto one of the other card making sections for the time being). Once it’s dry, brush off the pieces of salt.
Step five: Cut your watercolor paper into stripes – you need one strip that measures 8″x 2″ and two strips that measure 8″x1.5″
Step six: On the back of your strips draw a wave pattern and cut out – you can use your first cut out wave to trace on your other strips or create a different pattern on each strip. I saved pieces of the wave I cut out to use a splashes of water later (you can also cut splashes out of your leftover watercolor paper).
MAKING THE CARD BASE:
Step one: Fold your card stock papers for the inside and outside of your card.
Step two: On the folded edge of your inside card stock, complete the measurements shown in the photo.
Step three: Cut on the lines shown in orange.
Step four: Open your card and fold in the sections cut in the last step – use your fingers on the back of your card to push the sections through. Fold the sections on your same center crease line, just in the opposite direction! Create new crease lines at the point you cut to. (The top image shows what your card should look like when it’s closed and the bottom image shows what it should look like open)
Step five: Fold your card back up and cut on the orange lines.
Step six: Open your card back up and fold in the sections you just cut – the same way you completed step four. You will have two sections to fold on each of your original sections or blocks. (The top image shows the cut lines before folding, the image on the right shows the folds, and the bottom image shows what your card should look like folded)
Step seven: Once you have cut and folded both sides your inside card is finished and should look like the photo!
MAKING THE FISH:
Step one: Gather your sharpies, tin foil and piece of mesh onion bag.
Step two: Tape your mesh to your work surface and then tape your tin foil on top.
Step three: Draw and color your fish on the tin foil with your sharpies – the mesh creates a scaly texture for your fish! My fish are not much larger than an inch.
Step four: Carefully cut out your fish!
PUTTING IT ALL TOGETHER!
Step one: Glue your fish to your wave pieces with a craft glue.
Step two: Glue each of your wave pieces onto the blocks you created.
Step three: Use a glue stick and add any splashes of water you’d like from your watercolor paper.
Step four: Close your card and using a glue stick, glue the inside card to your outside piece of card stock – your outside card is slightly larger so you’ll have a nice border around your inside piece!
Your card is complete! Decorate the front of your card and add a special message for your dad! Happy Father’s Day to all you Dads!
These have always been a student favorite! It’s like a magic art project – you draw on the shrink film, heat it up, and watch it shrink! Shrink film is so much fun, there’s really a lot of different ways you can create with it – it’s not just for kids!
What is it? Shrinky dinks are a type of plastic – polystyrene. Certain types of polystyrene are often used in food packaging and containers, it’s got the number 6 plastic code…..which also means if you have a take out container or some other type of plastic with the number 6 plastic code, you can make a shrinky dink out of it!
You can also buy Shrinky Dink sheets. I used the “Ruff n’ Ready” sheets. They’re my favorite, with one side that has a sanded surface, which, takes mediums really well! However, you can re-create this with recycled plastics too – just use some sandpaper to scratch up your plastic!
Shrinky dinks shrink about 1/3 their original size when heated – I use a small craft oven; a toaster oven, kitchen oven, or heat gun, can also be used! When they shrink, the colors on your artwork become more condensed, making them darker. I typically use colored pencils or markers on the shrink film. I’ve also use chalk pastels and pens. You can cut shapes out of the shrink film before you shrink it, as well as punch holes in it for key chains, etc.
For this project I’m making a key chain but check out some other ideas of things you can create at the bottom of the post! I’ll also be drawing my own design but as this shrink film is transparent you can also trace a page from a coloring book, magazine or book!
What you need:
Shrink Film, or #6 Plastic
Scissors
Hole Punch
Colored pencils or Markers & a Sharpie pen
Pencil
Paper
Key Chain – unless you plan to make something else!
Step one: Cut your shrink film to the desired size – keep in mind it shrinks to about 1/3 it’s original size! Trace your piece of shrink film on a sheet of paper.
Step two: Draw your design on your sheet of paper with a pencil – once you’re happy with your design trace it onto your shrink film with a sharpie pen. You can tape your shrink film to your paper to help keep it from moving!
Step three: Color in your shrink film design – I used colored pencils but you can use markers or pens as well!
Step four: Once your design is colored, punch a hold in your shrink film, using a hole punch, so you can turn it into a key chain later!
Step five: You can also cut out around your design if desired!
Step six: Bake your shrink film! 325* F for just a couple minuets – You’ll notice it crinkles up and then will flatten back out as a much smaller and thicker piece of plastic.
Let your shrink film cool for a few minuets. It’s fun to see how much it shrinks compared to your original drawing!
As it shrinks your colors also become more condensed, so they appear darker!
Step seven: Add your key chain pieces to your shrink film!
Trace a coloring book page instead of drawing your own design
Besides a key chain you could also turn your Shrinky Dinks into zipper pulls, magnets, pins, hair clips, jewelry, mini artworks, or anything else you can think of! I use the Shrinky Dink “Ruff n’ Ready” variety but they also offer several other types that you can use for different techniques!
Send me your Shrinky Dink creations to add to the Followers Gallery!


