Check out some of our current projects happening in the art room and how they’re made!
Happy Holidays! Check out some of what we’ve been up to below!
Students had fun creating a gingerbread ornament from polymer clay or painting on slate for our final project of the year!
Fun at the Westside Community Center Annual Christmas Dinner Making crafts and playing games!
Students finished up working on their line drawings this month, focusing on line & form, pen techniques and watercolor! They’ve been working on creating forms and incorporating line and pen techniques to create shading! Their final step is to add watercolor in a fun way!
Each month I will be spotlighting one of my students – past or present, and their artistic ventures! I work with students of all ages and abilities and you’ll get to learn a little bit about these amazing artists and their work!
Our September spotlight is on:
Caden Pavese
Hello, my name is Caden Pavese and I am 13 years old. I am home schooled and in 8th grade. I have been taking art classes with Ms. Jenell since 2nd grade. I began taking classes because I enjoy it and both of my older siblings were attending classes too. Two of my favorite art mediums to use are pencil and acrylics. Some of my other interests include: woodworking, hiking, camping, Boy Scouts and VEX robotics.
“Sunrise Through The Arch”, Mixed Media
How long does it take you to complete your artwork? “It depends on what I am doing, but if I am drawing it usually takes me a few hours.”
“Nature”, Watercolor on Plaster Cast
Besides visual arts are you into any other art forms? “Yes, I like creating stop motion movies with Lego’s, woodworking and wood burning.”
“Snowy Owl”, Pastels
Do you have a favorite color? “My favorite color is dark green or blue.”
“Trash Into Treasure”, Mixed Media
Is there a certain style, or type of art that you would like to someday try? “One style of art I would like to try is charcoal drawing.”
“Geometric Bear”, Watercolor
How has your artwork improved/ what have you done to keep improving as an artist? “I like to watch video tutorials on YouTube because watching people draw helps me to learn new technique.”
Do you have any advice for someone who wants to become an artist and/or improve their skills? “I think practicing daily is a key aspect to help you to become a good artist.”
Caden takes his time and puts forth determination, effort, and thought, into all of his artwork! He’s excited to utilize new techniques and mediums to achieve the goals he sets out to reach within each piece of art he creates. It’s this focus and willingness to learn that will allow Caden to continue to grow and improve as an artist!
Create unique and decorative designs out of paper! Paper quilling involves nothing more than rolling strips of paper and utilizing these rolls by forming different shapes, designs, and patterns. It’s a simple process that can create, what looks like, complex pieces of art! Create a snowflake, mandala, or starburst with this method!
What you need:
Paper Quilling Needle/Tool
Quilling Paper – 5mm wide and 21″ long
Craft Glue
Wax Paper
Scissors
Tweezers
Pattern (download below – Print as a full 8.5×11″ sheet)
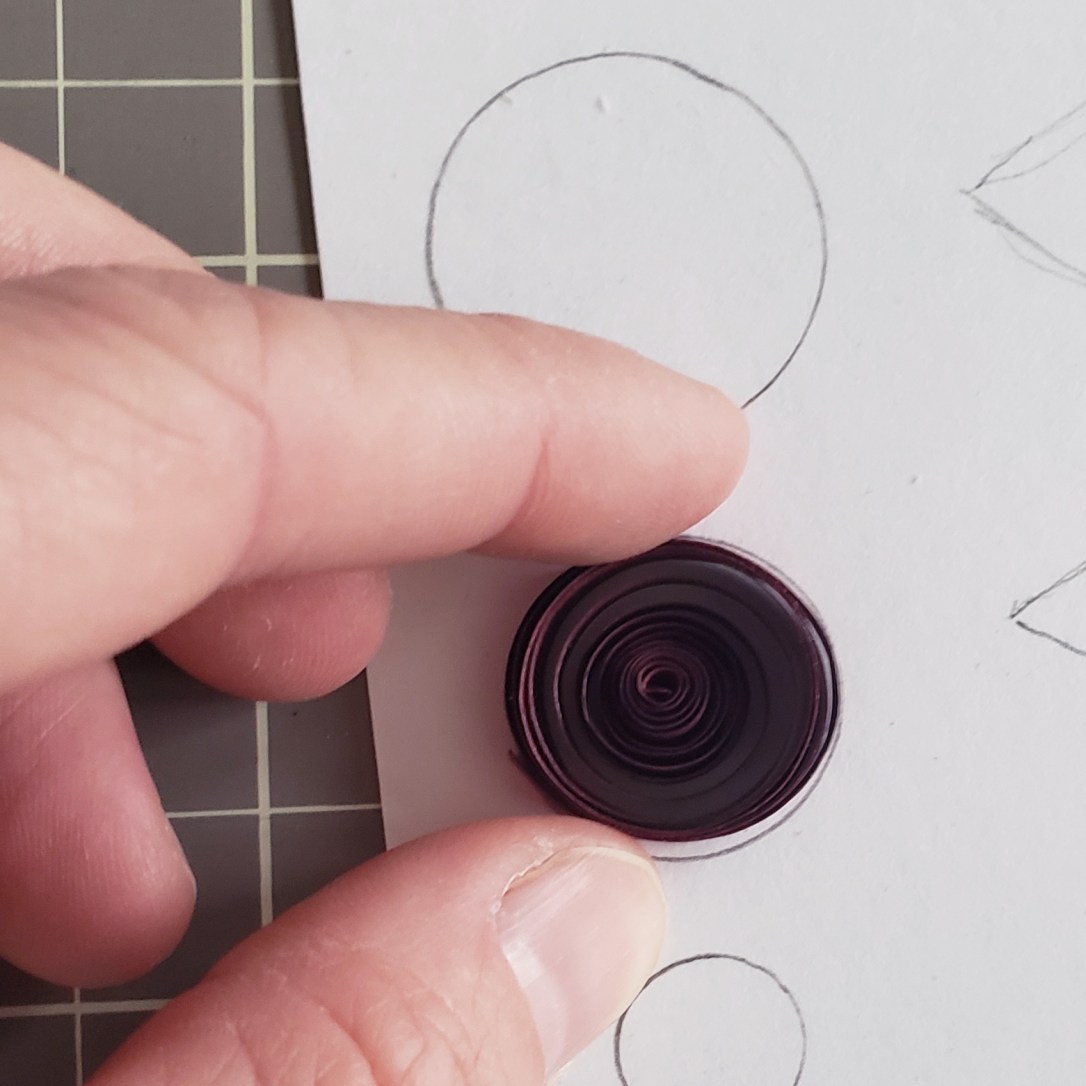
Step One: We will be starting with the inside of your snowflake. Take a strip of your quilling paper in the desired color and begin to coil it with your quilling needle by inserting the end of your paper strip in the slot located at the top of your needle. Then carefully begin to rotate the needle, wrapping your paper around it, to form a coil!
Step Two: Carefully grasp and remove your coil from the needle, being sure to not let it uncoil too much! Take your coil and set it on the top circle of the pattern. Let your coil loosen up slowly until it reaches the size of the circle on the paper. If your coil gets too big, tighten it up by pulling the end, and coiling it back around with your fingers. Once your coil is the correct size add a very small amount of glue to hold the end in place, use tweezers to help pinch the end in place!
Step Three: Now we’re going to shape your coil into a tear drop shape by pinching one side to a point. We want your tear drop to fit the outline next to the top circle on your pattern. Repeat steps 1 through 3, five more times, so you have a total of 6 tear drop shapes (shown in the last picture).
Step Four: Choose another color to create the next shape of the snowflake pattern. Coil your strip and make it the size of the center circle on the pattern, glue the end in place. Next, form your coil into an almond shape by pinching each side of the circle – making your shape line up with the almond shape on the pattern next to the center circle. Repeat 5 more times so you have a total of 6!
Step Five: Choose another color for the last shape of your snowflake pattern. This time cut your paper strip in half before making your coil – these shapes are a little smaller! Create a coil the size of the last circle on the pattern and glue the end in place. Make this into a tear drop shape that matches the smallest tear drop shape on the pattern. Repeat 11 more times for a total of 12!
Step Six: Now that we have all your pieces made it’s time to glue it all together! Place a piece of wax paper over the snowflake pattern and line your pieces up on top – it’s okay if your pieces don’t fit the pattern exactly (you can see in the second photo how mine doesn’t fit perfectly). Starting with the center of your snowflake, begin gluing your pieces together, adding a little bit of glue to the sides of your shapes that will be touching. Line up your pieces carefully and use tweezers to hold the shapes together until the glue holds!
Step Seven: Continue to glue your pieces together and building your snowflake on the wax paper, lining up the pieces on the pattern as best you can. Don’t worry if any glue gets on the wax paper – your snowflake can be easily removed from the waxed paper once the glue is dry!
Step Eight: Let your glue dry completely – at least a couple of hours or longer depending on how much glue you used. Carefully remove the wax paper from your snowflake – if you have any pieces that don’t feel stable or come apart, add more glue and use tweezers to hold in place. You can leave your snowflake as is, or add another coil at the top to add a ribbon to!
Create your own snowflake designs or make changes to the given one! You can add coils on top of your snowflake or make your snowflake larger by adding more to the outside. You can also add gems, sequence, or glitter to your finished snowflake! Hang them in your windows, on your wall, give as gifts, or use as decorations on boxes or frames!
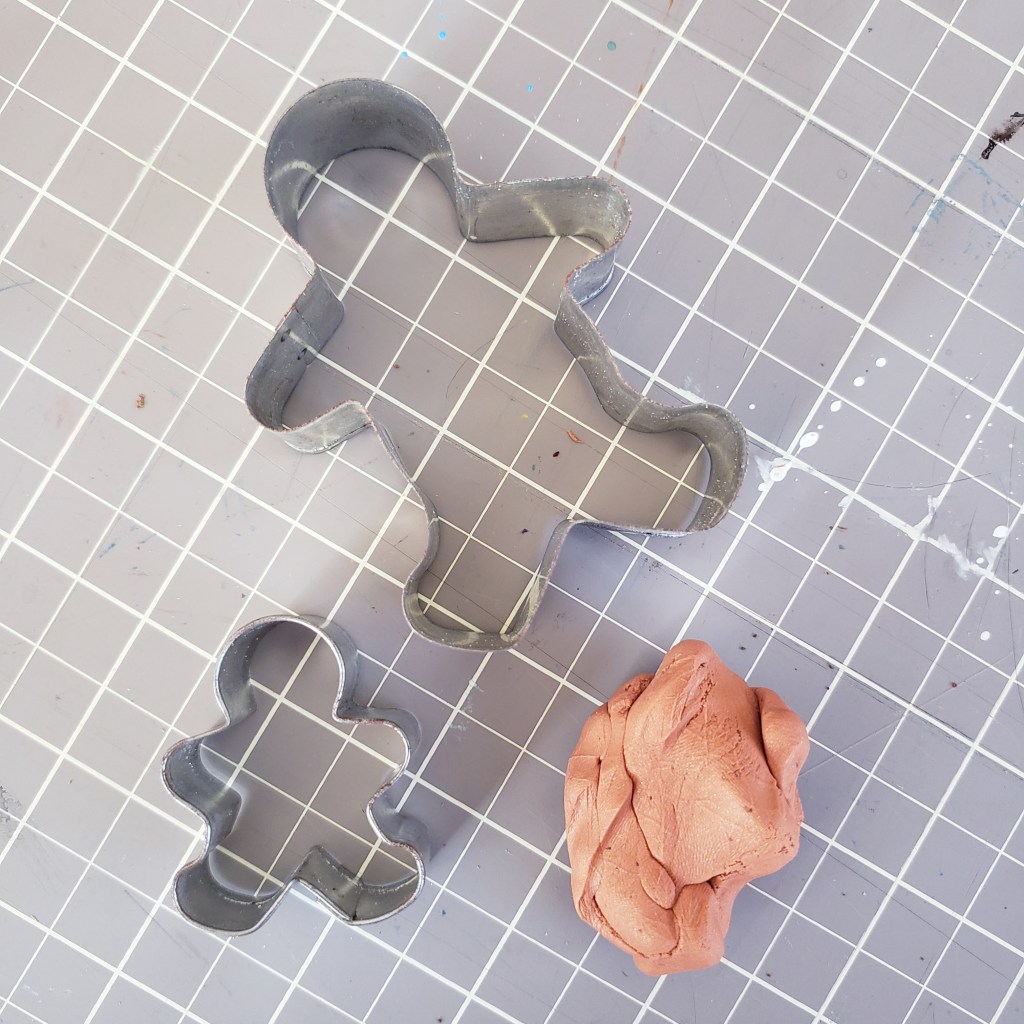
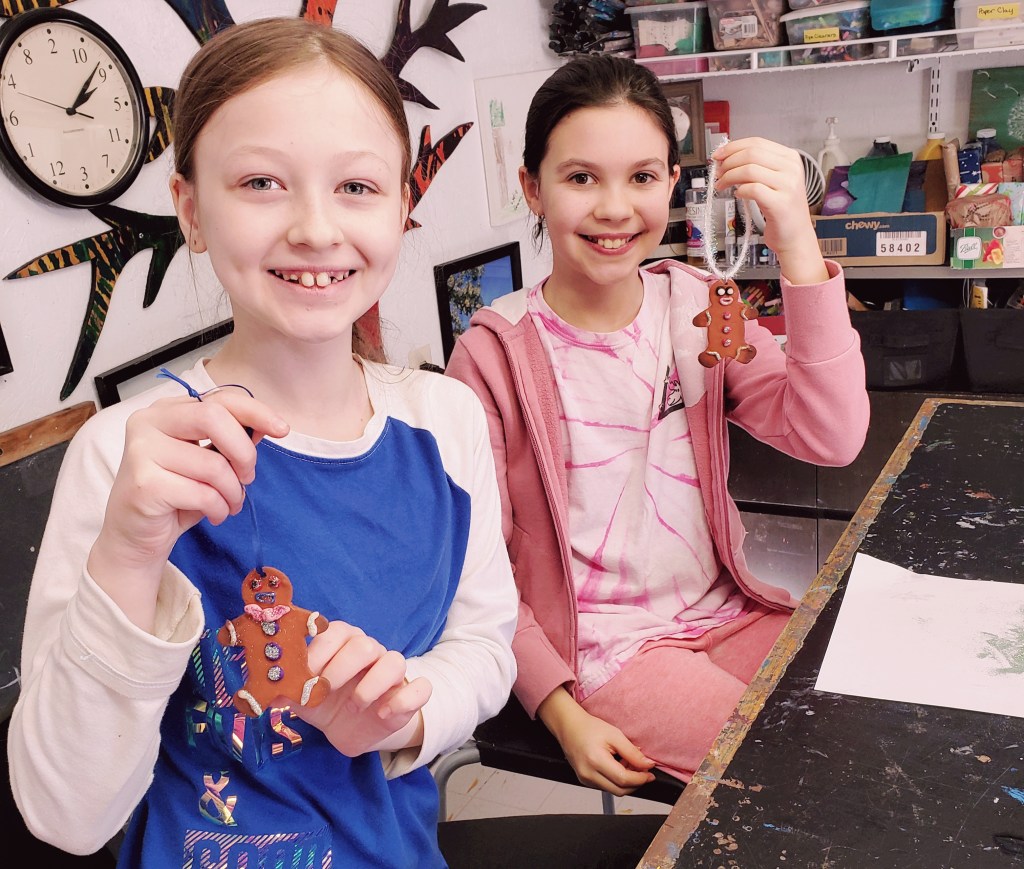
Create these fun little gingerbread people to adorn your tree, give as gifts, or use as name tags & gift toppers! Made with polymer clay, bake your gingerbread to last!
What you need:
Polymer Clay in desired colors (I used Terracotta for my gingerbread)
Liquid Sculpey – I use translucent
Chalk Pastels – dark brown, to give your gingerbread a toasty look!
Elmers glue
Glitter
Ribbon
Clay tools – roller, toothpick, etc.
Small black seed beads for eyes (or use clay instead)
Cookie Cutters – any shape, instead of people you could make stars, ornaments, etc.!
Small paint brushes
Step one: Gather your supplies and work your clay to soften it! I’m using a craft mat to protect my surface and create my gingerbread on – you can also use parchment or wax papers.
Step two: Roll your clay out to approx. 1/8″ – 1/4″ thick.
Step three: Use your cookie cutters to cut out gingerbread people!
Step four: Scribble your chalk pastel on some scrap paper and grab a soft paint brush!
Step five: Rub your paint brush onto the scribbled pastel to pick up the “dust”. Lightly brush pastel dust on to your clay to add a “just toasted” look to your gingerbread cookie! Concentrate on adding more around the edges of your cut-out.
Step six: Now your cookie is ready to decorate! Make sure the pastel dust is off of your work surface and fingers before moving on! Use liquid sculpey as a glue for any of your decorations – I used a toothpick to apply my liquid sculpey!
Step seven: Continue to add your decorations to your cookie, using liquid sculpey to securely hold everything in place! Create bows, ties, hats, scarfs, mittens, boots, clothing, hearts, etc.!
Step eight: If you’re using seed beads as eyes, apply some liquid sculpey and press the beads into place!
Step nine: Use a toothpick or skewer to make a hole in your cookie for hanging or to add a ribbon (make sure your hole is large enough for the ribbon you plan to use).
Step ten: Once you have all your clay elements complete, it’s time to bake your gingerbread! Bake for 5-15min. @275*F depending on size and thickness (check your packaging for directions).
Step eleven: Once your gingerbread has cooled off use a small brush to apply Elmers glue to any areas you want to add glitter!
Step twelve: Add your glitter and knock off any access, add your ribbon and your gingerbread is ready to go!
Have fun and get creative with your gingerbread cookie ornaments! Check out other Holiday projects your can do here!
Check out some of our current projects happening in the art room and how they’re made!
Happy Thanksgiving! Check out some of what we’ve been up to below!
Students finished up work on their awesome landscapes and we were able to see all their finished artwork on display at a local restaurant! They completed their layered landscapes in acrylic and oil pastels to achieve these awesome pieces! Everyone did such a great job on these and they look awesome on display!
Wreath making at the Greenwood DE Library this month was a lot of fun!
Students are starting new projects this month, focusing on line & form, pen techniques and watercolor! They’ve been working on creating forms and incorporating line and pen techniques to create shading! Their final step is to add watercolor in a fun way!
Each month I will be spotlighting one of my students – past or present, and their artistic ventures! I work with students of all ages and abilities and you’ll get to learn a little bit about these amazing artists and their work!
Our September spotlight is on:
Elana Pavese
Hi my name is Elana, I’m 10 years old and in the 5th grade. I like playing outside, being with friends, gymnastics, camping and Legos!
“Sunset Mountains”, Mixed Media
Why did you begin to take art lessons/how did you become interested in art? “I started liking art because you can express your feelings in a way besides telling them.”
What are your favorite mediums and/or subjects for your artwork? “Painting & coloring.”
“The Walk Of The Elephant”, Watercolors
What is your favorite thing you’ve ever created and why? “My geometric shape elephant because it has all my favorite colors and is my favorite animal.”
Do you have a favorite color? “Bubble gum pink & Lavender purple.”
“A Day in Nature”, Metal Tooling
What or who inspires you to create your artwork? “My art teacher Miss Jenell, her artwork is really inspiring!”
Is there a certain style, or type, of art that you’d like to try someday? “Origami – I just love the way the shapes come out in different things.”
“Sports”, Paper Mache
How has your artwork improved/what have you done to keep improving as an artist? “Keep practicing and the art homework helps me.”
Is there an aspect of art that you don’t like and why? “It’s really messy and sometimes it doesn’t come out the way you want it.”
Do you have any advice for someone who wants to become an artist or improve their skill? “Keep practicing to get better.”
Elana is careful in her artwork, taking her time and coming up with ideas before executing them! She puts a lot of thought into her work but is open to make changes or adjustments if needed! Elana is also very dedicated to accomplish what she sets out to do and continues to work on a piece until she’s happy with it! Keep up the great work Elana!
Each month I will be spotlighting one of my students – past or present, and their artistic ventures! I work with students of all ages and abilities and you’ll get to learn a little bit about these amazing artists and their work!
Our October spotlight is on:
Gage Smartnick
“I’m Gage and I’m 15 and in 9th grade at James M Bennett High School. I like swimming and I swim on the YMCA swim team, running, playing on the computer, and art classes. I was adopted from China and have 3 brothers and 1 sister.”
“This is a paint by number on canvas. It took me a long time to finish.”
How long have you been taking art lessons? “8 years”
Why did you begin to take art lessons/how did you become interested in art? “To get more creative.”
What’s your favorite thing about art? “I like seeing the finished product from all my hard work. “
This is my favorite art work and I won an award for it at the Ward Museum.
What are your favorite mediums and/or subjects for your artwork? “I like painting landscapes the most.”
When you’re making your art do like to listen to music or watch tv for inspiration (if so what)? “I like it to be quiet when I work on my art. At home, I usually paint in my room because it’s away from all the noise.”
What is your favorite thing you’ve ever created and why? “The picture of Marty, my sister’s dog, that I painted her for her birthday.”
Do you have a favorite color? ” My favorite color when I was younger was green, but now I like blue.”
“One of my walls full of my art.”
What or who inspires you to create your artwork? “Ms. Jenell”
Is there anything else about you that you’d like us to know? “I’m an uncle already.”
Do you have any advice for someone who wants to become an artist or improve their skills? “Follow your dreams and never give up.”
Gage always has a positive outlook on his art – even when his work isn’t quite going the way he’d like! Instead of getting frustrated and giving up, he takes his time and carefully continues to work on the piece until he’s able to reach his artistic goals! His perseverance and determination is inspiring! Keep on creating Gage!
Check out some of our current projects happening in the art room and how they’re made!
This past month flew by! Check out some of what we’ve been up to below!
Students continued to work on their awesome landscapes all month, learning what a landscape is, and created dimensional & depth filled paintings, incorporating the use of horizon lines, perspective, background, middle ground, & foreground. Older students were asked to include several layers and work with more details on the structure/design as well as include light and shadow with their painting and coloring. Students were also inspired by the Fauvism style of art which makes use of bright, bold, expressive colors! They completed their layered landscapes in acrylic and oil pastels to achieve these awesome pieces! They are doing a great job planning, designing, cutting, painting & shading, to execute their layered landscapes! We’re excited to hang and display these pieces at a local restaurant next month!
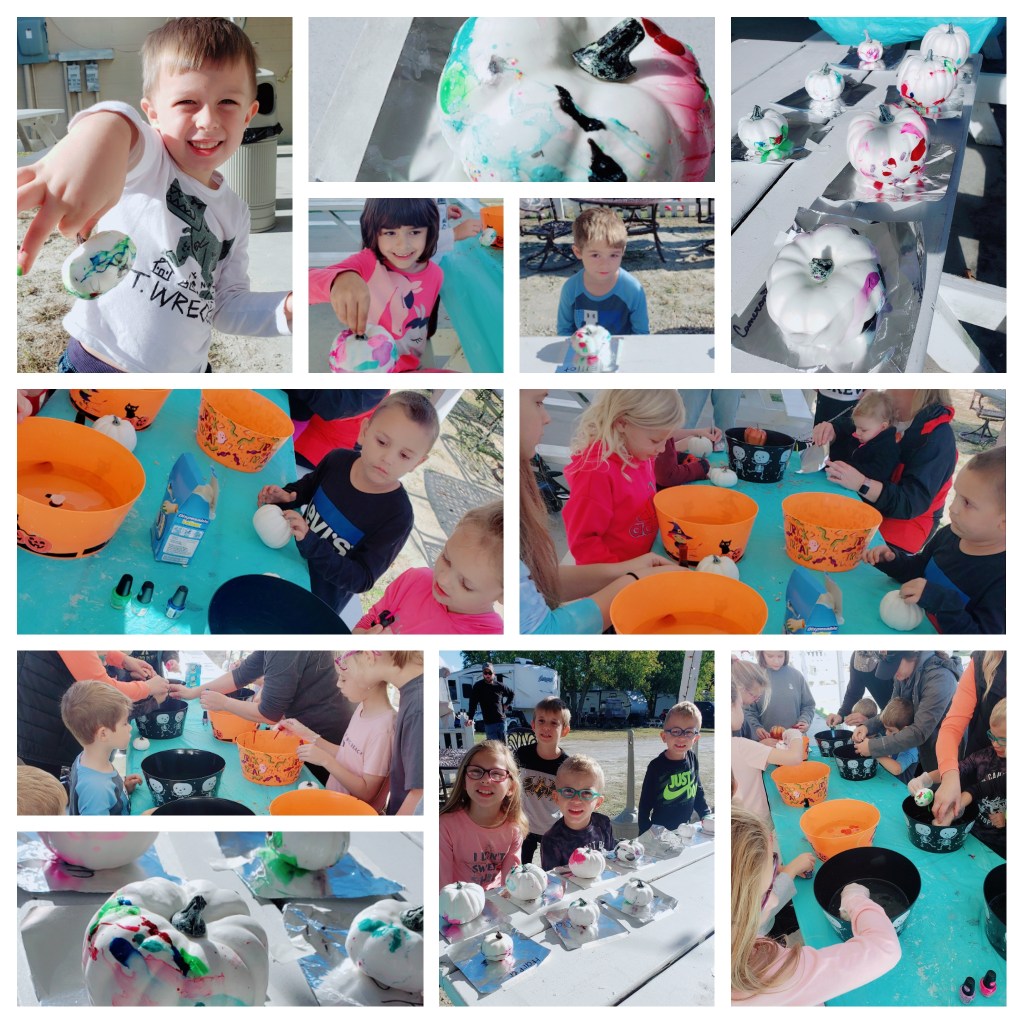
Some more fun projects at Roaring Point for kids crafts with October being the last month of crafts for the season! Check out the marbled pumpkin DIY here!
Check out these projects you can do at home! And if you’re interested in upcoming classes check out the new session of art here!
Check out some of our current projects happening in the art room and how they’re made!
Lots of fun things have been going on the month of September!
We began a new session of classes in the Art Room! We were also able to work with M4Reactor, a local makers space, and hold a session of classes there as well! Our first project of the session is to create some awesome landscape art that will get to be displayed at a local restaurant. These 3-D landscape paintings are going to be awesome!
We’ve been enjoying the cooler weather at Roaring Point Campground this month and getting into some fun crafts too!
It’s also been a fun month of Paint Alongs at Greenwood Library, Roaring Point Campground & with the Art League of OC! Check out upcoming paint alongs here or take a look at the example paintings and schedule your own!
Check out these projects you can do at home! And if you’re interested in upcoming classes check out the new session of art here!
Each month I will be spotlighting one of my students – past or present, and their artistic ventures! I work with students of all ages and abilities and you’ll get to learn a little bit about these amazing artists and their work!
Our September spotlight is on:
Caroline Nielson
My name is Caroline Nielson. I am 5 years old and am in Kindergarten. I have been taking art lessons with Miss Jenell for 4 months. I began taking art lessons because I really like making art. Miss Jenell inspires me to do art because she is really good at it. I like using acrylic paint for my artwork and drawing pretty things like hearts and flowers. I also enjoy reading and playing with my little brother.
Title: The Pretty Petal Medium: Paint I used pink to paint the petals because it’s my favorite color.
What’s your favorite thing about art? “My favorite thing about art is drawing and coloring.”
Besides visual arts are you into any other art forms? “I take ballet lessons because I like dancing. I feel happy when I dance.”
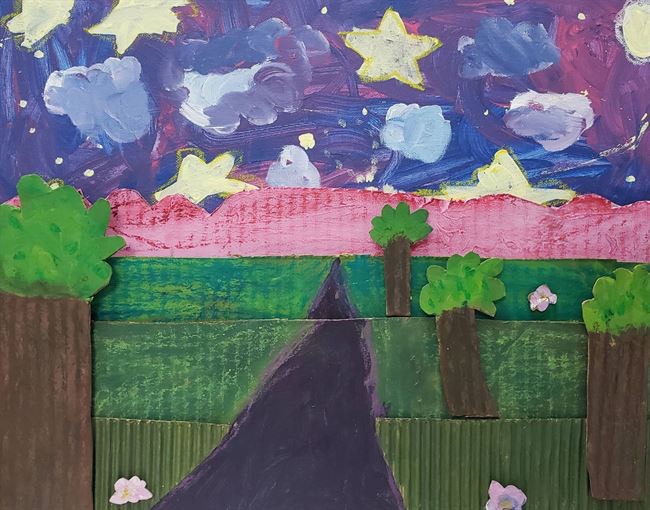
Title: Moonlight Road, Medium: Paint
This is a painting of a road leading to a magical land in the mountains. I like the colors I used in this painting.
What is your favorite thing you’ve ever created and why? “My favorite thing I’ve ever created is my painting, “Moonlight Road.” It is my favorite because I like to paint.”
Do you have a favorite color? “My favorite color is pink because it’s bright and pretty.”
Title: Flower the Cat Medium: Pencil, Crayon This picture makes me feel happy because I like drawing pink hearts.
How has your artwork improved/what have you done to keep improving as an artist? “I’ve been taking art lessons with Miss Jenell every week. We color, draw, and paint a lot and that helps me get better.”
Caroline comes full of smiles and ready to create some art every week! She is eager to learn new art mediums and techniques and puts in a lot of concentration and focus to become better! She always has fun and is imaginative in her work as well! Keep up all the good work Caroline!


