Check out some of our current projects happening in the art room and how they’re made!
This past month I’ve been able to hold some classes back at other locations! It’s been fun to get to have some in person classes going again!
Monthly classes have been working on ceramic pieces using hand-building techniques. They’ve created unique fun pencil holders and personal creations! In the monthly paint, draw, sculpt classes, students have also created distressed wooden signs! Join us next month for a new session of monthly ceramics and paint, draw, sculpt classes – check out the classes page!
Students finished up and created many different things this past month – two point perspective, pastels drawing, acrylic painting landscapes, artistic playing cards & polymer clay creations!
Students have been busy the past few weeks working on creating collages inspired by children’s author and illustrator, Eric Carle. Students chose an animal as their collage subject, then drew the animal out. Using crayons, watered down acrylic paints, and stamps, they painted sheets of rice paper – incorporating several colors, textures and methods into each piece. Students then use their drawn animal as a template for cutting out their colorful papers and apply their cut-outs to their final paper. Finally students incorporate smaller details and design elements to their collage with crayons and/or pens. Can’t wait until they are all done – these have been looking awesome!
Each month I will be spotlighting one of my students – past or present, and their artistic ventures! I work with students of all ages and abilities and you’ll get to learn a little bit about these amazing artists and their work!
Our April spotlight is on:
Caden Gleason
My name is Caden and I am in the 2nd grade. I have been taking art lessons since I was 5 years old. I am now seven years old! I wanted to take art lessons because my sister took them. I love spending time in the art room with Miss Jenell, my sister, and other friends I meet in class! We enjoy telling jokes and being silly while making art (Mom: “Sorry, Miss Jenell!”) I like learning about the birth of our country. I draw lots of pictures with pencils of the Colonists and the Redcoats. My favorite thing I have made was a paper mâché crab with Mrs. Jenell. My favorite style of art is music. I often create new songs on my piano. When I make art projects, I usually use blue because it is my favorite color. I think what makes a good piece of art is its beauty. I like beautiful art pieces. One day I would like to try mixing different colors of paint on top of different things like balloons, furniture, or even trees. I look forward to my next art class! I love learning from Miss Jenell!
“Crabby Army”, Paper Mache
“Young Pumpkin”, Acrylic Paint
“The Light Tree”, String & Nails
“The Hot Cup”, Markers, Water Color
Caden is fearless when it comes to trying out new mediums and techniques in art – happily learning new methods and bringing creative ideas to the table! He always goes about his art with a positive and happy attitude, which shows through in his playful artwork! Keep on creating Caden!
Polymer Clay – I used white, however, any lighter color will work with the coloring techniques we will utilize. You’ll need approx. half an ounce of clay to make one mushroom (depending on how small or large you make it!), most blocks of polymer come in one ounce blocks.
Chalk Pastels – in the colors you would like to add to your mushroom
Jumbo paper clip
Paintbrush
Scrap paper
Tin foil
Wire – 18 gauge or similar
Pliers for cutting & twisting the wire
Toothpick
Step one: Gather all your supplies and knead your polymer clay so it’s soft! Cut a piece of wire approx. 2-3″ long.
Step two: Wrap your piece of wire around the end of your paper clip – make sure it’s the end of the paper clip shown in the photo (as the other end will become the part of your bookmark)! Twist your wire tightly around the paper clip, like in a twist tie fashion, this is easiest with a pair of pliers.
Step three: Divide your one ounce piece of clay into 4 pieces (or if you have 1/2 an ounce divide it into 2 pieces). Use one of your 4 pieces to form the stalk of your mushroom, pushing the wire and top part of the paper clip into your clay (if needed, you can trim your wire down so it’s not taller than the stalk!). Secure your stalk to the paper clip by making sure the clay is tight around the paperclip where it was pushed in – I used my toothpick to help with this!
Step four: Use another one of your 3 remaining pieces of clay to form the cap of your mushroom (or if starting with 1/2 an ounce, your remaining piece). Roll it into a ball and slightly flatten it – we don’t want it too thin, it should still hold it’s shape and not be floppy when picked up, not much thinner than a 1/4″.
Step five: Use the back of your paint brush, or eraser end of a pencil, to make an indent in the center of your flatten ball – this will become the underside of your mushroom cap.
Step six: With the toothpick, score the clay from the center indent made in the last step, to the outside edge, in a radial fashion.
Step seven: Now you have your cap and stalk!
Step eight: Attach the cap to your stalk with the toothpick – placing your stalk in the indent created by your pencil end or paintbrush. Blend in the stalk clay and cap clay to help secure the two pieces together. You may need to touch up your cap texture after this step! Flip your mushroom right side up and make any needed adjustments to the cap shape!
Step nine: Scribble your pastels on a scrap piece of paper to create pastel dust!
Step ten: Use your paint brush to pick up some of the pastel dust and gently brush it on to the top of your mushroom cap!
Step eleven: I brushed a layer of my lighter color pastel over the entire cap and a layer of my darker color around the edges of my cap! Once your have your cap colored to your liking, bake your mushroom at 275*F for approx. 10-15 min. (check the package directions on the clay you have compared to your mushroom thickness). I use a piece of tin foil crunched up to make a cradle for my mushroom cap as it bakes so the cam doesn’t get flattened. Let your mushroom cool and enjoy your one of a kind bookmark! Use your leftover clay to create another!
Variations: Instead of making this a bookmark, use the same steps above only use a jumbo toothpick instead of a paper clip, making your mushroom great for fairy gardens, table top gardens, or decorations for flower pots! If your paper clip is large enough to support the weight of your mushroom, you could definitely use it in a fairy garden, etc. too! Try making more than one mushroom on the same paperclip – just add more than one piece of wire to your paper clip! Use extra clay to give your mushroom dimensional spots on it’s cap before baking!
Let me know if you’ve given this project a try and check out other projects here!
Check out some of our current projects happening in the art room and how they’re made!
This month I was able to hold classes at Westside Community Center in Bivalve MD! We enjoyed painting wine glasses and weaving baskets (and will enjoy painting next weekend!). It was great to be able to have classes at another location again and we have some new classes scheduled for April – check them out here!
Monthly classes have been working on ceramic pieces using hand-building techniques. They’ve created unique tea pots and are now working on fun pencil holders! In the monthly paint, draw, sculpt classes, students are working on sculptures inspired by artist Alberto Giacometti. They were asked to create a tall, lean figure depicting and action or movement with wire & tin foil armatures covered with paper mache!
Students worked to create their own playing cards the past month as well – designing an image that was of personal interest to them! It was also fun to learn about the history of playing cards and the artwork they include!
This month we also will be holding Creative Science “Inking it up” and have created future creative science lessons; Creative Science is a partner program between Brad Hartle, 4-H STEM educator with UMES and myself. We’ve worked together to create fun & engaging lessons that involve art and science for youth! Our Paint by Science lessons are intended to educate youth on specific subjects while painting these subjects along on canvas, helping to immerse the student on the topic! Our Art Exploration lessons, designed to engage youth in hands on activities in both art and science, with experiments, arts & crafts, and combined projects! All of our new lessons are intended for youth 8+ and each lesson comes with a supply kit that ships to you! Classes are held via zoom, registration closes one week prior to the start date of the class! Please contact me if you have any questions or interested in joining us! Check out the link below to see all of our upcoming lessons!
Check out upcoming Creative science programs here! Use the coupon code “EARLYBIRD” to receive 10% off through March 25th!
Additionally we’ve worked on various art projects this month, including landscapes that incorporate, background, middle-ground & foreground, light & shadow and charcoal water droplets! Tux also enjoys helping everyone out with their art projects!
Each month I will be spotlighting one of my students – past or present, and their artistic ventures! I work with students of all ages and abilities and you’ll get to learn a little bit about these amazing artists and their work!
Our March spotlight is on:
Peyton Lindsey
I have been taking art for three years. I started taking art because I love drawing and painting. I wanted to become a better artist and learn about the different mediums. My friends and family inspire me mostly, A lot of the artwork I do is my friend’s pets. the person who gives me the most inspiration is my mom; she always gives me great ideas of what I should draw or paint next. I love drawing and working with acrylics. Those two are my favorite but I do like working with clay too. My artwork has improved drastically since I started taking art class. I went from that looks kind of like a person to that looks exactly like a person. Miss Jenell has helped me out a lot she is an amazing teacher. She is extremely helpful!
Besides art, what other activities do you enjoy? “I love riding horses and dancing, but I mostly love riding It always makes me feel more in control of life right then since right now we cannot control how life goes right now. Dancing also helps with that same thing because you are in control of your movement and it just feels amazing.”
“Back Braking” This is a pencil drawing. I did it last year! This is one of my favorite drawings that I did because this person is a strong dancer. It is hard to balance like that for too long, so it takes a lot of strength.
Have you ever entered your artwork into a contest or show? “Yes, I have entered four pieces into the Ward Museums Art Show. I have entered two pottery pieces and the tentacle, and an inspiration from isolation glass painting.”
“Twisting Tentacle” This is a copper sheet embossing, it is made from an aluminum copper sheet. I did this for the ward museum, It was a lot of small details to get it right. It was hard not pressing to hard, so you did not go through the sheet. I loved making the tentacle. I found it to be a lot of fun and interesting on how easy it bent. I found it even more amazing when we aged it to make it look old.
How long does it take you complete your art? “It takes me anywhere from one day to one month to complete a drawing or painting just depends on how big and how detailed it is.”
“Daisy” This is an acrylic painting of my dog that I did two years ago. It was extremely hard because I know what she looks like and that is something that always gets me when I am doing painting, I got it eventually and it turned out to look like her.
“Light house dream” This is a rubber stamp of a light house that I did in class last year. This was hard but fun to make since you could not cut too deep or you would go through the rubber.
Are there any mediums or styles of art that you’d like to try? “One day I would like to try sculpting, I do not want to do anything big just something small and somewhat easy!”
“Yummy Spaghetti” This is a fork with spaghetti and meatball made from polymer clay. It is a food bookmark! This was fun to make and what is even more fun is that when I got home, I used it to prank my brother! He thought that I had ruined his new sweatshirt! It was so funny!
Payton’s fearlessness to try new mediums and techniques, along with her positive attitude, allows her easy-going, fun loving, personality to shine through in all of her works of art! She is persistent, working to get a piece to her liking and open to trying new techniques along the way! Her pieces are inspiring and sure to bring a smile to your face!
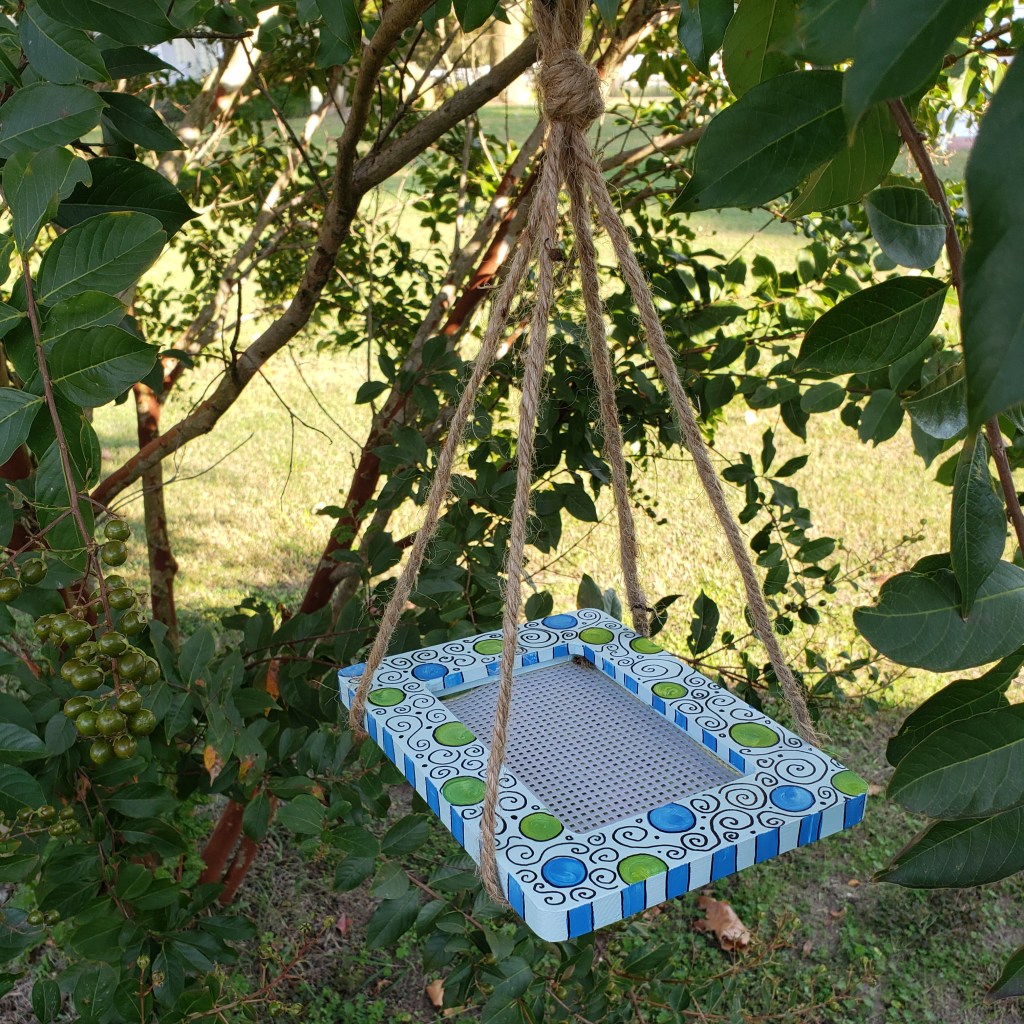
Make a little bird feeder for your yard! Paint, decorate, and design your own to give as a gift or keep for yourself! This cute little platform feeder is a simple and fun project!
What you need:
Wooden craft picture frame – mine is approx. 8″x6″ with a 4″x6″ opening
Acrylic craft paints in desired colors
Paint brushes
Sharpie
Krylon clear gloss outdoor spray sealer
Flat thumb tacks – Use stainless steel ones for longer lasting outdoor results
Plastic mesh cut to the opening size of your frame (I used needle point plastic but you could also use aluminum gutter shield, or plastic food mesh – if you have some with small enough gaps to hold birdseed!
Twine, rope, chain, leather, or any similar material suitable to use outdoors – I used approx. 6′ of jute, cut into two, 3′ pieces
Hammer
PAINTING YOUR FRAME:
Step one: Paint both sides and all edges of your frame one color.
Step two: Let your first layer of paint dry (use a hairdryer to speed up the dry time) and apply a second layer of paint if needed!
Step three: Add some designs and patterns with your other colors – I did dots and stripes! Let your paint dry completely before moving on!
Step four: Apply the outdoor sealer – do this outside on a protected work surface. Apply the sealer to both sides and edges of your frame – letting it dry completely before flipping your frame.
Step five: Once your sealer is completely dry use a sharpie to outline and add details to your painted design. I decided to cover most of my painted area with additional doodles!
ASSEMBLING YOUR FEEDER:
Step one: If using jute, twine, or rope, line up your two 3′ pieces and fold in half, creating a loop as shown in the first photo. Make sure the ends of your rope are even. Gathering all four strands of rope, tie a knot towards the top – leaving a loop, shown in the second picture.
Step two: Attach your rope and mesh to the frame with a thumb tack. Sandwich the ends of your rope between the mesh and the frame. Use a hammer to make sure your tack is firmly pressed into your wooden frame.
Step three: Continue to add all 4 pieces of your rope to the frame in the same manor! Make sure the knot and strands of rope are not twisted or tangled before attaching!
Step four: Add extra thumb tacks to your mesh to keep it securely in place!
Step five: Hang and fill your platform bird feeder!
Where to hang your feeder: Depending on where you place your feeder will determine what types of birds you attract (along with feeder type & seed). Attract the most birds by offering a range of feeders & food placed in various locations! Most feeders do best in a quiet, semi-sheltered area, or near shrubs & trees so birds can rest and hide from predators. Make sure you also have a good viewing point of your feeder from inside! Placing your platform feeder closer to the ground will attract ground-feeding birds such as, Juncos, doves, sparrows, & blackbirds. Placing your feeder up higher will attract birds such as, sparrows, finches, & titmice!
What to put in your feeder: Different foods can attract different birds to your feeder – some types of birds are picky and only eat certain things while others will eat most anything you put out! I like to use black oil sunflower seeds or a seed mix. You can also try foods such as, peanuts (raw kernels only) and other nuts as well as coconuts (fresh, cut open), stale breads, cakes, & cookies (no chocolate). Fruits such as apples, oranges, grapes, & bananas. With foods that you put out, make sure to keep your feeder clean- and pick-up uneaten foods that could attract rodents, insects and other pests as well as create mold & bacteria growth.
Feeder care: Feeders can become messy quick! Platform feeders can hold trampled food and droppings, and should be regularly cleaned out. A little soapy water and rinse should be sufficient. Re-coat your feeder with a clear coat each season to help keep it in shape (clean and dry your frame before re-coating).
Making more feeders: If you had fun with this project, and want to make more, here are some various ideas for supplies!
The frame in this kit is a small wooden craft frame, you could also re-purpose old picture frames in the same manor! Outdoor spray paint is a quick and easy way to cover old frames!
I used needle point plastic in this kit for the mesh to hold seed, you could also use aluminum gutter shield, plastic food mesh, or window screen material. Just be sure your mesh material has small enough gaps to hold seed!
The included hanging material is jute – eventually this will get weathered down, as an alternative, you could use twine, rope, chain, leather, or any similar material suitable to use outdoors.
The included thumb tacks are stainless steel – this helps with the longevity of them being out in the weather! Depending on the frame being used, nails, screws, & staples could be utilized instead of tacks!
BONUS PROJECT: Make a winter treat for your birds! What you’ll need: Pinecones, String or Wire, Peanutbutter (or Crisco), & Birdseed. Gather your pinecones and tie a string or piece of wire tightly to the top of your pinecone! Next completely cover your pinecone with peanutbutter or crisco – pushing it into all the gaps & spaces on your pinecone. (Note* if your pinecones are not open, let them set inside for a day or so or place them in your oven on 200*F for 20 min or so to speed up the process). Roll your covered pinecone in birdseed and hang up!
Like this project? It was from one of our Creative Science lessons – a partner program between Brad Hartle, 4-H STEM educator with UMES and myself! We work together to create fun & engaging lessons that involve art and science for youth! Check out other projects to do at home and upcoming creative science lessons here!
Each month I will be spotlighting one of my students – past or present, and their artistic ventures! I work with students of all ages and abilities and you’ll get to learn a little bit about these amazing artists and their work!
Our February spotlight is on:
Calli Gleason
My name is Calli and I am in the 4th grade. I love cats! I enjoy all things cats: books, pictures, creating stories, and drawing them! My favorite type of cat is the Siamese cat (They really like to chatter!). Cats give me lots of inspiration to create art.
I could draw all day long. I have learned a lot of drawing tips and tricks from taking classes with Miss Jenell. I am very thankful she is helping me get better at drawing. I have been taking art class with her since I was four years old. I am now 9 years old! My mom signed me up to take an art class with Miss Jenell and I have loved it ever since.
My favorite way to create art is to draw a picture with pencil then color it in with paint or crayon. Some other forms of art I enjoy are singing, playing piano, and theater. I can express my feelings through art. Bob Ross did an excellent job painting with feelings. Happy trees! One day I would like to try painting with a chisel to make mountains like he did. My favorite thing about art is when artists create a painting that looks real. Mary Blaire is my favorite artist because she created a lot of Disney characters. I like how she boldly mixed different colors together.
“Cat Catastrophe” Mixed Medium: Pictures, paint
“Birds Eye” Water Color
“Solar System” Paint
“Snowy Alley” Water color
Calli has an excellent imagination and puts it to good use in her artwork, creating stories and scenes that are full of life! Her artwork reflects her happy personality and is sure to put a smile on the viewers face! The fearlessness she has in trying new mediums and styles, while continuing to develop her own unique style, will continue to help her grow as an artist! Keep up all the good work Calli!
Check out some of our current projects happening in the art room and how they’re made!
Students worked on special pieces for a youth art show at the Ward Museum this month. The theme for the show is “Inspiration from Isolation”. We utilized picture frames to become a “window frame” and students created reverse glass paintings to show what was out, or in, their window, with an emphasis on how their view (or the viewers) may have been changed or inspired this past year. The show is open to students on the Delmarva peninsula in Pre-K through 12th, for more info visit: https://www.wardmuseum.org/learn-explore/education/student-art-show/
So far this month we also had fun holding virtual Creative Science, Feed the Birds & Let’s Upcycle! Students learned all about different types of bird beaks, made their own bird feeder and learned about a trash timeline and created an up-cycled piece of art in the style of Louise Nevelson from found objects! We have more Creative Science lessons coming up – visit the link for more details! https://www.eventbrite.com/o/in-the-art-room-30616503746
Cut paper snowflakes are a fun easy project that you can create so many variations with and they make excellent winter decorations! In nature most snowflakes are 6 sided, many times when we make paper snowflakes, we create 4 or 8 sided snowflakes – below you will find instructions for folding 6 pointed, 8 pointed and 12 pointed! Once you get the hang of these folds and where to draw your design you will have some amazing paper snowflakes! These can also make a great lesson to incorporate symmetry, angles, fractals, & kirigami into!
What you need:
Paper – I just prefer to use plain white copy paper but any thin paper will do. You can even create colorful snowflakes!
Scissors – Because we’ll be cutting through several layers of paper at once, be sure you have a sharp pair! If you plan to do a lot of smaller details on your snowflake, small sewing scissors can come in handy!
X-Acto Knives – These are optional to be used in place of the scissors or to make cuts that are not along the edge of your folded snowflake.
Pencil for drawing designs out if desired!
MAKING YOUR PAPER SQUARE:
If you’re starting with plain copy paper, the first thing to do is make your paper square – we will need to start with a square piece of paper for any of the snowflakes below!
Step one: Fold the bottom corner of your paper up, and to the opposite side, until you’ve created a point at the bottom of your paper.
This is what it looks like unfolded….
Step two: Cut off the single layer of paper that you see.
Step three: Open your paper back up – square!
You can make your squares any size! Try using the piece of paper you cut off of your rectangle to make a smaller square (and smaller snowflake!).
6 SIDED SNOWFLAKE: This method of folding gives your snowflake 6 points/sides just like a snowflake found in nature! This is also the easiest method listed to cut as there’s less layers of paper to cut through!
Step one: Start with a square piece of paper, leave it folded. (Or fold a square piece of paper from corner to corner)
Step two: Find the center of the bottom of your triangle (shown in the next photo) – do this by folding corner, along the bottom edge, and “pinch” your paper in the center. This way you don’t create a crease line all the way to the point of your paper!
Step three: Make sure you have your paper opened back up after “pinching” the middle point of your paper!
Step four: We will be folding the corners of your paper up on the two lines shown in the picture – you can use a protractor for this, marking the crease lines at 60-degrees.
Step five: Fold the right flap up on the 60-degree mark shown in step four.
Step six: Flip your whole paper over, keeping the point towards you.
Step seven: Fold the right flap up on your other 60-degree mark – the two sides of your paper should all be even.
Step eight: Cut the top triangles off of your paper, making the top layers of paper all even.
Step nine: Draw out your design; I like to have my design go all the way, or almost all of the way, to the top corners, and dip low between them. Then I draw shapes & designs on the edges of my triangle, these shapes start and stop on the same edge of my paper – this keeps my snowflake whole!
Step ten: Cut out your design – it’s easiest to start by cutting your little designs first and then your larger areas.
You can also use the extra paper you cut to create a square and make mini snowflakes!
8 SIDED SNOWFLAKE: This method gives your a couple more points than the first!
Step one: Start with a square piece of paper.
Step two: Fold in half, edge to edge.
Step three: Fold in half again, to create a square.
Step four: Check the edges of your square – point the corner that has all open flaps of paper away from you, and the corner that is the center of your paper (or no flaps of paper) pointed towards you!
Step five: Fold the square in half, right point to left point (keeping the open ends at the top and center towards you).
Step six: Draw out your design!
Step seven: Cut out your smaller details first…..
Step eight: Cut out your larger area & carefully unfold!
12 SIDED SNOWFLAKE: This is my favorite snowflake fold – because it’s 12 layers it can be harder to cut but it makes the snowflakes look more intricate and delicate!
Step one: Start with a square piece of paper!
Step two: Fold your paper in half, from corner, to corner.
Step three: Fold your paper in half again, with your folded edge from the last step on the bottom.
Step four: This next step can be tricky until you’ve done it a few times! We will be folding your paper into 3rds, shown on the fold lines your can see in the photo above. You can use a protractor to do this (dividing it into 3rds, each at a 30-degree angle) or just eyeball it and fold & unfold, until you get it right in the next steps! The more exact you line up and fold your paper, the better your cuts and snowflake will come out, so take your time on getting things lined up!
Step four: With the point of your paper facing you, fold the left side of your paper over on your first 30-degree mark or the first line seen in the picture on step three.
Step five: Flip your whole paper over, keeping the point towards you.
Step six: Fold the left side of your paper over to line up with the right edge, and the other 30-degree mark on your paper.
Step seven: Now you have your papers folded, cut the top triangle pieces off, so that all of your paper layers are even at the top.
Step eight: Draw your designs on your snowflakes! Keep your designs on the edges of your triangles, being sure not to cut all the way from one edge to the other.
Step nine: Cut your snowflake out on your lines! Carefully use an Xacto knife for small cuts if needed! Open your snowflake gently!
Your finished snowflakes can be used to decorate your windows – they look awesome from both inside and out, especially when it’s dark outside! I use a glue stick to attach my snowflakes to the window. You could also use double sided tape or hand them from a string!
You can make smaller or larger snowflakes with the same folds as above – just start out with smaller or larger squares of paper! The snowflakes above that have the objects and scenes incorporated into them are large, approx. 20″ – 24″ wide! They also have cuts that were created “inside” the folded triangle, not along the edge, I had to use a hole punch and my xacto knives to remove these cuts! Keep in mind when you create objects on your snowflakes anything drawn along the edges is just half of a shape, when opened it will become whole!
Use your paper snowflakes for other art projects too – like this mixed media encaustic piece! Paper snowflakes have been layered with different color waxes, pearl powders, & other papers to create a unique collage! I also cut some snowflakes from old book paper, tracing paper and vellum, to create different effects! You could also make a snowflake garland, use as gift topper/decorations, or on greeting cards!
Make this project? I’d love to see some photos! Check out other projects to complete at home here!
Check out some of our current projects happening in the art room and how they’re made!
Classes are back in session this month after taking a break for the Holidays!
The first project students are working on this session is for a youth art show at the Ward Museum. The show is open to students on the Delmarva peninsula in Pre-K through 12th. The theme this year is “Inspiration from Isolation”. Check back next month to see all their awesome pieces of artwork!
Last session students worked on more painted panels that are hung during the winter months at the Tyaskin Wharf. These are the newest panels on display at the wharf! The panels are a collaborative effort between students of all ages! Panels will eventually go up for auction and money raised will be donated to the Tyaskin Wharf.
This month is also the start to virtual Creative Science lessons! A partner program with UMES, where youth will learn about a science topic and create a piece of art related to it! You can register here!
Prepping for grab & go kits and creating instructions as well as making example projects for upcoming classes and posts have been in full swing this January!
Check out upcoming classes here & projects you can complete at home here!