Art, Happenings, Make, Create, & Share!, student artwork

Student Spotlight! (November 2020)

Each month I will be spotlighting one of my students – past or present, and their artistic ventures! I work with students of all ages and abilities and you’ll get to learn a little bit about these amazing artists and their work!

Our May spotlight is on:

Sonny St.Pierre

My name is Sonny St. Pierre and I am 15. I am going into 11th grade. I have been enthralled with all things paleontology and marine biology since I can remember. I love to write, and I am currently working on my second revision of my first novel. Art has been an outward form of expressing my inner self since I lost my first goldfish at 5 years old. When I’m not exploring Biology or writing, I enjoy bodysurfing, hunting and fossil collecting.

How long have you been taking art lessons and why did you begin taking art lessons or become interested in art? “I have been taking art lessons for 9-10 years. I love art and I’m glad my mom signed me up when I was so little.”

What or who inspires you to create your artwork? “I am inspired by Biology and my imagination. I often use my imagination to tweak what would typically be found in nature into something new.”

What are your favorite mediums and/ or subjects for your artwork? “My favorite medium is pen or pencil. I love to draw dinosaurs and beasts.”

Is there anything else about you that you’d like us to know? “I have a snowflake moray eel named Edgar. I enjoy keeping my saltwater tank and plan to get an octopus someday.”

When you’re making your art do like to listen to music or watch tv for inspiration (if so what)? “I enjoy listening to music when I draw. It helps me focus, but I can’t really say it’s for inspiration.”

What is your favorite color? “Blue- it’s been my favorite my whole life.”

How has your artwork improved/what have you done to keep improving as an artist? “My drawing has improved as I practice it in my downtime. I keep a notebook and draw in it often.”

Do you plan to have a career in the arts? “I do. I am interested in architecture and graphic design.”

Is there a certain style, or type, of art that you’d like to someday try? “I’d like to try 3-D modeling and sculpting.”

“Dunkleosteus”, Charcoal

“Crypoclidus”, Charcoal

“Prehistoric Monster of the Cretaceous Deep”, Acrylic paint & resin

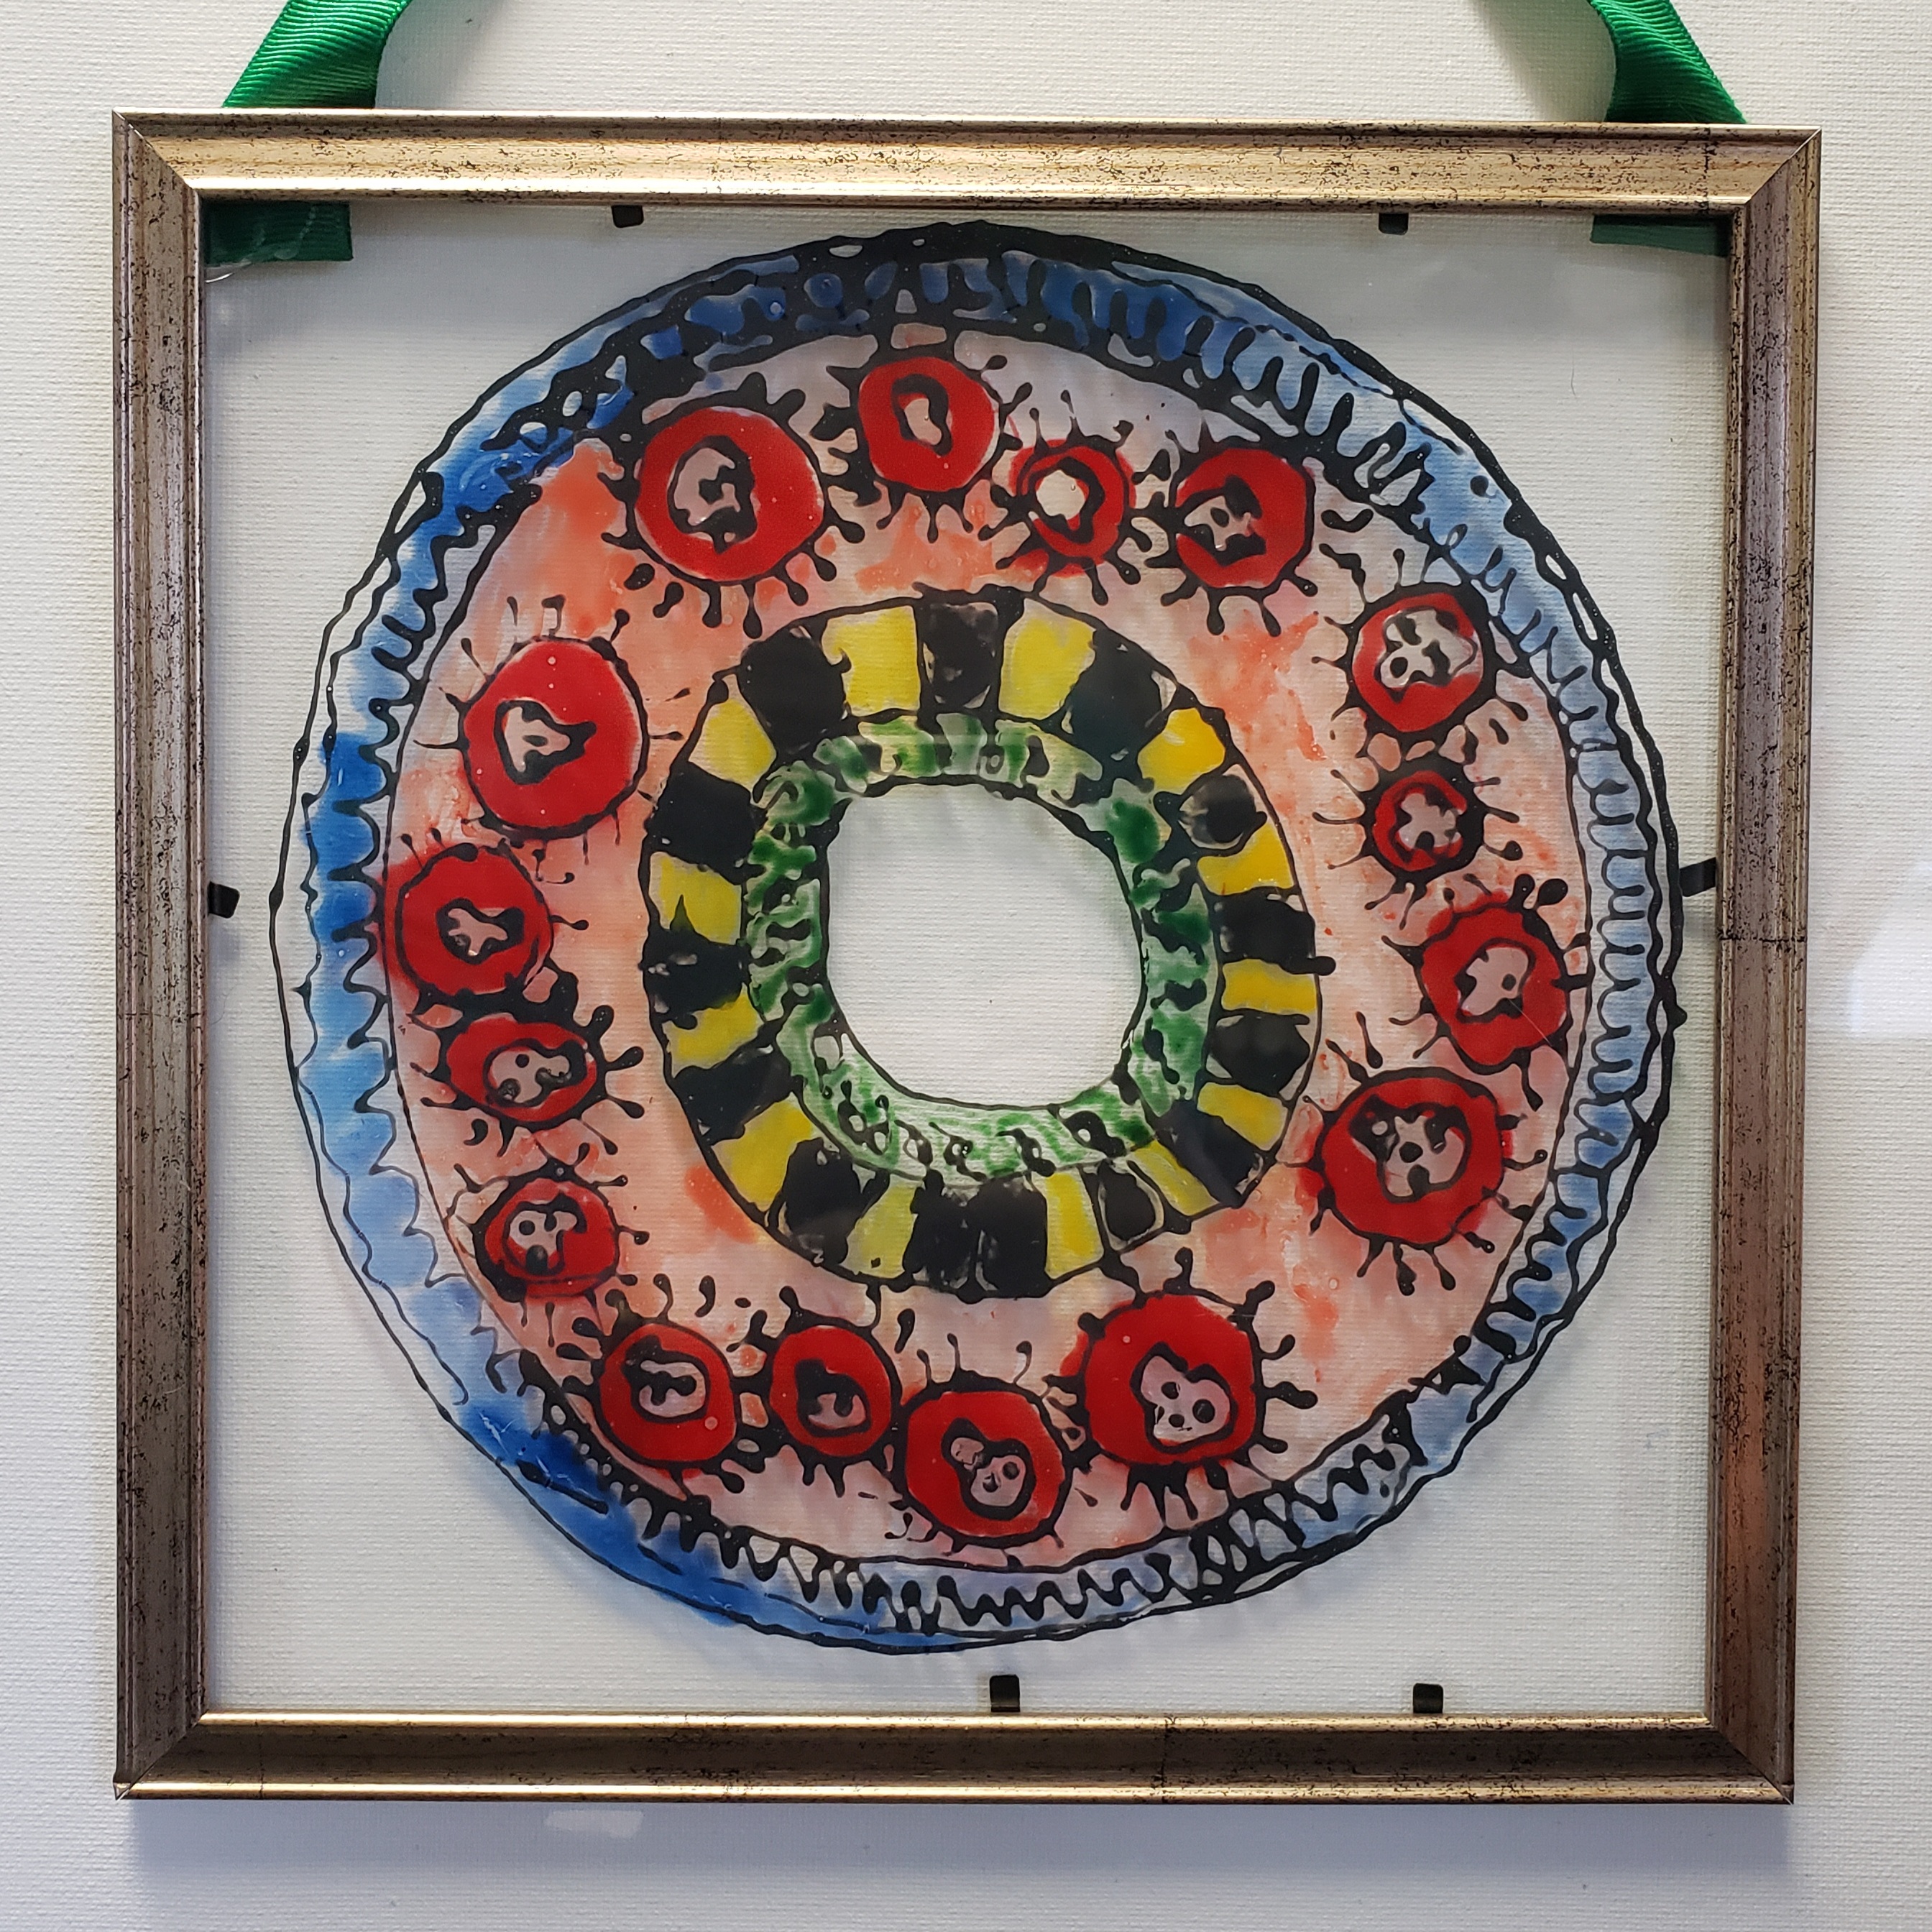
“This piece is my favorite I have ever made. I made it when I was much younger. It is an aquatic reptilian tetrapod of Phylum Chordata, Class Reptila, Order Squmata, Family Mosasauridea, Tribe Mosasaurini, and Genus Mosasaurus. In short, it was a prehistoric marine reptile. I entered it into an art show and won second. I brought it home and hung it in my room. Three years ago, we had a house fire and I feared this piece was ruined by the smoke. After a lot of care, treatment and fresh air, it hangs, once again in my room.”

Sonny is always creative in his artwork and brings a bit of science to his pieces! He has a lot of passion for the elements & subjects of his work – it’s inspiring! He’s not afraid to try new mediums, techniques, or add his own twist, making his work unique and one of a kind. Keep on creating and bringing those ideas to life!

Art, Art activities, Happenings, Make, Create, & Share!, student artwork

What’s up in the Art Room? (November)

Check out some of our current projects happening in the art room and how they’re made!

Painted Panels! Students work on collaboratively painting panels which will be displayed at the Tyaskin Wharf. Finished panels that have been displayed are donated/auctioned off to raise money for the wharf! Over the past few years students have created more than 20 painted panels!

Alcohol Ink & Line Drawing! Students used alcohol inks on polypropylene to create the colorful & beautiful abstract “blooms” and used white chalk markers to create line drawings on top!

Ceramic Letters & Numbers! Students are in the process of creating a wall hanging with ceramic lettering and numbers! Pieces are in the process of being glazed & fired before being attached to wooden boards for a finished hanging piece!

What’s in Your Cup? Students have been working on drawing and shading cylinders, turning them into a custom designed cup of their favorite drink! We used mixed media for these awesome pieces!

Art, Art activities, Craft, DIY, Make, Create, & Share!, student artwork

Radial Designs on Glass!

Create a radial design or Mandala, with glass paints, for an awesome piece of window art! Mandalas are a type of radial design – where your design radiates and repeats from a center point. Mandala comes from the Sanskrit word meaning “circle”. Mandalas can be found in many cultures and can have different symbolic meanings and processes. In Buddhist and Hindu traditions, mandalas are a spiritual symbol that represent the universe. More modern mandalas are used for meditation or just to create and enjoy beautiful designs!

What you need:

  • Picture Frame with Glass – we used 8″x10″ frames from the dollar store but any old frame will do!
  • Glass Paints – We used Gallery Glass, Martha Stewart and Arti’stick, brands, transparent, glossy, glass paints.
  • Copy/Printer Paper – that’s at least the same size of your glass/frame.
  • Pencil
  • Compass
  • Sharpie
  • Light box or sunny window!

Step one: Create your radial design! We did this with a square piece of paper, folded into fourths, from corner to corner. You can do this any size, however, ours were approx. 8.5″x8.5″ to fit our frames.

Cut out one fourth of your paper on your crease lines.

Step two: Draw your design on your cut 1/4 of paper – to make your design have a complete circle pattern, use a compass from the center of your paper out.

Step three: Fold another square piece of paper into fourths, corner to corner. We will be tracing your design onto these four sections. You can use a light box or a sunny window to help your design show through your paper – you can also go over your design with a marker before tracing to help make it more visible. Trace your first 1/4 section and then flip your triangle pattern over and trace your next 1/4 section (this will reverse your design and make the edges of your design line up). Flip it again for your next section and back over for your last section!

Step four: Next line up your radial design under your piece of glass and begin outlining your design – We used Gallery Glass Liquid Lead for this (I’ve also transferred the outliner to a small applicator bottle for easier handling and a smaller line). Let your outline dry!

Step five: While you’re waiting for your outline to dry, you can color your triangle in how you’d like to color your glass!

Step six: Once your outline is dry, use your glass paints to fill in the design with color! We used a mixture of different glass paint brands!

No matter what brand you use, you just want to make sure it’s transparent color as we want these to hang in a window and create a stained glass effect!

Step seven: Once your color has dried, place your glass back in the frame (you can use hot glue, silicone, E6000 or Goop Glue, etc. to help hold your glass in if needed), glue a ribbon to your frame or add eye hooks and a chain/ribbon for hanging! Our frames were very light weight so a hot glued ribbon worked well! Hang up your finished artwork in a sunny window! 🙂

Check out more of our radial designs here!

Art, Art activities, Drawing, Happenings, Make, Create, & Share!, student artwork

What’s up in the Art Room? (October)

Check out some of our current projects happening in the art room and how they’re made!

Check out lasts months post for more info on some of the projects below!

Radial Mandala designs on glass! Students finished up working on their radial mandala designs – so many cool pieces! Check out last months post for more info on this project and keep an eye out for a DIY on this project to be posted soon!

What’s in your cup? Students worked on how to draw cylinders and shade them in. Next they will create a drawing of their cup, decorating it with patterns and designs, filling it with a favorite drink! This project will be created with mixed media!

Impossible Shapes! Impossible shapes are a type of optical illusion – they can be drawn, however, could never exist in 3D form. Students practiced drawing an impossible Penrose triangle, and impossible square, before choosing which one they would like to paint. They also completed a color wheel and choose a color harmony to utilize in their painting.

Acrylic Pumpkin Paintings! Students worked on drawing spheres and turning them into pumpkins. They included light and shadow, completing value scales and working on shading. They drew their pumpkins and mixed their own colors to create shades of orange for their final pumpkin paintings!

Art, Happenings, Make, Create, & Share!, student artwork

Student Spotlight! (October 2020)

Each month I will be spotlighting one of my students – past or present, and their artistic ventures! I work with students of all ages and abilities and you’ll get to learn a little bit about these amazing artists and their work!

Our October spotlight is on:

Matt St.Pierre

My name is Matthew St. Pierre and I am 13 years old. I am going into 8th grade. I enjoy playing fortnite, taking care of my backyard chickens, flying drones, and collecting coins. I also enjoy swimming in the ocean and on swim team, fencing and playing with my golden retriever, Molly.

How long have you been taking art lessons and why did you begin taking art lessons or become interested in art? “I started taking art lessons for school and enjoyed going with my brother and friends. I have been taking art lessons for about 8 years.”

What or who inspires you to create your artwork? “I usually draw from things I have seen. My own experiences and memories inspire me.”

What are your favorite mediums and/ or subjects for your artwork? “My favorite medium is pencil, but I really don’t have a favorite subject. I just like to create whatever comes to mind.”

Is there anything else about you that you’d like us to know? “I have a freshwater tank with a goldfish named Doofus. I am looking forward to adding a freshwater puffer fish who will be named Poofles.”

What is your favorite thing about art? “I like how pretty art is.”

Do you plan to have a career in the arts? “I don’t plan to have a career in the arts, but I know it will always be a hobby.”

How long does it take you to complete your artwork? “It typically takes me about 8 hours to complete a project from start to finish.”

What is your favorite color? “My favorite color is green. When I was a little kid, all I ever wanted for Christmas and by birthday was green things! Lime green has been my favorite shade for a while now.”

Besides visual arts are you into any other art forms? “I like music a lot. I like listening to music based on video games and movie scores. I’ve played violin for a long time and also enjoy classical music. I also kind of like some rap and country music.”

Godzilla, not Sponsored. Acrylic

“I painted this the same day that I watched Godzilla, King of the Monsters for this first time. I painted this on one of the canvases I got after completing a year of lessons “In the Art Room.”

Windmill Street, Acrylic on a leaf

I chose windmills because I think they are pretty. I saw fields of windmills like this on a cross country road trip and they came to mind when I was painting this. Painting on a leaf was somewhat challenging because I didn’t want to rip it.

Sunflower, Acrylic

I painted the sunflower like this because it reminded me of sunflowers we had in a field in our yard one year.

Matthew is always very creative in his work and brings his unique style to each piece he creates! He’s never afraid to try out new mediums or styles of art and has fun working on all his pieces – which shows through!! Keep on creating and having fun!

Art, Art activities, Craft, decorating, DIY, Make, Create, & Share!, Painting

DIY Painted Signs!

Create a custom distressed wooden sign to add to your décor or to give as a gift!

What you need:

  • Wooden board – My example is approx. 8″x9″ and 1/4″ thick, but you can use any board or wooden plaque you have on hand!
  • Acrylic paints – I suggest acrylic craft paints in black or dark brown, white or cream, and a color of your choice (you could also incorporate multiple colors if desired). I used teal as my color.
  • Sandpaper
  • Rope or twine for hanging – I’ve drilled holes in my board but you could also staple the rope or twine to the back, or use a picture hanger instead!
  • Stencil or pattern – You can download & print the ones I used, or create your own!
  • Pencil
  • Masking Tape
  • Ruler
  • Paper Towels
  • Hairdryer
  • Optional: Minwax finishing paste in special dark or other sealer

Step one: Sand down any rough edges or spots on your board.

Step two: Paint your board with your black or dark brown color – paint the edges too!

Step three: Once your black paint is dry (you can speed this up with a hairdryer), cover your board with a layer of white or cream paint. Let the white dry – you may need to add a second coat of white/cream if you can still see a lot of your darker color show through. Let it dry!

Step four: Download and print out the desired lettering and designs for your board here or create your own! Follow these steps to transfer a printed design to your board!

Step five: Fill in your design outline with the color paint of your choice!

Step six: Make sure your board is very dry before moving on to this step! Sand your board to add age and a distressed look – I sanded more heavily around the edges of my board and lightly near my lettering. If you sand too much off you can always touch it back up with your paint!

Step seven: This is an optional step, you can leave your board as it is or add a sealer. I prefer to Minwax finishing paste in special dark!

Step eight: Add a rope for hanging (I drilled holes in my board and tied my knots in the front, but you could also staple a rope to the back). Hang your sign as is or hot glue some silk flowers for some pizzazz!

Art, Happenings, Make, Create, & Share!, student artwork

What’s up in the Art Room? (September)

Check out some of our current projects happening in the art room and how they’re made!

We were finally able to start back with some classes in September!! Check out our first month of class projects! We are still in the midst of finishing up a few of the projects but be on the lookout for instructions to create some of the projects at home!

Radial Mandala designs! Students created a four fold radial design of their choosing by designing 1/4 of their design and then repeating it to complete their full radial designs. They outlined their designs on glass with Gallery Glass black out-liner and are working on adding colored glass paints!

Abstract Wall Hangings! Students created non objective abstract art on 3 fabric panels with Pantel fabric crayons, Tee Juice fabric markers, and Sharpies. They then sewed their fabric together to create one large panel. Our next step is to add a dowel to hang their panel from and adorn them with a few finishing details!

Ceramic Letters & Numbers! Students are in the process of creating a wall hanging with ceramic lettering and numbers! We’ll be glazing and attaching them to wooden boards to hang and display their works!

Embossed Metal Zentangles! Students learned about Zentangles and how to create their own inspired versions. They then created a Zentangle on foil by embossing their design into the surface! They used Sharpies to color their metal and then glued them to a piece of poster board! Check out instructions for creating your own inspired Zentangle here!

Art, Happenings, Make, Create, & Share!, student artwork

Student Spotlight! (September 2020)

Each month I will be spotlighting one of my students – past or present, and their artistic ventures! I work with students of all ages and abilities and you’ll get to learn a little bit about these amazing artists and their work!

Our September spotlight is on:

Liam St.Pierre

My name is Liam St. Pierre and I will be 11 in September. I am homeschooled and am entering 6th grade. I live in the woods with my 2 golden retrievers, my sister’s cat, and our chickens and ducks. I love living in the woods, because there is just my family and me and we can go exploring. I enjoy swimming, fencing, art, playing video games, going to the beach and swimming in the ocean with my friends and eating tacos and burgers

Five Keys

Pastels

“I started taking art lessons with Miss Jenell about 6 years ago, because my big brothers were already taking lessons and I thought it was interesting. I remember one of my earliest art projects was making origami frogs that actually hopped! When I get an assignment, I use my imagination and a picture of what I want to make just pops into my mind! Then, I just start creating it.”

The “L” Bot

Acrylic

“This is probably one of the pieces I like the most. I like it because it looks like the robot is actually standing up.”

“My favorite mediums are colored pencils and pens, but I also like acrylic paint, and pastels. I have entered quite a few art shows with Miss Jenell’s help and it’s always fun to go and see my work on the wall! It usually takes about 8-10 hours to complete my projects.”

Sunset Leaf

Paints on an actual leaf

“This one was hard. I drew inspiration from magazine pictures and added the sunset and boat from my imagination. Painting on a dry leaf is very hard because it is so fragile.”

“I like a lot of forms of art, but I don’t really like abstract art because if I look at it, I always try to find something in the picture. I feel mad at myself if I can’t find something realistic!”

A Different Galaxy

Paper, paints, pastels, pencils

“It’s hard to see in the picture, but this piece is made of layers and layers of frames so that you can reach your hand into the middle of the galaxy. It’s a 3D final product that I really think is cool.”

“My favorite color is blue- green… kind of like a mix of aqua and teal… more blue then green…. I’ll call it telaqua! In addition to visual art, I also have been playing the piano for about 4-5 years.”

Liam is imaginative and positive with his artwork and creations! He is always able to take an idea or project and add his own creative and unique twist to it. Putting forth his best efforts into his artwork, while still having fun, he creates happy pieces of art for viewers to enjoy! Nice job Liam! 🙂

Art, Art activities, Craft, DIY, Make, Create, & Share!

Scoops of the Sea!

Take a scoop of the sea with you! Use a large shell to “scoop” up a piece of the sea – with ultra thick embossing enamel to encase your beach treasures and act as the water! You could also do the same method with resin! Finished scoops of the sea can be made into decorations, ornaments, jewelry, etc.!

What you need:

  • Sea shells – At least one shell that’s large and deep enough to hold sand and smaller shells!
  • Beach glass, pebbles, or other small beach treasures! (Make sure they’re clean and dry)
  • Sand – it must be very dry before using, if collecting your own sand you can dry it out by placing it on a cookie sheet and baking at 325*F until it’s dried out!
  • Melt Art – Ultra Thick Embossing Enamel
  • Tin Foil
  • Optional: You can add bits of paper (like if you wanted to include writing or doodles). Wire or ribbon if you wanted to add a hanger to your shell – You can wire wrap, drill a hole, or glue, to your shell if you’d like to make it into a ornament or hanger!

Step one: Clean and dry your large shell (you want to make sure it has a dish or spoon like shape to it – flat shells won’t hold our enamel!)

Step two: Make sure your large shell is sitting level – you can use a piece of shaped tin foil to hold your shell. *Note: the embossing enamel has to be heated in an oven……it’s easiest to make your scoop of the sea on the surface it will be heated on).

Step three: Add some sand to your shell – just enough to cover the surface! If you’re collecting your own sand make sure it’s super dried out first!

Step four: Add in other little shells, sea glass, or other beach treasures! You could also add in bits of papers with lettering or doodles on them too!

Step five: Cover the sand and items carefully with the ultra think embossing enamel.

Step six: Let the embossing enamel mound up in the center but don’t fill it all the way to the edges of your shell. *Note: You can gently blow or brush off any embossing enamel that got on your tray before baking – It will stick to surfaces somewhat once melted! (You can protect your baking surface with a layer of tin foil).

Step seven: Carefully transfer your shell to an oven or toaster oven. Bake at 350*F (watching closely) until the enamel just turns clear.

Step eight: Remove from the oven and let cool! If you have a lot of air bubbles form on the surface, you can use a heat gun to heat the enamel back up – this will remove the bubbles! Or leave the bubbles to create a fun foamy effect! If your sand and inside shells are not covered with enough enamel after it melts, you can add more powder on top and heat again to melt it! It’s also okay if your inside shells aren’t completely covered….you just don’t want your sand able to leak out!

Have fun creating your own scoops of the sea! What treasures will you include? 🙂