Check out some of our current projects happening in the art room and how they’re made!
Lots of fun things have been going on the month of September!
We began a new session of classes in the Art Room! We were also able to work with M4Reactor, a local makers space, and hold a session of classes there as well! Our first project of the session is to create some awesome landscape art that will get to be displayed at a local restaurant. These 3-D landscape paintings are going to be awesome!
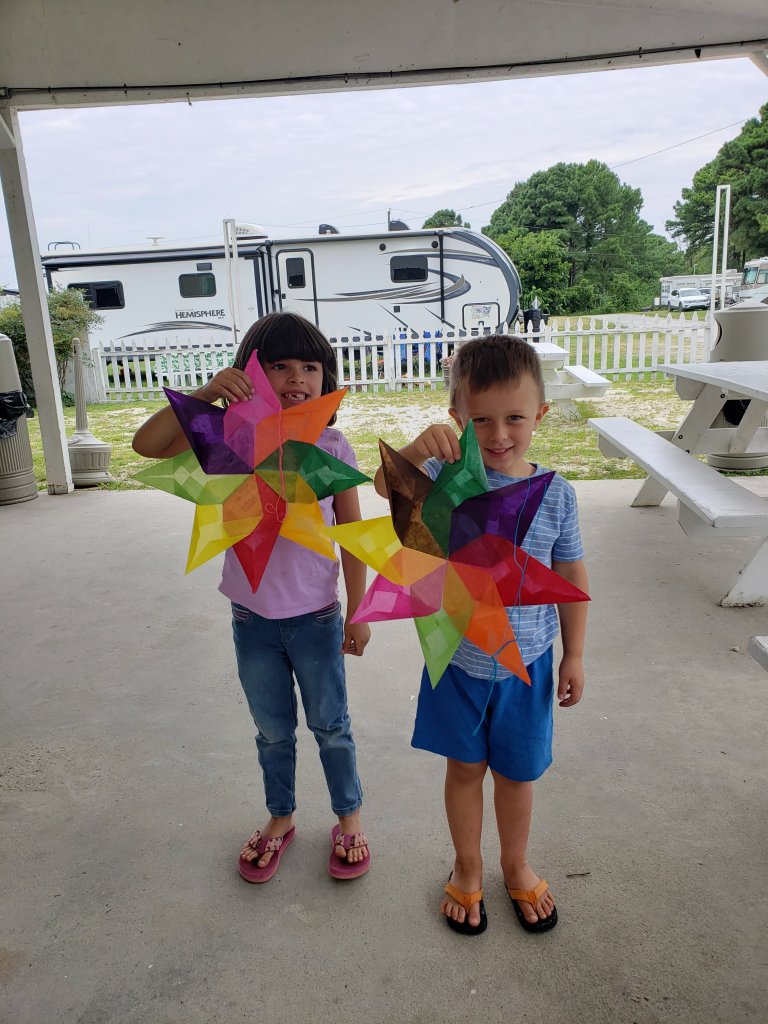
We’ve been enjoying the cooler weather at Roaring Point Campground this month and getting into some fun crafts too!
It’s also been a fun month of Paint Alongs at Greenwood Library, Roaring Point Campground & with the Art League of OC! Check out upcoming paint alongs here or take a look at the example paintings and schedule your own!
Check out these projects you can do at home! And if you’re interested in upcoming classes check out the new session of art here!
Each month I will be spotlighting one of my students – past or present, and their artistic ventures! I work with students of all ages and abilities and you’ll get to learn a little bit about these amazing artists and their work!
Our September spotlight is on:
Caroline Nielson
My name is Caroline Nielson. I am 5 years old and am in Kindergarten. I have been taking art lessons with Miss Jenell for 4 months. I began taking art lessons because I really like making art. Miss Jenell inspires me to do art because she is really good at it. I like using acrylic paint for my artwork and drawing pretty things like hearts and flowers. I also enjoy reading and playing with my little brother.
Title: The Pretty Petal Medium: Paint I used pink to paint the petals because it’s my favorite color.
What’s your favorite thing about art? “My favorite thing about art is drawing and coloring.”
Besides visual arts are you into any other art forms? “I take ballet lessons because I like dancing. I feel happy when I dance.”
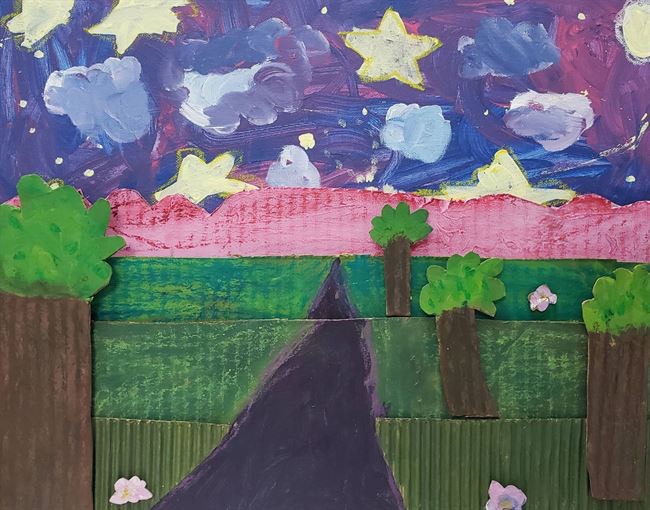
Title: Moonlight Road, Medium: Paint
This is a painting of a road leading to a magical land in the mountains. I like the colors I used in this painting.
What is your favorite thing you’ve ever created and why? “My favorite thing I’ve ever created is my painting, “Moonlight Road.” It is my favorite because I like to paint.”
Do you have a favorite color? “My favorite color is pink because it’s bright and pretty.”
Title: Flower the Cat Medium: Pencil, Crayon This picture makes me feel happy because I like drawing pink hearts.
How has your artwork improved/what have you done to keep improving as an artist? “I’ve been taking art lessons with Miss Jenell every week. We color, draw, and paint a lot and that helps me get better.”
Caroline comes full of smiles and ready to create some art every week! She is eager to learn new art mediums and techniques and puts in a lot of concentration and focus to become better! She always has fun and is imaginative in her work as well! Keep up all the good work Caroline!
Create these fun and super easy tile coasters with a few Sharpies and some rubbing alcohol! Ceramic tiles make an inexpensive substrate to make these wonderful abstract designs on – I find tiles from our local Re-Store in all different shapes and sizes! Perfect for inexpensive & unique gifts to give!
What you need:
Sharpies or permanent markers
91% Isopropyl Alcohol
Clear Coat spray – I used Rust-Oleum Gloss
Ceramic Tile
Adhesive Felt pads
Small paint brush
Step one: Gather all your supplies and clean your ceramic tile surface with the rubbing alcohol, you can apply it to a cotton ball or paper towel!
Step two: Make sure your tile is dry from the rubbing alcohol, then start coloring your tile with your Sharpies or permanent markers! Keep in mind your colors are going to get moved around and colors will blend together – it’s best to just create abstract designs here, don’t try to create a picture, as it will get messed up in our next few steps!
Step three: Continue to color in your tile – you can leave some areas blank if desired, however, I find that the more color the better!
Step four: Dip your rush in the rubbing alcohol and gently “dab” the alcohol on the tile – a little bit goes a long way. You will immediately see the alcohol have an effect on the color.
Step five: Continue to add rubbing alcohol, I did mine in all dabs, creating a droplet effect. You could try splattering, brush strokes, or a combination to achieve different effects!
Step six: I continued to add dabs until all of my marker lines were gone. Be careful not to add too much rubbing alcohol as it moves and spreads your colors out, making the colors lighter and allowing more of the white to show through (this is why I find the more color the better in step three).
Step seven: Let you rubbing alcohol dry completely and then spray your tile with a clear coat – I used Rust-Oleum Gloss. Start with a very light layer of clear coat as sometimes it can effect your design. Let the light layer dry and then add a second coat to finish your tile!
Step eight: Let your tile dry completely – you can tell the clear coat effected my colors, making them a bit more muted!
Step nine: Once your tile is dry flip it over and add felt pads to the corners so your tile doesn’t scratch any surfaces! I used self adhesive felt pads but you could also hot glue cut felt pieces or cork as well!
Step ten: Enjoy your coaster! Or make and give as gifts!
Each month I will be spotlighting one of my students – past or present, and their artistic ventures! I work with students of all ages and abilities and you’ll get to learn a little bit about these amazing artists and their work!
Our August spotlight is on:
Ellie Iman
“My name is Ellie, and I’m in 3rd grade. I have been taking art lessons with Ms. Jenell for about 5 years. I love to sculpt and paint. Outside of art I like to play with Legos, and I love traveling.”
“Just Crabby”, Acrylic Paint
He was partying with his fellow crabs.
“Bird-Tastic”, Watercolor and Pen
This Blue Bird was perching on its favorite tree.
“Patchwork Butterfly” , Mixed Media (Eric Carle inspired)
This was one of my favorite projects. The butterfly was having the most wonderful flight of her week. “A Day in the Wilderness”, Acrylic & Pastel landscape
This was the day the bunnies were hoping, the butterflies were flying, and everyone was having a fantastic day.
Ellie brings her imagination into her artwork – creating stories and ideas along the way! Even though she’s open to new ideas and making changes, she also works hard to put in her best effort, and takes her time on all her artwork until she’s satisfied with the pieces! Keep on making awesome art Ellie!
These window stars are easy, fun, and sure to brighten your home! Made from kite paper, also known as colored wax paper, these stars are vibrant and translucent, letting the light shine through and overlapping colors combine to create new colors! Perfect for color mixing lessons!
Step one: Cut 8 squares of kite paper – all the same size. Try various colors! I started with 4″ squares for this example, however, you can make them any size you’d like!
Step two: Fold your square from corner to corner, crease, and unfold.
Step three: Fold the opposite corners together, crease, and unfold – your square should have a crease line from corner to corner, forming an X on your paper!
Step four: Fold one corner into the center of the X.
Step five: Fold the opposite corner to the center of the X.
Step six: Fold the right top edge to the center line as shown.
Step seven: Fold the left top edge to the center line.
Step eight: Repeat with all remaining 7 squares!
Step nine: Once you have all your squares folded, begin to glue them together – the point you just created in the last step will be the outside points of your star! Use a glue stick, starting on one side of the center line, from the wider tip of your origami, up to where the folds begin.
Step ten: Place a second folded piece on the center line and lining up the tips.
Step eleven: Continue to glue 7 pieces of your star together, making sure each one lines up on the center line of the last one and all tips meet in the middle.
Step twelve: Your eighth, and final piece, will be placed with one half on top and the other half underneath your star (or under the first piece you started with) to complete the pattern.
Step thirteen: Complete your star by punching a hold and adding a string or ribbon to hang it from!
Each month I will be spotlighting one of my students – past or present, and their artistic ventures! I work with students of all ages and abilities and you’ll get to learn a little bit about these amazing artists and their work!
Our July spotlight is on:
Akosinachukwa Norbert
Hi my name is Akosinachukwu Norbert, I am 5 years oldI have been taking art lessons for 6 months! I like art because I can create things. My favorite thing that I have created is my Cuckoo clock because I can make the pendulum move and make my cuckoo bird come out! I look forward to creating more with Miss Jenell and our next project is to create a musical instrument! I also look forward to seeing Tux every week!
Name: “Twitter” Medium: Paper Mache
When you’re making your art do like to listen to music or watch tv for inspiration (if so what)? “Sometimes I do and sometimes I don’t!”
Ako creating his “Twitter” in paper mache!
What is your favorite thing about art? “My favorite thing about art is that I can make things that I like!”
Ako and his “mycoocoo clock” that he made!
Is there anything else about you that you’d like us to know? “I like music a LOT! I play the musical instruments; piano, acoustic guitar, drums & bongo. I am still learning how to play the acoustic guitar, I am best at the piano. My newest music that I play is All of Me.”
Name: “Ako’s Fish” Medium: Mixed media
What or who inspires you to create your artwork? “I am inspired by my mom and Miss Jenell to keep creating and look forward to making more projects!”
Why do you think art is important? – Why is it important for you? “It’s important because I can create what I like!”
Name: “Apple Tree” Medium: Acrylic Paint
Do you have a favorite color? “My favorite color is Red!” “My favorite color for my mom is Yellow, and my favorite color for Miss Jenell is blue, and my favorite color for Tux is black and White.”
Ako creating his foil embossing “
How has your artwork improved/what have you done to keep improving as an artist? “By taking art classes with Miss Jenell and mainting a weekly schedule”
Ako is always excited to create and make art! He enjoys the process of taking an idea and turning it into a finished piece. The enthusiasm and joy he brings to all of his artwork is inspiring – Keep up the good work Ako, can’t wait to see you grow as an artist!
A fun, simple & easy project to brighten your day! Create these fun flowers from basic supplies and give your decor a fun burst of colorful flowers!
What you need:
Tissue Paper in multiple colors
Green Pipe Cleaners
Scissors
Button
Step one: Cut out circles from your tissue paper – I use a roll of masking tape to trace and cut for size. You will need approx. 5 circles per flower. I chose to use shades of one color but you could do all the same color or multiple colors for one flower!
Step two: Thread about an inch of your pipe cleaner through your button.
Step three: Bend the inch piece of pipe cleaner in half and push back through another hole in your button. Twist the end to your stem to secure!
Step four: Cut your circles to give your flowers different appearances – here, I cut slits in a radial fashion to make my flower look more ruffle like! For the red flower I cut waves around the edge of my circle. I did this step to all 5 of my tissue paper layers. *Note: don’t have cuts too close to the center of your circles – this may cause them to tear easily in the next few steps!
Step five: Poke the end of your pipe cleaner through the center of your tissue paper circle, gently push your tissue paper all the way up the stem so it’s under your button! Gently crinkle your tissue paper around your button, repeat with all your other layers!
Step six: With all 5 layers on your stem, crinkle the papers up around your button, being careful not to tear your paper! This helps give our flower some more dimension!
Step seven: Carefully “fluff” out your flower petal layers so your center is visible again. You can go back and crinkle individual layers more if needed! You can also add a drop of tacky glue, hot glue, or wrap some floral tape around the stem where the tissue paper is to help hold it in place.
Step eight: To create a leaf, use another piece of pipe cleaner, place across your stem and twist it tightly around a few times to hold it in place. Bend each end back to the stem, creating a loop, and twist it to the stem to secure.
Step nine: Make more flowers! Try different cuts to achieve even more variations of flowers, use larger or smaller circles and create different size flowers! Give as a gift, use as a gift topper, make into pins, hair clips, or just place in a vase and enjoy!
Each month I will be spotlighting one of my students – past or present, and their artistic ventures! I work with students of all ages and abilities and you’ll get to learn a little bit about these amazing artists and their work!
Our June spotlight is on:
Eden Rush
Hi my name is Eden, I’m 17 years old and I’m going into 12th grade. I’ve loved art for as long as I can remember and I’m happy to be developing my own art style. Besides art, I love horseback riding, the beach, music, and antiquing.
Name: “Louis Tomlinson” Medium: Gouache and watercolor I found this picture of a artist that I like on Pinterest. I really liked the lighting in the photo so I painted it with a gouache set from hobby lobby.
How long have you been taking art lessons? “I have gone to art classes here and there ever since I can remember. My mom is an artist so I have also learned a lot from her. I have been taking Ms. Jenell’s classes in the art room for about two years now.”
Why did you begin to take art lessons/how did you become interested in art? “I have always loved art. I guess my mom saw that in me from a young age so she put in several art classes when I was younger. My love for horses has also helped to develop my art since horses were the only thing I drew for a while.”
Name: “Butterfly and Giraffe” Medium: Acrylic paint This is a piece that I completed last year after Christmas. Since I had done so many art pieces as gifts for others I wanted to make one for myself, so I did.
What is your favorite thing about art? “My favorite thing about art is the uniqueness of every artwork and artist. If you tell a group of artists to draw a cow each artwork produced would be totally different.”
What are your favorite mediums and/or subjects for your artwork? “My favorite art mediums are graphite pencil, watercolor and gouache.”
Is there anything else about you that you’d like us to know? “I love the Beatles and Fleetwood Mac and a lot of my art is inspired by songs.”
Name: “The Queen of Hearts” Medium: Alcohol markers I did this drawing in one of Ms. Jenell’s paint draw sculpt classes. We were doing a playing card theme. I’m really happy with the colors and look of this picture.
What or who inspires you to create your artwork? “Honestly something that inspires me a lot to keep making artwork is displaying the finished pieces in my room. I’ve also always been really inspired by my mom who is an amazing artist. I grew up seeing my mom’s artworks everywhere and wanting to be like her in that aspect.”
Why do you think art is important? – Why is it important for you? “For me, art is so important because it is a way of expressing yourself. If you’re mad draw about it, if you’re happy draw something happy. There are endless possibilities with what you can create.”
Name: “Strawberry Teapot” Medium: Ceramic This is a tea pot that I completed in one of Ms. Jenell’s ceramics classes. It is the first ceramic piece that I have done. I love how it turned out.
Besides visual arts are you into any other art forms? “I love music! I often wish that I was a better singer but for now I’ve settled with learning the ukulele.”
Do you have a favorite color? “My favorite color changes pretty often but right now it is forest green.”
Name: “The Statue Graphite pencil” This is one of my favorite drawings that I’ve done. When I started it I almost gave up because it looked so rough in the beginning! I’m so glad I finished it! I also almost cut off the empty space above the people but I feel like it really adds to the completed drawing.
When you’re making your art do like to listen to music or watch tv for inspiration (if so what)? “I almost always listen to music or audio books when I’m working on an artwork.”
How has your artwork improved/what have you done to keep improving as an artist? “In the past year my ability to draw faces has improved a lot because I started drawing in a sketchbook way more often. I like to challenge myself with weekly goals depending on how busy I am.”
Eden is a talented artist who is always up for trying out new mediums and techniques. She takes on artistic challenges, and works hard with determination, to achieve what she set out to accomplish in her artwork – all while enjoying the process! Keep up the great work Eden!
Create your own magnet or key-chain of your furry friend on shrink film! Use a photo of your pet to trace an outline on shrink film, color you pet in, and then place your shrink film in an oven to shrink! Turn these mini pet masterpieces into a key chain or magnet! Learn more about Shrink film here!
What you’ll need:
A sheet of sanded shrink film (Learn how to make your own here)
Magnets and/or Key-chain pieces
Colored pencils
A fine point permanent marker
A photo of your pet approx. 3.5”x5” or 4”x6”
Scissors
Hole punch & Pliers if making a key-chain
Oven or Craft Oven
Step one: Print a picture of your pet – a head shot will work best, with clear details & good lighting. If you don’t have a pet or picture of your pet you can use a picture from a book or magazine! The photo should be at least 3.5”x5” or similar – I wouldn’t go much smaller as it will make details more difficult!
Step two: Place your shrink film over your pet’s photo with the rough/sanded side facing up. We will want to color on the sanded side!
Step three: With your permanent marker trace your pet; Tracing from a photo can be tricky – we want to include some details but not EVERYTHING, especially with shrink film as our artwork will become very small and details become more condensed. Focus on outlining the main features of your pet (like the eyes, nose, coloration spots) and the main outline.
Step four: Slide your outline off you photo to see what it looks like without your photo! Sometimes this helps us see what more we need to add! If needed, finish up any lines or details with the marker. You can also use the marker to color in any black areas (such as the pupils). *Tip: When making eyes be sure to leave a little white dot to help make them look more alive!
Step five: Color your pet in! Use the colored pencils to add color to your pet – you can make your drawing any color you’d like or similar to your pet’s real colors! The colored pencils will look very light on the shrink film – this is okay, when we “shrink” your film the colors will become more vivid and bright!
Step six: Be sure to color any white areas of your pet in with the white colored pencil – it’s hard to see on the shrink film before it’s shrunk but if we don’t add the white colored pencil these areas will look grey! You can also layer and blend your colored pencils to create different shades and shadows!
Step seven: Once you have your pet colored in you can add a background or outline!
Step eight: Cut out your pet – I like to leave a little border space around my drawing but you don’t have to do this. If you’re going to make your piece into a key-chain, make sure to leave an area where you can punch a hole!
Step nine: If you’re making this into a key-chain or anything else that you need a hole for, use a hole punch to create your hole before baking!
Step ten: Bake your shrink film! Place your shrink film in an oven @ 325* F for just a few minutes – You can bake it on a piece of parchment paper or tin foil on a baking sheet. You’ll notice your shrink film crinkles up and then will flatten back out as a much smaller and thicker piece of plastic. Once flat remove your shrink film & let cool.
Step eleven: Finish your shrink film! Add your key-chain piece by connecting the jump ring to your shrink film and key-chain part with pliers. Or adhere magnets to the back of your piece to create a magnet! These could also be made into zipper pulls, ornaments, hair clips, pins, necklaces, earrings, etc.! Check out other ideas for shrink film projects here!
Check out some of our current projects happening in the art room and how they’re made!
Having some fun at Roaring Point Campground the past month with kids crafts! We’ve created Thaumatropes, Embossed metal designs, String art, & origami hopping frogs!
Monthly classes have been working on ceramic pieces using hand-building techniques. They’ve created unique fun pencil holders and personal creations! We were also inspired by Alberto Giacometti: Students were asked to create a tall, lean figure depicting and action or movement with wire & tin foil armatures covered with paper mache!
Students finished up and created many different things this past month…..
Paper Mache & Paper Clay Sculptures! Students created an armature out of paper, cardboard, wire or tin foil, and used either traditional paper mache or are working with paper clay, to create 3-D sculptures! These are then finished with acrylic paints and extra details such as feathers, eyes, and more!
Charcoal water drops: Students created a watercolor wash and formed waterdrops with charcoal! Special attention was taken in creating shadows and highlights to give a 3-D appearance.
Watercolor & Pen: Using pen to give texture and shading to their drawings, students then used watercolor to add color!
Mixed Media & Collage: Using several different mediums and techniques in these pieces to create some fun, one of a kind, pieces of art! Expressing personal style and technique!
Painted botanicals on wood with acrylics – creating designs and patterns with shapes, colors & textures in a botanical theme!
Polymer clay faux taxidermy! Using polymer clay, students created miniature sculpted taxidermy pieces and turned them into magnets!
Students have been busy the past month working on creating collages inspired by children’s author and illustrator, Eric Carle. We have finally finished them all up and they are awesome! Students chose an animal as their collage subject, then drew the animal out. Using crayons, watered down acrylic paints, and stamps, they painted sheets of rice paper – incorporating several colors, textures and methods into each piece. Students then use their drawn animal as a template for cutting out their colorful papers and apply their cut-outs to their final paper. Finally students incorporate smaller details and design elements to their collage with crayons and/or pens.
Check out these projects you can do at home! And if you’re interested in upcoming classes check out the new session and summer art here!